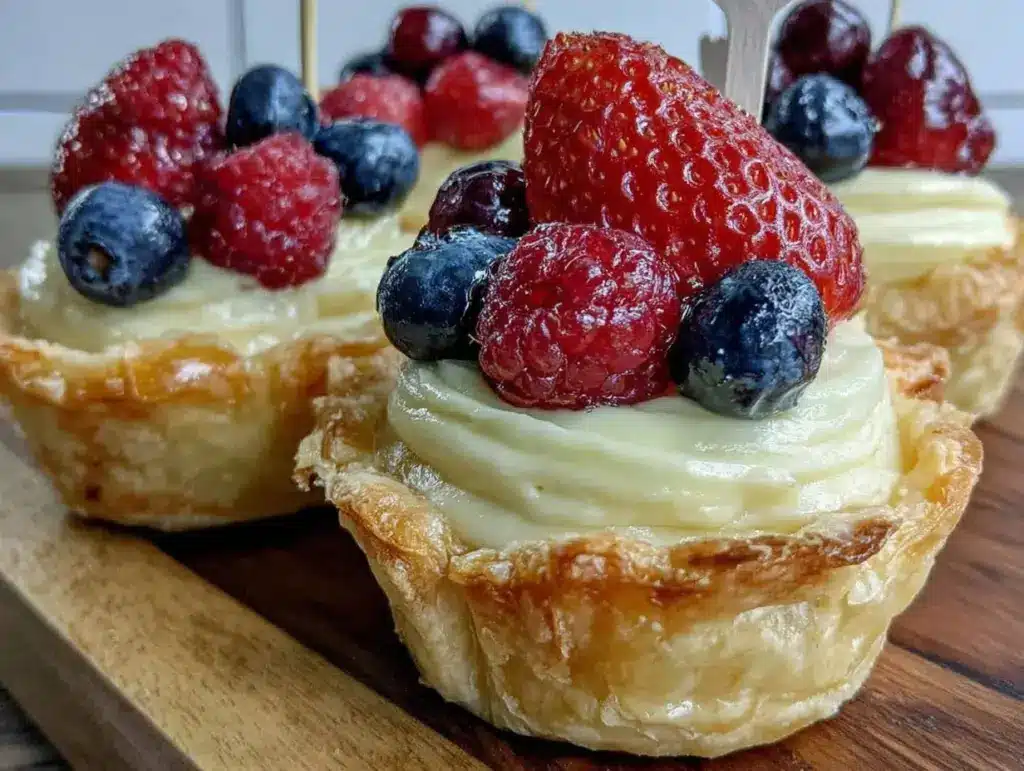
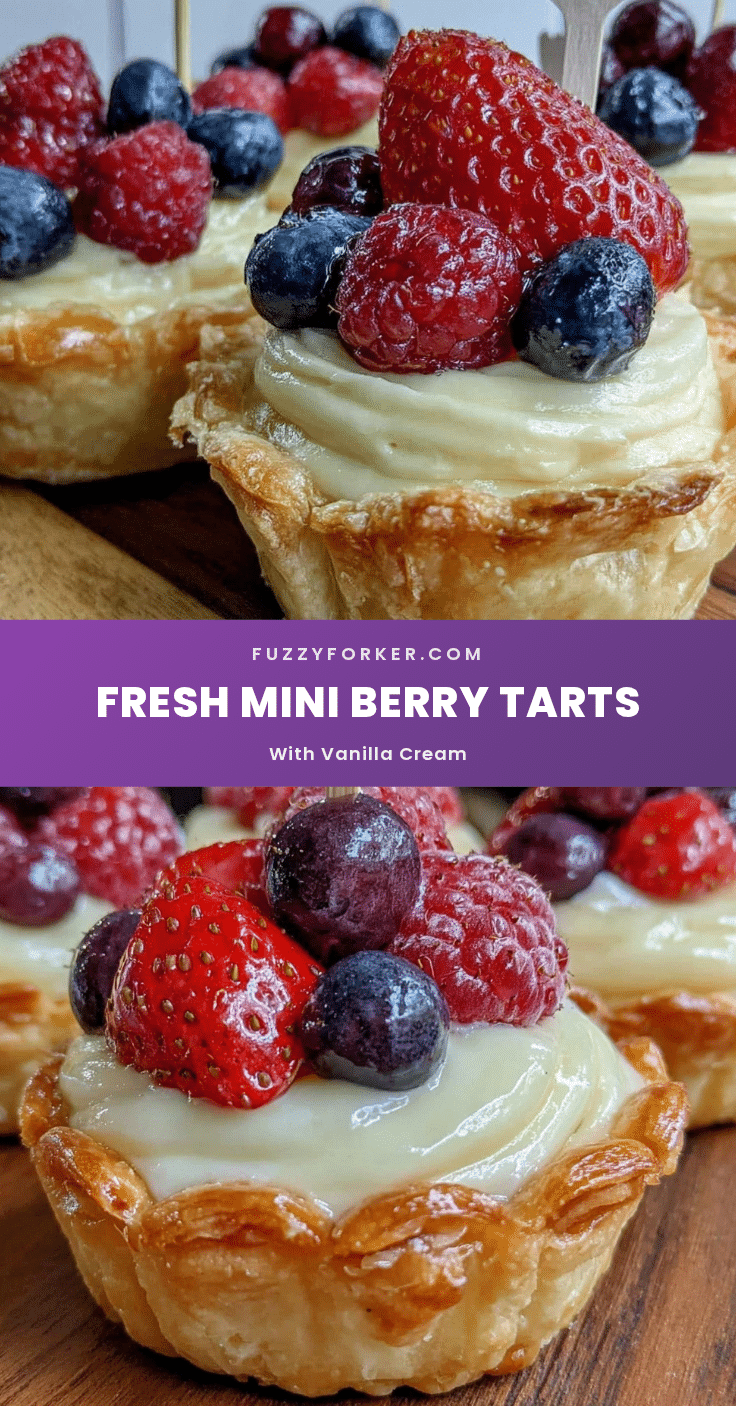
That unexpected idea sparked an afternoon in my kitchen that turned into these Perfect Mini Flag Berry Tarts with Vanilla Cream. Honestly, I never thought a simple dessert could spark so much joy (and a little chaos, too). The way the fresh strawberries, blueberries, and raspberries line up like a tiny edible flag on buttery crust — it’s just so fun and charming. I remember the sweet vanilla cream filling, smooth and light, pairing beautifully with the tartness of the berries, making these little tarts the perfect crowd-pleaser for any occasion.
It wasn’t about making something fancy for once. It was about a quick, homemade dessert that felt special yet easy enough to whip up on a whim. Plus, the smell of vanilla and fresh berries in the kitchen that afternoon? Absolutely unforgettable. You know that warm, cozy feeling you get when baking something that’s not just tasty but also carries a little story? That’s what stuck with me. These mini flag berry tarts are not just a recipe but a little celebration you can share — no matter what’s on your calendar.
And honestly, if you’ve got a sweet tooth but not much time, this recipe might just become your new favorite go-to — trust me on that.
Why You’ll Love This Recipe
Let me tell you why these Perfect Mini Flag Berry Tarts with Vanilla Cream have been such a hit in my kitchen (and beyond):
- Quick & Easy: The whole thing comes together in under an hour, making it perfect for last-minute gatherings or a sweet treat after dinner.
- Simple Ingredients: You probably already have most of these in your pantry and fridge — no exotic shopping trips needed.
- Perfect for Celebrations: Whether it’s a summer BBQ, a patriotic holiday, or just a fun weekend project with kids, these tarts fit the bill.
- Crowd-Pleaser: Kids love the playful flag design, and adults can’t get enough of that creamy vanilla filling paired with fresh berries.
- Unbelievably Delicious: The buttery crust, the smooth vanilla cream, and the juicy burst of berries create a flavor combo that feels both fresh and indulgent.
This isn’t just another berry tart recipe, either. The secret? The vanilla cream is whipped just right to be silky but stable, so it holds the berries perfectly without getting soggy. Plus, the mini tart crusts have a delicate crunch that contrasts beautifully with the creamy filling. It’s that balance that makes these stand out.
Honestly, this recipe has a way of turning a simple dessert into a little moment of joy — the kind you savor slowly and remember fondly.
What Ingredients You Will Need
This recipe keeps things straightforward, using simple, wholesome ingredients that come together to deliver fresh flavor and a delightful texture. Most are pantry staples or easily found at your local grocery store, and you can swap a few out if needed.
- For the Tart Crust:
- All-purpose flour – 1 1/4 cups (150g), for that classic crumbly texture
- Unsalted butter – 1/2 cup (115g), cold and cubed (I like Plugrá for consistent baking results)
- Granulated sugar – 2 tablespoons, adds just a hint of sweetness
- Salt – 1/4 teaspoon, balances flavor
- Ice water – 2 to 3 tablespoons, to bring the dough together without melting the butter
- For the Vanilla Cream Filling:
- Heavy cream – 1 cup (240ml), chilled (use fresh cream for best whipping)
- Powdered sugar – 2 tablespoons, for smooth sweetness
- Vanilla extract – 1 teaspoon, the star flavor here (pure vanilla is a must)
- Cream cheese – 4 ounces (115g), softened (adds body and richness)
- For the Berry Flag Topping:
- Fresh strawberries – 1 cup, hulled and sliced (choose firm, ripe berries for the best look)
- Fresh blueberries – 1/2 cup, washed and dried
- Fresh raspberries – 1/2 cup, gently rinsed
Substitution tips: Use gluten-free flour blend for a gluten-free crust option, and swap cream cheese with mascarpone for a lighter filling. In winter, frozen berries can work if thawed well and patted dry. For a dairy-free twist, try coconut cream instead of heavy cream.
Equipment Needed
- Mini tart pans: These make shaping the crust easy and give that perfect tart size. I use 4-inch (10cm) pans, but muffin tins can work in a pinch.
- Food processor or pastry cutter: For blending the crust dough — a food processor speeds things along, but you can do it by hand with a pastry cutter or even two knives.
- Electric mixer or hand whisk: To whip the vanilla cream filling until it’s silky and thick.
- Mixing bowls: A couple of medium sizes for dough and cream prep.
- Spoons and spatulas: For mixing, folding, and assembling without deflating the cream.
Don’t worry if you don’t have a food processor; I’ve made this dough by hand plenty of times — just takes a little elbow grease. For tart pans, I find non-stick versions easiest for removal, but a little butter or parchment can help if yours tend to stick. Keeping the butter cold in the crust dough is key, so chilling your mixing bowl can help if you’re in a warm kitchen.
Preparation Method

- Prepare the tart dough: In a food processor, pulse the flour, sugar, and salt together. Add cold butter cubes and pulse until the mixture resembles coarse crumbs, about 8 to 10 pulses. Slowly add ice water, one tablespoon at a time, pulsing just until the dough starts to come together (about 6-8 pulses). If you don’t have a food processor, use a pastry cutter or two knives to cut the butter into the dry ingredients until crumbly, then add water and mix gently. Wrap the dough in plastic and chill for at least 30 minutes.
- Preheat your oven: Set to 375°F (190°C). While the oven warms, roll out the dough on a lightly floured surface to about 1/8 inch (3mm) thickness.
- Form the mini tart shells: Using a 4-inch (10cm) round cutter or the rim of your tart pan, cut circles from the dough. Gently press the dough into each mini tart pan, trimming any excess edges. Prick the bottoms lightly with a fork to prevent puffing.
- Bake the tart shells: Line each shell with parchment paper and fill with pie weights or dried beans to keep shape. Bake for 12-15 minutes, then remove weights and parchment and bake for another 5-7 minutes until golden and crisp. Let cool completely on a wire rack.
- Make the vanilla cream filling: In a chilled bowl, beat the softened cream cheese until smooth. In a separate bowl, whip the heavy cream with powdered sugar and vanilla extract until soft peaks form. Gently fold the whipped cream into the cream cheese until combined and smooth. Be careful not to overmix — you want it light and fluffy.
- Assemble the tarts: Spoon or pipe the vanilla cream evenly into each cooled tart shell, filling just to the top. Arrange the berries on top in flag formation — blueberries clustered in one corner, strawberries and raspberries lined up in stripes. Don’t be afraid to get creative or even slightly imperfect; it adds charm.
- Chill before serving: Let the assembled tarts chill in the fridge for at least 1 hour so the cream sets up nicely and flavors meld. Serve chilled or at room temperature for best taste.
Tip: If your dough feels too sticky when rolling, chill it a bit longer. And when arranging berries, drying them well after rinsing helps keep the crust from getting soggy.
Cooking Tips & Techniques
Making these Perfect Mini Flag Berry Tarts with Vanilla Cream isn’t complicated, but a few pointers can really make a difference:
- Keep the butter cold: Cold butter in the crust dough creates those flaky, crumbly layers we all love. If it melts before baking, the texture suffers.
- Don’t overmix the cream filling: Fold gently to keep it airy and light — overmixing can turn it dense or even curdle the cream.
- Use fresh, firm berries: Soft or overly ripe berries can release too much juice, making the tart soggy. Pat them dry before arranging.
- Blind bake the crust: Weighting the dough during baking prevents puffing and ensures a crisp shell that holds up under the cream.
- Chill the assembled tarts: This step is key for a clean slice and for the cream to set properly. Plus, flavors deepen after some resting time.
One thing I learned the hard way: skipping the chilling step often leads to a runny mess. So, patience here pays off big time. Also, when I first tried making these, I underestimated how soft the berries could get if piled too thick — spreading them just right helps maintain that pretty flag look.
Variations & Adaptations
These mini tarts are super adaptable, so feel free to switch things up based on your preferences or what you have on hand:
- Seasonal Berry Switch: In autumn or winter, swap fresh berries for stone fruits like sliced peaches and plums or even pomegranate seeds for a jewel-like effect.
- Dairy-Free Version: Use coconut cream whipped with a bit of powdered sugar and vanilla instead of heavy cream, and replace cream cheese with a dairy-free alternative.
- Crust Alternatives: Try a nut-based crust using ground almonds or pecans mixed with a little honey and coconut oil for a gluten-free, no-bake option.
- Flavor Twists: Add a touch of lemon zest or a splash of almond extract to the cream filling for extra zing.
- Mini Tart Variations: Instead of berries, fill the tarts with creamy lemon curd topped with fresh mint or a drizzle of chocolate ganache for a decadent treat.
One variation I adore is mixing in a few chopped fresh herbs like basil or mint into the cream filling — it adds a refreshing note that pairs beautifully with the berries.
Serving & Storage Suggestions
These Perfect Mini Flag Berry Tarts with Vanilla Cream are best served chilled or just slightly cool at room temperature. The cream filling shines brightest this way, and the crust stays delightfully crisp.
For a lovely presentation, serve on a simple white platter to make the vibrant berries pop, maybe garnished with a sprig of fresh mint. They pair well with a light cup of tea, sparkling lemonade, or even a chilled glass of prosecco for a festive touch.
To store, keep the tarts covered in the refrigerator for up to 2 days. The crust will soften a bit over time, but they remain delicious. Avoid freezing once assembled, as the cream and berries don’t freeze well together.
If you need to prepare in advance, bake the tart shells ahead of time and keep them airtight at room temperature for up to 3 days. Make the vanilla cream and assemble just before serving to keep everything fresh and perfect.
Flavors meld beautifully after chilling, so they almost taste better the next day — the vanilla cream develops a deeper richness, and the berries soak up a hint of sweetness from the filling.
Nutritional Information & Benefits
Each mini tart clocks in at approximately 220 calories, with around 12 grams of fat, 25 grams of carbohydrates, and 3 grams of protein, depending on the exact sizes and ingredient brands used.
The berries are a powerhouse of antioxidants, vitamins C and K, and fiber, which support immune health and digestion. The vanilla cream provides calcium and healthy fats from the cream and cream cheese, but it’s best enjoyed as an occasional treat.
This dessert can be made gluten-free with a few tweaks and is naturally vegetarian. Just watch for dairy if you have sensitivities.
From my experience, making desserts like these at home helps me feel connected to what I’m eating — no preservatives, fresh ingredients, and a sweet moment that’s just right.
Conclusion
The Perfect Mini Flag Berry Tarts with Vanilla Cream are exactly the kind of dessert that makes you smile quietly to yourself. They bring together simple ingredients, a bit of fun creativity, and a taste that’s both fresh and comforting.
Whether you’re making them for a family gathering, a festive holiday, or just because, they invite customization and sharing. I love how this recipe reminds me that desserts don’t have to be complicated to be memorable.
If you give these a try, don’t be shy about making them your own — switch up the berries, add a twist to the cream, or even serve alongside savory bites like creamy deviled eggs with fresh herbs or the brie cherry pastry cups I love for parties.
I’d really enjoy hearing how you make these tarts your own, so drop a comment or share your favorite variation anytime!
FAQs
Can I make the tart crust ahead of time?
Yes! You can prepare and blind bake the tart shells up to 3 days in advance. Store them in an airtight container at room temperature until ready to fill.
What if I don’t have mini tart pans?
Use a muffin tin as an alternative. Press the dough gently into each cup and bake as directed. You may need to adjust baking time slightly.
How do I prevent the crust from getting soggy?
Make sure to blind bake the crust properly with weights and let it cool completely before adding the cream. Also, pat berries dry to reduce moisture.
Can I substitute the fresh berries with frozen?
Frozen berries can work if fully thawed and patted dry, but fresh berries hold their shape and flavor better for this recipe.
Is there a dairy-free version of the vanilla cream?
Absolutely! Use chilled coconut cream whipped with powdered sugar and vanilla instead of heavy cream, and replace cream cheese with a dairy-free alternative like cashew cream.
Pin This Recipe!
Perfect Mini Flag Berry Tarts with Vanilla Cream

These mini tarts feature a buttery crust filled with silky vanilla cream and topped with fresh berries arranged like a tiny edible flag. Quick and easy to make, they are perfect for celebrations and crowd-pleasing desserts.
- Prep Time: 15 minutes
- Cook Time: 25 minutes
- Total Time: 1 hour 40 minutes
- Yield: 12 mini tarts 1x
- Category: Dessert
- Cuisine: American
Ingredients
- 1 1/4 cups all-purpose flour (150g)
- 1/2 cup unsalted butter (115g), cold and cubed
- 2 tablespoons granulated sugar
- 1/4 teaspoon salt
- 2 to 3 tablespoons ice water
- 1 cup heavy cream (240ml), chilled
- 2 tablespoons powdered sugar
- 1 teaspoon vanilla extract
- 4 ounces cream cheese (115g), softened
- 1 cup fresh strawberries, hulled and sliced
- 1/2 cup fresh blueberries
- 1/2 cup fresh raspberries
Instructions
- Prepare the tart dough: In a food processor, pulse the flour, sugar, and salt together. Add cold butter cubes and pulse until the mixture resembles coarse crumbs, about 8 to 10 pulses. Slowly add ice water, one tablespoon at a time, pulsing just until the dough starts to come together (about 6-8 pulses). If you don’t have a food processor, use a pastry cutter or two knives to cut the butter into the dry ingredients until crumbly, then add water and mix gently. Wrap the dough in plastic and chill…
- Preheat your oven to 375°F (190°C). While the oven warms, roll out the dough on a lightly floured surface to about 1/8 inch (3mm) thickness.
- Form the mini tart shells: Using a 4-inch (10cm) round cutter or the rim of your tart pan, cut circles from the dough. Gently press the dough into each mini tart pan, trimming any excess edges. Prick the bottoms lightly with a fork to prevent puffing.
- Bake the tart shells: Line each shell with parchment paper and fill with pie weights or dried beans to keep shape. Bake for 12-15 minutes, then remove weights and parchment and bake for another 5-7 minutes until golden and crisp. Let cool completely on a wire rack.
- Make the vanilla cream filling: In a chilled bowl, beat the softened cream cheese until smooth. In a separate bowl, whip the heavy cream with powdered sugar and vanilla extract until soft peaks form. Gently fold the whipped cream into the cream cheese until combined and smooth. Be careful not to overmix.
- Assemble the tarts: Spoon or pipe the vanilla cream evenly into each cooled tart shell, filling just to the top. Arrange the berries on top in flag formation — blueberries clustered in one corner, strawberries and raspberries lined up in stripes.
- Chill before serving: Let the assembled tarts chill in the fridge for at least 1 hour so the cream sets up nicely and flavors meld. Serve chilled or at room temperature.
Notes
Keep the butter cold to ensure a flaky crust. Do not overmix the cream filling to keep it light and airy. Pat berries dry before arranging to prevent soggy crust. Blind bake the crust with weights to avoid puffing. Chill assembled tarts for at least 1 hour before serving for best flavor and texture.
Nutrition
- Serving Size: 1 mini tart
- Calories: 220
- Fat: 12
- Carbohydrates: 25
- Protein: 3
Keywords: mini tarts, berry tarts, vanilla cream, easy dessert, homemade dessert, patriotic dessert, summer dessert, berry flag tart


