One chilly Saturday afternoon last winter, I found myself rifling through my grandma’s old recipe box, looking for something simple and comforting to bake. Among the faded, handwritten cards, a particular recipe caught my eye: Water Pie. At first, I thought it was a mistake—water? Really? But then I remembered the stories Grandma told about the Depression Era, when every penny counted and stretch-your-ingredients recipes were a way of life. Intrigued, I decided to try this classic creamy vintage dessert recipe that’s been quietly passed down for generations.
After testing this Depression Era Water Pie recipe more than 15 times (yes, really), I finally cracked the secret to its perfect creamy texture and nostalgic sweetness. It’s an easy classic creamy vintage dessert that tastes like a warm hug on a plate. What’s truly amazing is that this pie uses just a handful of pantry staples, including water, and somehow turns out silky, rich, and utterly comforting. If you’re curious about old-fashioned cooking that’s both budget-friendly and surprisingly delicious, this one’s for you.
In this post, I’m sharing everything you need to know to master this Depression Era Water Pie recipe easy classic creamy vintage dessert — including the quirks, the pitfalls, and how to make it your own.
Why You’ll Love This Depression Era Water Pie Recipe
This pie has completely changed how I think about desserts that come from humble beginnings. I’ve served it to my family on quiet weeknights and to friends during casual gatherings, and everyone is always surprised by how creamy and satisfying it tastes.
- Unbelievably Simple Ingredients — You probably have everything already: flour, sugar, butter, eggs, and yes, water. No fancy creams or expensive add-ons needed. This is the ultimate pantry-friendly pie.
- Classic Creamy Texture — The filling sets up smooth and silky, almost like a custard, but without the fuss of double boilers or tempering eggs. It’s a vintage dessert that still feels special.
- Budget-Friendly — Born out of necessity during the Depression, this pie is a perfect example of making something delicious with less. It’s a great choice for anyone feeding a family on a budget or looking to reduce food waste.
- Comfort Food Vibes — There’s something about this simple pie that transports you to a slower, cozier time. It’s a perfect dessert for a Sunday family meal or a casual holiday gathering.
- Feeds a Crowd — A standard 9-inch pie pan makes 6–8 servings. I’ve brought it to potlucks and it always disappears fast.
This classic creamy vintage dessert is perfect for easy weeknight family meals or those nostalgic holiday gatherings where you want something sweet but low-fuss. If you love simple, comforting recipes like my creamy deviled eggs or a cozy comfort chili with cornbread, you’ll fall for this pie’s straightforward charm.
Ingredients for Depression Era Water Pie Recipe
Here’s the best part: you probably have most of these ingredients in your kitchen right now. I’m very particular about a couple of them, and I’ll explain why as we go.
- All-Purpose Flour (3 tablespoons / 24 grams) — This thickens the filling just right. Use regular flour; no need for anything fancy.
- Sugar (¾ cup / 150 grams) — Granulated white sugar brings sweetness and helps the filling set. Don’t skimp here or the pie will taste flat.
- Salt (¼ teaspoon / 1 gram) — Just a pinch to balance the sweetness and bring out the flavor.
- Butter (3 tablespoons / 42 grams) — Adds richness and a silky mouthfeel. Use unsalted if you prefer, just adjust the salt.
- Water (1 ½ cups / 360 ml) — Yes, the star ingredient! It’s what makes this recipe unique and budget-friendly. Use cold water straight from the tap.
- Eggs (3 large) — They give the pie structure and that custardy texture. Room temperature works best for even cooking.
- Vanilla Extract (1 teaspoon / 5 ml) — For warmth and depth of flavor. I always use pure vanilla extract, but imitation works in a pinch.
- Pie Crust (1 9-inch pre-made or homemade) — You can use your favorite pie crust recipe or store-bought for convenience. My go-to is a flaky butter crust, but a graham cracker base is an interesting twist.
Equipment Needed
You don’t need anything fancy for this. Here’s what I actually use:
- 9-inch Pie Pan — Glass or metal both work. Glass lets you watch the filling bubble and set, which I love.
- Mixing Bowls — One for dry ingredients and one for wet. I use medium-sized stainless steel bowls.
- Whisk — Essential for combining the eggs and water without lumps. A hand whisk works fine; no need for an electric mixer.
- Measuring Cups and Spoons — Accuracy matters with this recipe, especially for the flour and sugar.
- Oven — Preheated to 350°F (175°C) for perfect baking.
Optional but useful:
- Pastry Blender — If you’re making your own crust, this tool speeds things up.
- Cooling Rack — For letting the pie cool evenly after baking.
How to Make Depression Era Water Pie Recipe Easy Classic Creamy Vintage Dessert
Alright, let’s get into it. I’ll walk you through exactly how I make this Depression Era Water Pie recipe easy classic creamy vintage dessert, including the small tricks that actually make a difference.
-
Prepare the Pie Crust (10 minutes)
If you’re using store-bought crust, let it thaw on the counter while you prep. If you’re making your own, roll it out and fit it into your 9-inch pie pan. Prick the bottom lightly with a fork to prevent bubbling. This step ensures a crisp, flaky base that won’t get soggy from the filling. -
Mix Dry Ingredients (3 minutes)
In a medium bowl, whisk together the flour, sugar, and salt until well combined. This mix is what thickens the water into that luscious creamy filling. -
Combine Wet Ingredients (3 minutes)
In a separate bowl, beat the eggs lightly. Add the cold water and vanilla extract, whisking gently but thoroughly. The cold water helps keep the eggs from cooking prematurely and gives the pie its signature creaminess. -
Combine Wet and Dry (2 minutes)
Slowly pour the wet mixture into the dry ingredients while whisking continuously. This keeps lumps from forming and ensures a silky smooth batter. The mixture will look thin and watery—that’s exactly right. -
Add Butter (1 minute)
Cut the butter into small pieces and scatter them evenly over the bottom of your prepared crust. When the filling bakes, the butter melts into it, adding richness and a velvety texture. -
Pour Filling into Crust and Bake (45–50 minutes)
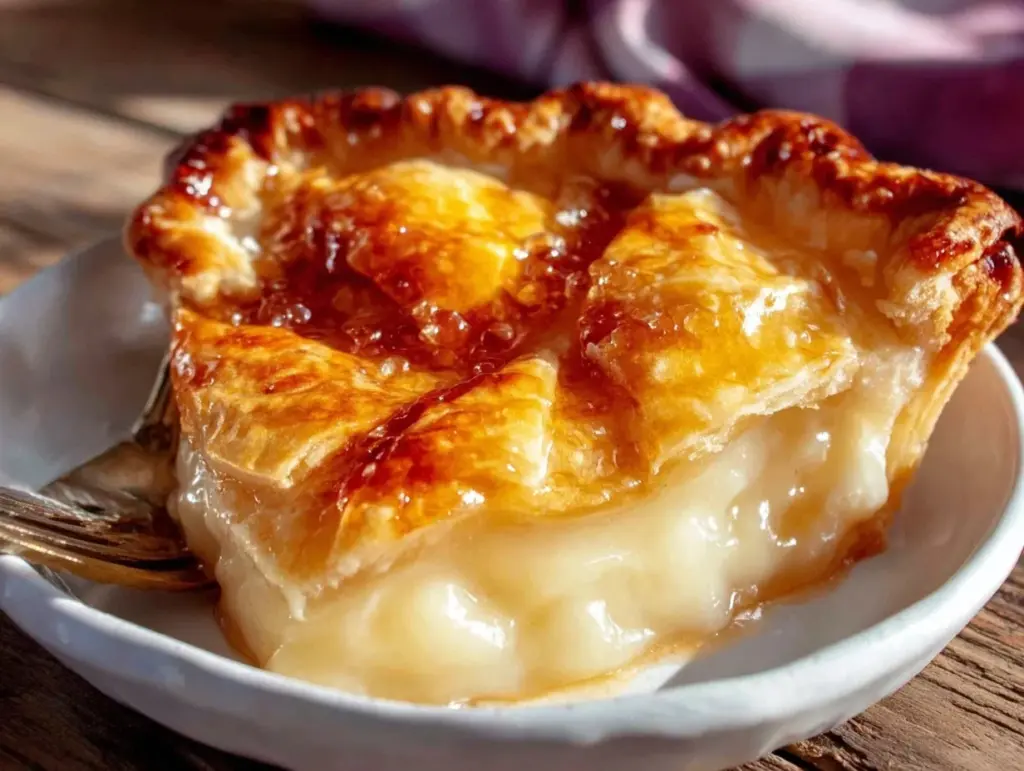
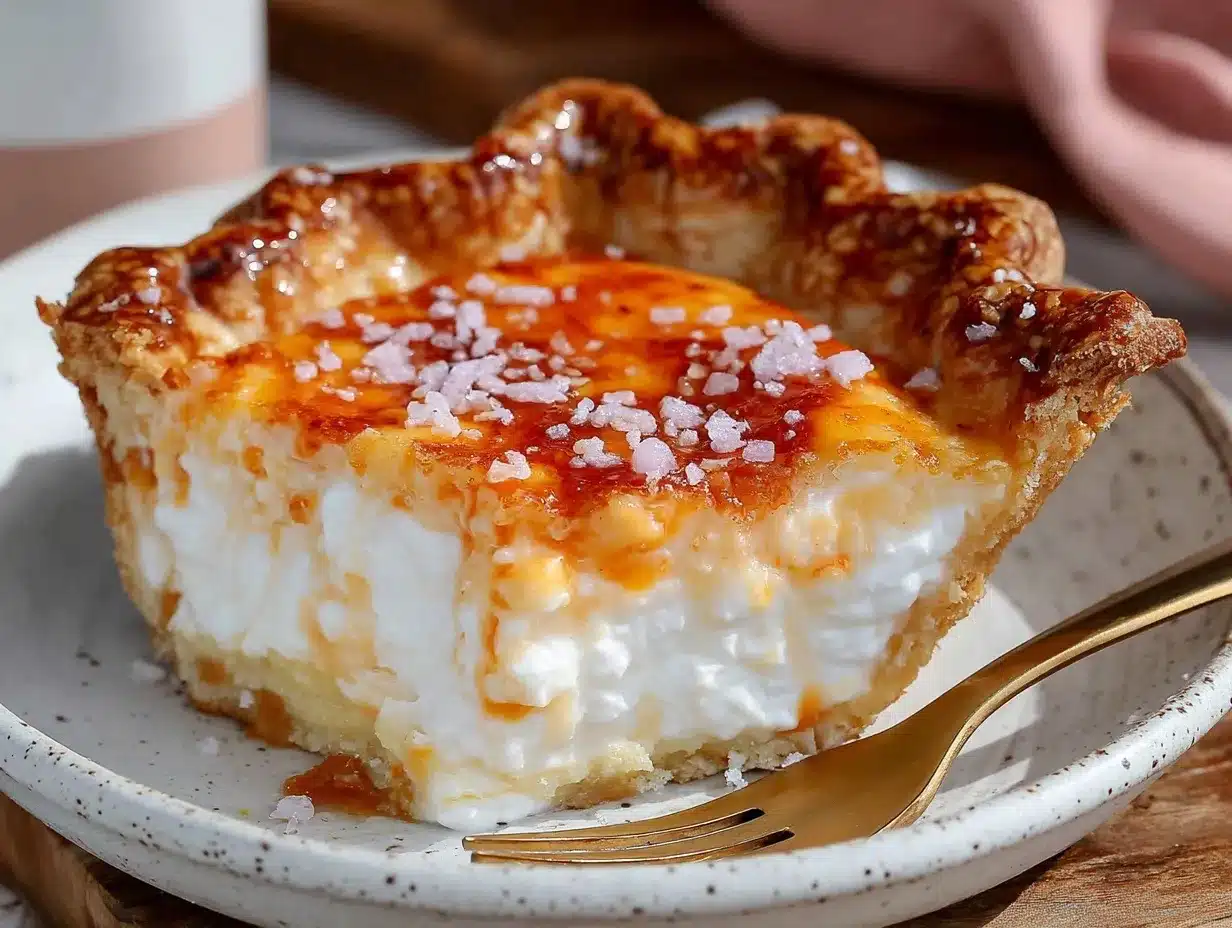
Pour the filling gently over the buttered crust. Bake at 350°F (175°C) for about 45–50 minutes, until the filling is set and slightly golden at the edges. The pie will jiggle like custard when you gently shake the pan but shouldn’t be liquidy. -
Cool Completely (2+ hours)
This is crucial. The pie needs to cool fully at room temperature to set properly. Resist the urge to cut into it too soon—patience pays off with a creamy, sliceable dessert.
Total time: About 1 hour 10 minutes active, plus cooling. This vintage dessert is hands-off for most of the bake, so you can get other things done while it cooks.
Expert Tips & Tricks for Depression Era Water Pie Recipe
Here’s everything I’ve figured out from making this recipe dozens of times. These tips will save you from the mistakes I already made.
- Don’t Skip the Butter — The butter scattered in the crust is what makes this pie rich and creamy instead of just watery. I burned this once by leaving it out, and it was a sad, flavorless disaster.
- Cold Water Is Key — Using cold water keeps the eggs from scrambling in the oven and helps the filling set just right. Warm water? No thanks.
- Use Fresh Eggs — The structure depends on the eggs, so fresh ones give the best rise and silky texture. Room temperature is ideal to avoid clumps when mixing.
- Don’t Rush Cooling — It’s tempting to slice right after baking, but the pie is still liquidy hot inside. Cooling for at least two hours (or overnight) makes it firm up perfectly.
- Pie Crust Choice Matters — I prefer a flaky butter crust, but a sturdy graham cracker crust can hold up nicely too. Just make sure it’s well baked before adding the filling.
- Why Does My Pie Turn Watery? If your pie is watery, it probably didn’t bake long enough, or the filling was mixed too vigorously causing the eggs to separate. Bake a little longer and whisk gently next time.
Variations & Substitutions for Depression Era Water Pie Recipe
Once you’ve got the base version down, here’s how I mix it up. I’ve actually tried all of these.
- Brown Sugar Version — Swap half the white sugar for brown sugar. It adds a subtle caramel note that makes the pie feel extra cozy, perfect for holiday family dinners.
- Lemon Water Pie — Add 2 tablespoons of freshly squeezed lemon juice and a teaspoon of lemon zest to the wet ingredients. It brightens up the filling with a tangy twist, great for springtime gatherings.
- Nutmeg or Cinnamon — Sprinkle ½ teaspoon of ground nutmeg or cinnamon into the dry ingredients for a warm, spiced flavor that’s nostalgic for fall dinners and potlucks.
- Gluten-Free Adaptation — Use a gluten-free pie crust. The filling itself is naturally gluten-free. I’ve used Bob’s Red Mill crust mix with success.
- Dairy-Free Version — Replace butter with a plant-based margarine or coconut oil. The texture changes slightly but it still tastes delicious for those avoiding dairy.
Serving & Storage
I usually serve this Depression Era Water Pie straight from the pie plate—it looks rustic and homey, and it stays warm on the counter during dessert time. A simple dusting of powdered sugar or a dollop of whipped cream is all it needs.
Here are some side ideas I love with it:
- Fresh berries or a berry compote for a pop of color and tang.
- Lightly sweetened whipped cream or vanilla ice cream to complement the creamy filling.
- A hot cup of tea or coffee to balance the sweetness.
Storage:
- Fridge: Store leftovers in an airtight container for up to 4 days. The filling firms up more in the fridge but remains delicious.
- Reheating: I recommend eating cold or at room temperature. Reheating tends to break down the texture.
- Freezing: I don’t recommend freezing. The custard-like filling separates when thawed and loses its creamy texture.
Nutrition Information
I’m not a nutritionist, but here’s the breakdown if you’re keeping track. These values are approximate per serving, based on 8 slices.
| Calories | Protein | Carbs | Fiber | Sugar | Fat | Saturated Fat | Sodium |
|---|---|---|---|---|---|---|---|
| 230 | 4g | 30g | 0g | 18g | 10g | 6g | 150mg |
Look—this is comfort food made with butter and sugar. It’s not a health food, and I’m not going to pretend it is. But it beats drive-thru desserts every time, is easy on the budget, and you know exactly what’s in it. When I want something lighter, I pair it with fresh fruit and a simple salad. Most nights though? I make the real thing and enjoy every bite.
Final Thoughts
Remember that chilly Saturday when I found this recipe in Grandma’s box? Since then, this Depression Era Water Pie recipe easy classic creamy vintage dessert has become a quiet star in my kitchen. It’s proof that simple ingredients and a little patience can create something truly special.
Make it yours. Add a pinch of spice, a splash of lemon, or even a handful of fresh berries on top. More butter is always the right call in my opinion. And if you want to get fancy, serve it alongside a few easy appetizers like my creamy baked crab dip or classic creamy classic hummus.
If you make this pie, drop a comment and tell me how it went. And if something goes wrong, tell me that too—I genuinely want to help troubleshoot. That’s what the comments are for.
Happy cooking—I hope your kitchen smells amazing.
Frequently Asked Questions
Q: Can I make this Depression Era Water Pie recipe without butter?
A: Yes, you can use a plant-based margarine or coconut oil as a substitute for butter, but the texture and richness will be a bit different. I’ve tried coconut oil once, and while it still set well, it lacked that classic creamy mouthfeel. For best results, stick with real butter if you can.
Q: Why did my water pie turn out watery or runny?
A: This usually happens if the pie wasn’t baked long enough or if the filling was mixed too vigorously, causing the eggs to separate. I once pulled mine out early, and it was a soupy mess. Bake until the edges are golden and the center jiggles slightly but isn’t liquid. Also, whisk gently when mixing the wet and dry ingredients to avoid breaking the eggs.
Q: Can I make this Depression Era Water Pie recipe ahead for a holiday dinner?
A: Absolutely. In fact, this pie tastes best after it’s chilled for a few hours or overnight. I often bake it the day before holiday dinners and store it in the fridge. Just bring it to room temperature before serving for the best texture.
Q: Is this recipe gluten-free or can it be made gluten-free?
A: The filling itself is naturally gluten-free, but the traditional pie crust contains gluten. To make it gluten-free, use a gluten-free pie crust. I’ve had good luck with store-bought gluten-free crusts or homemade ones using almond or rice flour blends.
Q: Can I double or halve the recipe?
A: Yes, you can double the filling to make two pies or halve it for a smaller 6-inch pan. Keep the baking time roughly the same but start checking for doneness a bit earlier if you halve it. I’ve halved the recipe when I want just a small dessert for two.
Q: Can I add flavors like chocolate or fruit to this water pie?
A: You can try adding a tablespoon or two of cocoa powder for a chocolate twist, but keep an eye on the texture since it might change how the filling sets. Fresh fruit additions can be tricky because they add moisture, which might make the pie runny. Instead, serve fresh berries or fruit compote on the side for a safer bet.
Pin This Recipe!
Depression Era Water Pie Recipe Easy Classic Creamy Vintage Dessert

A simple, budget-friendly vintage dessert from the Depression Era that uses water as a key ingredient to create a creamy, custard-like pie with pantry staples.
- Prep Time: 18 minutes
- Cook Time: 45-50 minutes
- Total Time: 3 hours 10 minutes (including cooling time)
- Yield: 6-8 servings 1x
- Category: Dessert
- Cuisine: American
Ingredients
- 3 tablespoons all-purpose flour (24 grams)
- 3/4 cup granulated white sugar (150 grams)
- 1/4 teaspoon salt (1 gram)
- 3 tablespoons unsalted butter (42 grams)
- 1 1/2 cups cold water (360 ml)
- 3 large eggs, room temperature
- 1 teaspoon vanilla extract (5 ml)
- 1 9-inch pie crust (store-bought or homemade)
Instructions
- Prepare the Pie Crust (10 minutes): If using store-bought crust, let it thaw on the counter. If homemade, roll out and fit into a 9-inch pie pan. Prick the bottom lightly with a fork to prevent bubbling.
- Mix Dry Ingredients (3 minutes): In a medium bowl, whisk together flour, sugar, and salt until well combined.
- Combine Wet Ingredients (3 minutes): In a separate bowl, beat eggs lightly. Add cold water and vanilla extract, whisking gently but thoroughly.
- Combine Wet and Dry (2 minutes): Slowly pour the wet mixture into the dry ingredients while whisking continuously until smooth and watery in consistency.
- Add Butter (1 minute): Cut butter into small pieces and scatter evenly over the bottom of the prepared crust.
- Pour Filling into Crust and Bake (45–50 minutes): Pour filling over buttered crust. Bake at 350°F (175°C) until filling is set and edges are slightly golden. The pie should jiggle slightly but not be liquidy.
- Cool Completely (2+ hours): Let the pie cool fully at room temperature to set properly before slicing.
Notes
[‘Do not skip the butter; it adds richness and creaminess.’, ‘Use cold water to prevent eggs from scrambling and to help filling set.’, ‘Use fresh, room temperature eggs for best texture.’, ‘Allow pie to cool completely for at least 2 hours or overnight for proper setting.’, ‘If pie turns watery, bake longer and whisk gently when mixing.’, ‘Variations include using brown sugar, adding lemon juice and zest, or spices like nutmeg or cinnamon.’, ‘For gluten-free, use a gluten-free pie crust.’, ‘For dairy-free, substitute butter with plant-based margarine or coconut oil.’]
Nutrition
- Serving Size: 1 slice (1/8 of pie)
- Calories: 230
- Sugar: 18
- Sodium: 150
- Fat: 10
- Saturated Fat: 6
- Carbohydrates: 30
- Protein: 4
Keywords: Depression Era, Water Pie, Vintage Dessert, Creamy Pie, Budget-Friendly Dessert, Easy Pie Recipe, Classic Pie, Pantry Staples


