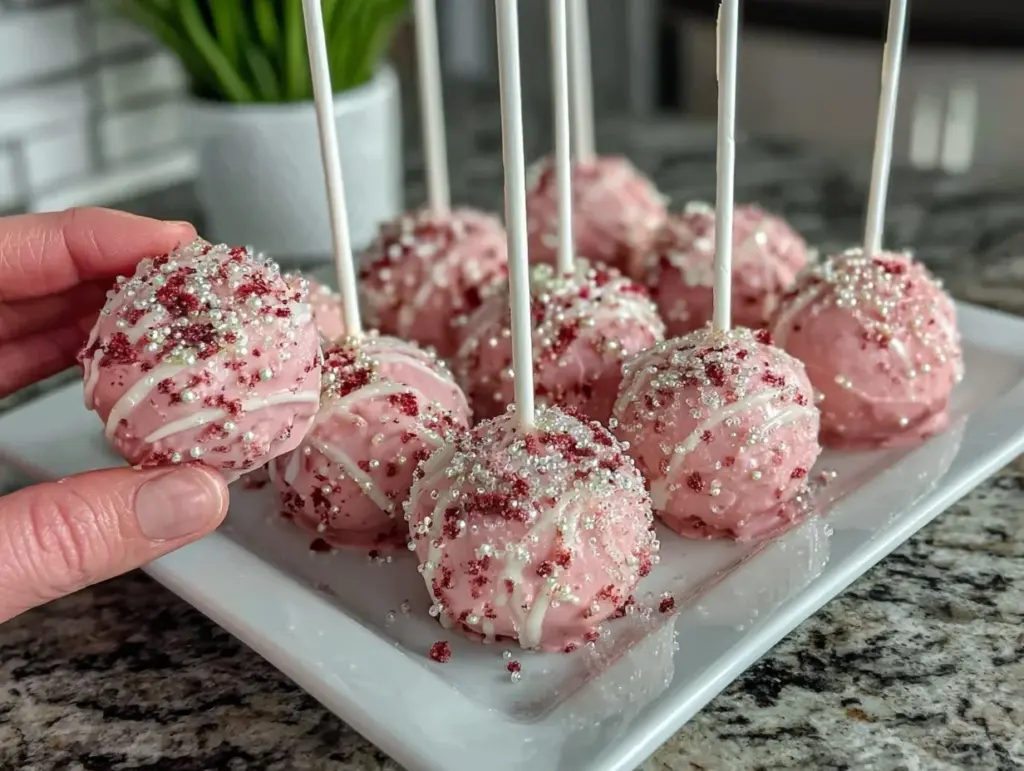
Picture this: you walk into a room filled with laughter, balloons, and the irresistible scent of freshly baked cake. There, on the dessert table, sit rows of pink velvet cake pops—glimmering with pastel sprinkles, each one perched proudly on a stick like a little edible jewel. The first time I made these pink velvet cake pops for my niece’s birthday, I was immediately hit with that unmistakable whiff of vanilla and cocoa mingling in the air. It’s the kind of scent that makes you pause mid-conversation and wander toward the kitchen, following your nose and your curiosity.
Honestly, I still remember that moment—the kids’ eyes went wide, and even the adults couldn’t resist sneaking a few bites before the party officially began. It brought back memories of when I was knee-high to a grasshopper, helping my mom swirl batter in a bowl, hoping for a lick off the spoon. Back then, we didn’t have cake pops, but if we did, I’m sure they would’ve been the star of every bake sale and family picnic.
What I love most about these pink velvet cake pops is how they turn any occasion into a celebration—baby showers, Valentine’s Day, or just a random Saturday when you need a burst of sweetness. They’re dangerously easy to make, and you don’t need any fancy equipment. My family couldn’t stop plucking them off the display stand (and I can’t really blame them). I’ve tested this recipe more times than I care to admit—in the name of research, of course! It’s become a staple for birthdays, gifting, and those “just because” moments. If you’re craving pure, nostalgic comfort in adorable, Pinterest-worthy bites, you’re absolutely going to want to bookmark this one. Pink velvet cake pops? They feel like a warm hug with sprinkles on top.
Why You’ll Love This Recipe
If you’re searching for a crowd-pleasing treat that’s as fun to make as it is to eat, these pink velvet cake pops truly check all the boxes. I’ve baked a lot of cakes in my years as a food blogger and home baker, and let me tell you—these cake pops have earned their place at the top of my party treat list. They’ve been tested at family reunions, school celebrations, and even as a whimsical wedding favor. Here’s why you’ll fall in love with them too:
- Quick & Easy: No need to spend all day in the kitchen. This recipe comes together in about an hour (including chilling time), making it perfect for busy party planners or last-minute dessert emergencies.
- Simple Ingredients: You probably have most of the basics in your pantry already. No wild goose chases for obscure items—just classic cake ingredients, cream cheese, and chocolate.
- Perfect for Any Occasion: These pink velvet cake pops shine at baby showers, birthdays, bridal teas, or as a sweet treat on a rainy afternoon. Their playful color and elegant finish make them party-ready for any celebration.
- Crowd-Pleaser: Both kids and adults rave about these. There’s just something magical about bite-sized cake on a stick. They disappear quickly, so consider making a double batch!
- Unbelievably Delicious: The combination of tender pink velvet cake, tangy cream cheese frosting, and a crisp chocolate shell is pure comfort food—just in a more portable package.
What sets this recipe apart? For starters, the pink velvet cake is moist and fluffy but holds together perfectly for rolling into pops (not all cake recipes can say that!). The secret is just the right balance of buttermilk and cocoa, plus a little extra vanilla for that bakery-style depth. I use a special technique—crumbling the cake while it’s still slightly warm—so the crumbs are extra soft and easy to mix. And if you’ve ever struggled with cake pops sliding off the stick, don’t worry: I’ve got you covered with my fuss-free coating method.
This isn’t just another cake pop recipe—it’s the kind that makes you sigh happily after one bite. It’s party food that feels special but never fussy. Whether you’re impressing guests or just treating yourself, these pink velvet cake pops are the best kind of sweet surprise.
What Ingredients You Will Need
These pink velvet cake pops use everyday ingredients to create a stunning dessert with bold flavor and that iconic rosy hue. I like to keep things simple but always aim for the best taste and texture—so here’s what you’ll need:
- For the Pink Velvet Cake:
- All-purpose flour (120g) – classic base for a tender crumb
- Granulated sugar (200g) – sweetens and keeps things moist
- Unsweetened cocoa powder (1 tbsp / 7g) – just a hint for color and depth
- Baking powder (1 tsp / 5g) – for lift
- Baking soda (1/2 tsp / 2g)
- Salt (1/4 tsp / 1g)
- Buttermilk (120ml / 1/2 cup) – brings tang and a soft texture; whole milk with a squeeze of lemon works in a pinch
- Vegetable oil (60ml / 1/4 cup) – keeps everything moist
- Large egg (1, room temperature)
- Pure vanilla extract (2 tsp / 10ml) – adds a bakery-style flavor
- Pink gel food coloring (as needed) – for that signature color; I like Americolor or Wilton
- White vinegar (1/2 tsp / 2ml) – helps the baking soda do its thing
- For the Cream Cheese Frosting:
- Cream cheese (60g / 2 oz, softened) – full-fat works best for richness
- Unsalted butter (30g / 2 tbsp, softened)
- Powdered sugar (75g / 2/3 cup) – sifted for smoothness
- Vanilla extract (1/2 tsp / 2ml)
- For Assembly & Decoration:
- White chocolate or candy melts (225g / 8 oz) – for dipping; use a good-quality brand for easy melting
- Sprinkles or edible glitter (optional) – for extra flair; pick pastel shades or hearts for parties
- Lollipop sticks (about 20)
Ingredient Tips:
- If you need a gluten-free version, swap the flour for a 1:1 gluten-free blend.
- Dairy-free? Use vegan cream cheese and plant-based butter.
- No buttermilk? Mix 1/2 cup milk with 1/2 tbsp vinegar and let sit for 5 minutes.
- For a deeper pink, add a tiny bit more gel food color (start small—gel is potent!).
- You can use leftover cake or store-bought cake in a pinch, but homemade always tastes best.
With these easy-to-find ingredients, you’ll be on your way to the cutest pink velvet cake pops in no time.
Equipment Needed
Making pink velvet cake pops doesn’t require a professional bakery setup—just a few trusty kitchen tools:
- Mixing bowls – at least two, one for dry and one for wet ingredients
- Electric mixer or hand whisk – a stand mixer makes things effortless, but a hand mixer is just fine
- Measuring cups and spoons – accuracy matters for baking
- Baking pan (8-inch square or round) – nonstick or lined with parchment for easy release
- Wire cooling rack – helps the cake cool evenly (or just use an upside-down muffin tin)
- Food-safe gloves (optional) – keeps hands tidy when rolling cake balls, but clean hands work too
- Cookie scoop or tablespoon – for evenly sized pops
- Lollipop sticks – available at craft stores or online; in a pinch, sturdy paper straws work
- Microwave-safe bowl or double boiler – for melting chocolate or candy melts
- Styrofoam block or a sturdy box – to hold cake pops upright while they set; I once used an egg carton with holes poked in it and it worked in a pinch!
If you’re on a budget, don’t worry—most of these are standard kitchen tools. For clean-up, I recommend soaking any bowls with frosting residue right away. And if you’ve got kids, hand them a lollipop stick and let them help—making cake pops is half the fun!
Preparation Method
-
Make the Pink Velvet Cake (Prep: 10 min, Bake: 25 min)
- Preheat your oven to 350°F (175°C). Grease and line an 8-inch baking pan with parchment paper.
- In a medium bowl, whisk together 120g flour, 200g sugar, 7g cocoa powder, 5g baking powder, 2g baking soda, and 1g salt.
- In another bowl, whisk 120ml buttermilk, 60ml oil, 1 egg, and 10ml vanilla extract. Add a few drops of pink gel food coloring until you get your desired shade.
- Pour the wet ingredients into the dry, stirring until smooth (don’t overmix).
- Add 2ml white vinegar and give it a quick stir. Pour batter into the prepared pan and smooth the top.
- Bake for 20-25 minutes, or until a toothpick comes out clean. The cake should spring back lightly when touched.
- Cool in the pan for 10 minutes, then remove and cool completely on a rack.
-
Make the Cream Cheese Frosting (Prep: 5 min)
- In a small bowl, beat 60g cream cheese and 30g butter until creamy.
- Add 75g powdered sugar and 2ml vanilla extract; beat until fluffy and smooth.
- If your kitchen is warm, chill frosting for 10 minutes to thicken.
-
Form the Cake Balls (Prep: 10 min, Chill: 30 min)
- Crumble the cooled cake into fine crumbs (use your hands or a fork—kids love this part!). You should have about 3 cups of crumbs.
- Add half the frosting and mix with a spoon or your hands. Add more frosting, a spoonful at a time, until the mixture holds together like damp sand but isn’t sticky.
- Scoop out 1-tbsp (about 20g) portions and roll into smooth balls. Place on a parchment-lined baking sheet.
- Chill the cake balls in the fridge for at least 30 minutes (or 15 minutes in the freezer). Don’t skip this step—warm cake balls will fall apart when dipped!
-
Dip and Decorate (Prep: 15 min, Set: 15 min)
- Melt 225g white chocolate or candy melts in a microwave-safe bowl in 20-second bursts, stirring until smooth. If the chocolate is too thick, add 1/2 tsp coconut oil.
- Dip the tip of each lollipop stick into the melted chocolate, then insert halfway into a cake ball (this helps anchor the stick).
- Dip each cake pop into the melted chocolate, gently tapping off excess. (If the cake ball falls off, chill longer or make balls slightly firmer.)
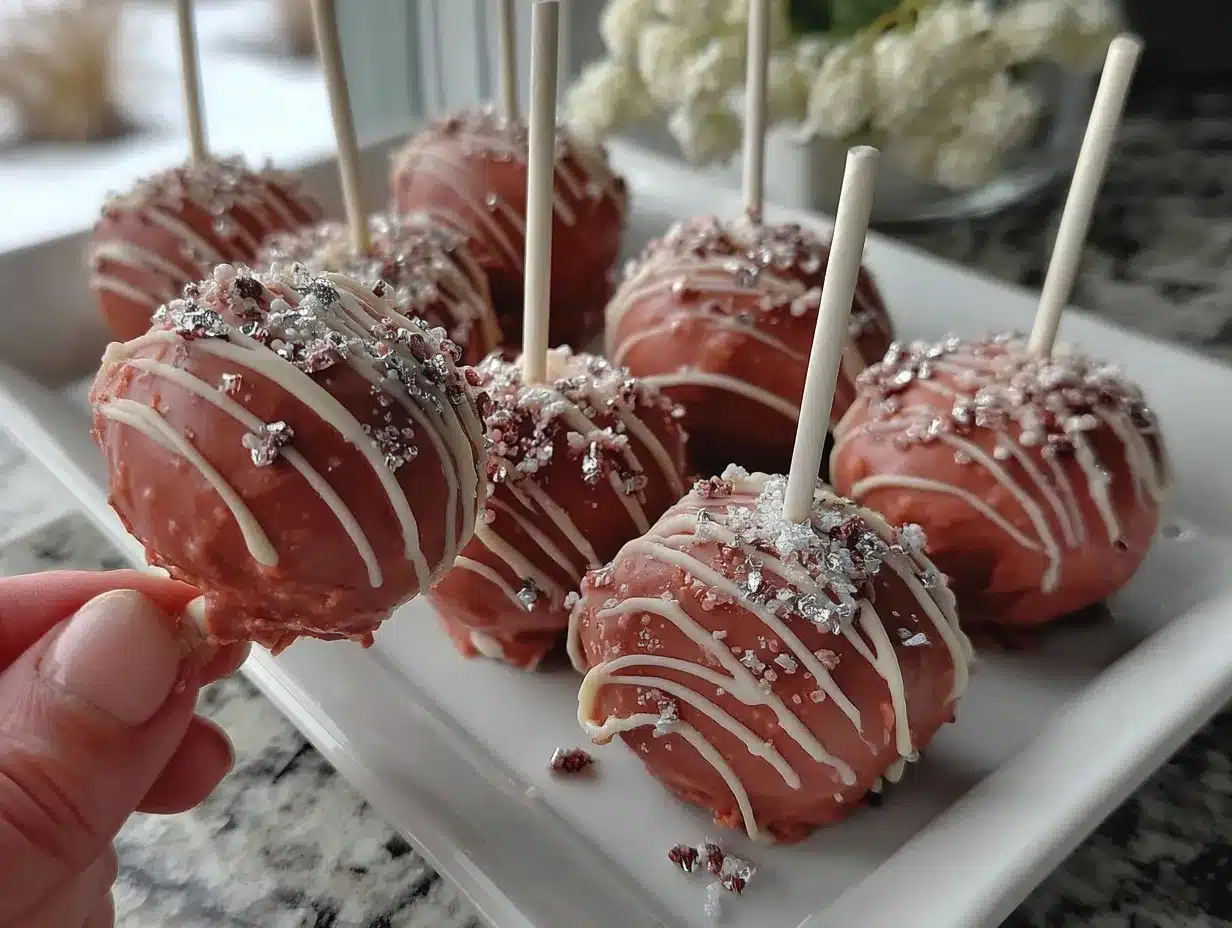
- Immediately sprinkle with decorations or edible glitter.
- Stand each pop upright in a Styrofoam block or box to set. Let chocolate harden completely (about 15 minutes).
Note: If your coating cracks, the cake balls may be too cold. Let them sit at room temperature for 5 minutes before dipping. If the chocolate thickens, re-melt in the microwave for a few seconds.
Honestly, the first time I made these, I rushed the chilling and ended up with a few wonky pops. Lesson learned—patience pays off! The final result is worth every step.
Cooking Tips & Techniques
Want truly flawless pink velvet cake pops? Here are my favorite tricks, some learned the hard way:
- Don’t Over-Mix the Batter: Gentle folding keeps your cake light. Over-mixed batter turns out tough pops (trust me, I’ve been there!).
- Use Gel Food Coloring: Liquid color can water down your batter, so stick to gel for brighter pink hues without changing the texture.
- Test the Cake Ball Texture: After mixing in the frosting, squeeze a small ball. If it cracks, add a touch more frosting. If it’s sticky, add a bit more cake crumb.
- Chill, Chill, Chill: I can’t stress this enough—cold cake balls are easier to dip. If you rush, pops may slide off the stick or crumble in the chocolate.
- Thin the Chocolate: For a smoother coating, mix in a teaspoon of coconut oil or vegetable shortening. Thick chocolate will drag the cake off the stick.
- Tap, Don’t Swirl: After dipping, gently tap the stick on the side of the bowl to remove excess coating. Swirling can loosen the ball or cause cracks.
- Decoration Timing: Add sprinkles or glitter while the chocolate is still wet, or they won’t stick.
- Fixing Mistakes: If a cake pop falls apart, don’t panic. Remold it, chill again, and try dipping once more. Imperfect pops still taste amazing!
- Assembly Line: Set up your dipping station before you start. Melted chocolate, sticks, sprinkles, and your “drying rack” (box or Styrofoam) should all be within arm’s reach. This makes things much less messy.
Let’s face it, not all cake pops come out perfectly round the first time. That’s okay! Sometimes the wobbly ones are the most loved. Practice makes delicious progress.
Variations & Adaptations
Pink velvet cake pops are super customizable, so you can put your own spin on them for any occasion or dietary need. Here are some fun ways to switch things up:
- Gluten-Free Version: Swap the all-purpose flour for a 1:1 gluten-free flour blend. I’ve done this for a friend’s bridal shower, and no one could tell the difference!
- Vegan Cake Pops: Use plant-based milk and vinegar for buttermilk, vegan butter and cream cheese, and a flax egg (1 tbsp ground flax + 3 tbsp water). Dairy-free white chocolate works great for dipping.
- Flavor Twists:
- Add a hint of raspberry extract to the cake batter for a fruity kick.
- Swap white chocolate for dark or ruby chocolate for a different coating color and taste.
- Mix in mini chocolate chips or crushed freeze-dried strawberries to the cake crumbs for texture and punch.
- Seasonal Decorations: Use heart-shaped sprinkles for Valentine’s Day, gold dust for New Year’s Eve, or blue accents for a gender reveal party. The sky’s the limit!
- Nut-Free Option: This recipe is naturally nut-free, but always check your decorations and chocolate for “may contain” labels if serving to allergy-sensitive guests.
- Other Cake Bases: Feel free to use red velvet, funfetti, or chocolate cake if you want a color or flavor swap. I once made a batch with lemon cake and pink frosting for a spring baby shower—so cheerful!
The best part? Each batch can be a little different. Let your creativity shine, or let your kids pick the sprinkles. There’s no wrong way to enjoy pink velvet cake pops.
Serving & Storage Suggestions
For the prettiest presentation, serve your pink velvet cake pops upright in a decorative stand, a pretty glass filled with candy, or even a foam block covered in tissue paper. I love arranging them in a bouquet for a party centerpiece—guests can grab one as they mingle. These are best enjoyed at room temperature, where the chocolate shell is just slightly crisp and the inside is perfectly soft.
Pair these cake pops with sparkling pink lemonade, a pot of tea, or a creamy latte for a sweet treat. They’re also adorable alongside a platter of mini cupcakes or macarons.
To store, place leftover cake pops in an airtight container in the fridge for up to 5 days. Separate layers with parchment paper to prevent sticking. For longer storage, freeze undipped cake balls for up to 2 months—just thaw, dip, and decorate before serving. If you need to refrigerate finished cake pops, let them sit at room temperature for 20 minutes before serving to avoid condensation on the chocolate.
Honestly, I think they taste even better the next day—like the flavors have a little party of their own overnight!
Nutritional Information & Benefits
Each pink velvet cake pop contains about 120 calories, 5g fat, 17g carbohydrates, and 2g protein. These are estimates and will vary based on coatings and decorations.
On the plus side, using buttermilk and a small amount of cocoa adds calcium and antioxidants. This recipe can be made gluten-free or dairy-free with the swaps mentioned above, making them accessible for many diets. Major allergens include wheat, dairy, and egg, so always let your guests know the ingredients if there are sensitivities.
From a wellness perspective, pink velvet cake pops are all about portion control and joy—one or two is just enough to satisfy a sweet tooth without going overboard. Sometimes, a little happiness on a stick is good for the soul!
Conclusion
There’s just something magical about pink velvet cake pops—they’re sweet, adorable, and always the life of the party. Whether you’re making them for a big celebration or a simple afternoon treat, you’ll love how easy and fun they are to create. The combination of tender cake, creamy frosting, and a snappy chocolate shell is pure comfort, wrapped up in a bite-sized package.
Don’t be afraid to experiment with flavors, colors, or decorations to make these cake pops your own. My family asks for them again and again, and I never get tired of seeing the smiles they bring. If you try this recipe, leave a comment below or tag me on social media—I’d love to see your cake pop creations or hear about your special occasions!
Go ahead—grab a stick, roll up your sleeves, and treat yourself to a batch of perfect pink velvet cake pops. Happy baking, friend!
FAQs About Pink Velvet Cake Pops
How far in advance can I make pink velvet cake pops?
You can bake the cake and prepare the cake balls up to two days ahead. Store them undipped in the fridge, then dip and decorate on the day you plan to serve.
Why are my cake pops falling off the stick?
This usually happens if the cake balls are too warm or too moist. Make sure to chill them well and avoid adding too much frosting. Dipping the stick in melted chocolate before inserting helps “glue” it in place.
Can I use boxed cake mix for this recipe?
Yes, you can use a pink velvet or white cake mix in a pinch. Just bake as directed, crumble, and follow the rest of the instructions for cake pops and frosting.
What’s the best way to melt chocolate for dipping?
Use a microwave-safe bowl and heat in short bursts, stirring often. Or, melt gently over a double boiler. Add a small amount of coconut oil for a smoother coating.
How do I store leftover cake pops?
Keep them in an airtight container in the refrigerator for up to 5 days. For longer storage, freeze undipped cake balls, then dip in chocolate when ready to serve.
Pin This Recipe!

Pink Velvet Cake Pops
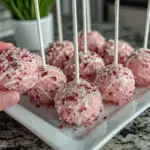
These adorable pink velvet cake pops feature moist cake, creamy cream cheese frosting, and a crisp white chocolate shell. Perfect for parties, celebrations, or a sweet treat any day, they’re easy to make and guaranteed to delight both kids and adults.
- Prep Time: 30 minutes
- Cook Time: 25 minutes
- Total Time: 1 hour 15 minutes
- Yield: 20 cake pops 1x
- Category: Dessert
- Cuisine: American
Ingredients
- 1 cup all-purpose flour (120g)
- 1 cup granulated sugar (200g)
- 1 tablespoon unsweetened cocoa powder (7g)
- 1 teaspoon baking powder (5g)
- 1/2 teaspoon baking soda (2g)
- 1/4 teaspoon salt (1g)
- 1/2 cup buttermilk (120ml) or whole milk with a squeeze of lemon
- 1/4 cup vegetable oil (60ml)
- 1 large egg, room temperature
- 2 teaspoons pure vanilla extract (10ml)
- Pink gel food coloring, as needed
- 1/2 teaspoon white vinegar (2ml)
- 2 ounces cream cheese (60g), softened
- 2 tablespoons unsalted butter (30g), softened
- 2/3 cup powdered sugar (75g), sifted
- 1/2 teaspoon vanilla extract (2ml)
- 8 ounces white chocolate or candy melts (225g)
- Sprinkles or edible glitter (optional)
- About 20 lollipop sticks
Instructions
- Preheat oven to 350°F (175°C). Grease and line an 8-inch baking pan with parchment paper.
- In a medium bowl, whisk together flour, sugar, cocoa powder, baking powder, baking soda, and salt.
- In another bowl, whisk buttermilk, oil, egg, and vanilla extract. Add pink gel food coloring until desired shade is reached.
- Pour wet ingredients into dry, stirring until smooth. Do not overmix.
- Add white vinegar and stir briefly. Pour batter into prepared pan and smooth the top.
- Bake for 20-25 minutes, or until a toothpick comes out clean. Cool in pan for 10 minutes, then transfer to a wire rack to cool completely.
- For the frosting, beat cream cheese and butter until creamy. Add powdered sugar and vanilla extract; beat until fluffy and smooth. Chill if needed.
- Crumble cooled cake into fine crumbs. Add half the frosting and mix. Add more frosting, a spoonful at a time, until mixture holds together like damp sand.
- Scoop 1-tablespoon portions and roll into balls. Place on parchment-lined baking sheet. Chill in fridge for at least 30 minutes (or 15 minutes in freezer).
- Melt white chocolate or candy melts in a microwave-safe bowl in 20-second bursts, stirring until smooth. Add 1/2 teaspoon coconut oil if needed for thinning.
- Dip tip of each lollipop stick into melted chocolate, then insert halfway into a cake ball.
- Dip each cake pop into melted chocolate, gently tapping off excess. Immediately decorate with sprinkles or glitter.
- Stand pops upright in a Styrofoam block or box to set. Let chocolate harden completely (about 15 minutes).
Notes
Chill cake balls thoroughly before dipping to prevent them from falling off the stick. Use gel food coloring for vibrant pink without affecting texture. Thin chocolate with coconut oil for a smooth coating. Add decorations while chocolate is wet. For gluten-free or vegan adaptations, see ingredient tips and variations.
Nutrition
- Serving Size: 1 cake pop
- Calories: 120
- Sugar: 12
- Sodium: 80
- Fat: 5
- Saturated Fat: 3
- Carbohydrates: 17
- Fiber: 0.5
- Protein: 2
Keywords: cake pops, pink velvet, party treats, birthday dessert, cream cheese frosting, easy dessert, kid-friendly, special occasions, baking, chocolate coating