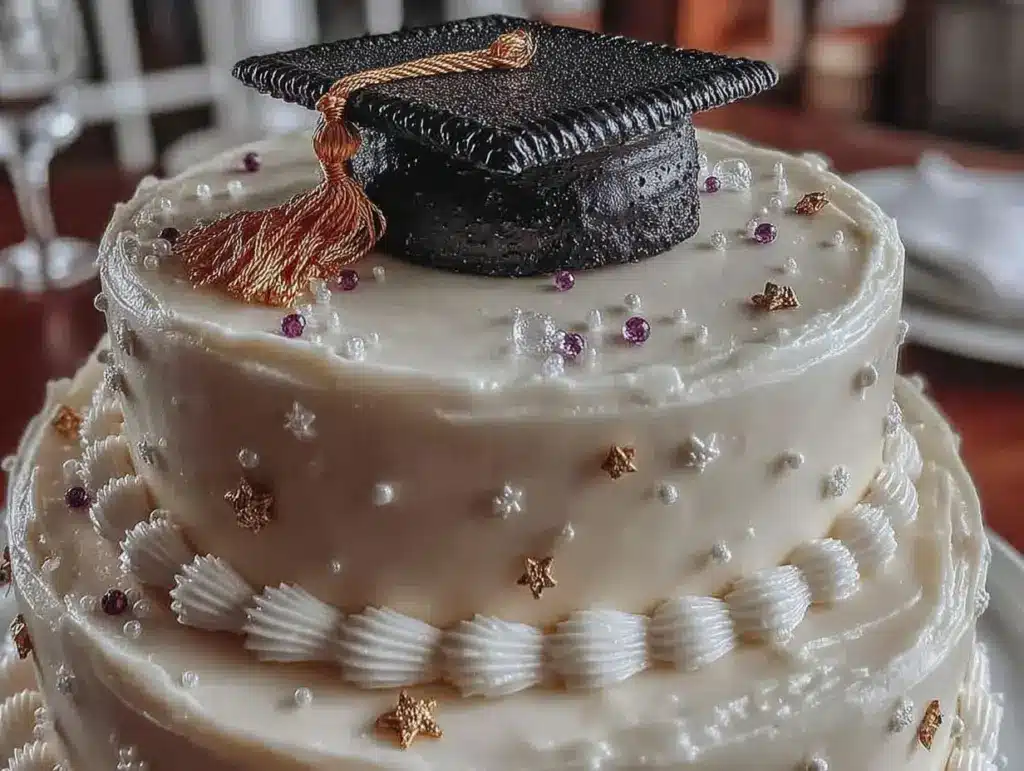
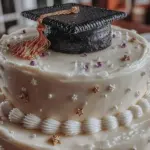
“You won’t believe how this cake almost didn’t happen,” my neighbor laughed, brushing flour off her hands as she recounted the story. It was last May, the day before her son’s graduation party, and the baker next door had just canceled. With little time and a kitchen full of mismatched pans, she set out to create something special—a three-tier graduation cake with an elegant fondant cap. Honestly, she had never worked with fondant before, and the tiers wobbled a bit during assembly, but that cake stole the show. That cracked bowl on the counter, the rushed icing job, the fondant that stretched too thin—it all somehow came together in a way that felt perfect and heartfelt.
Maybe you’ve been there, staring at a milestone celebration and wondering how to make the cake just right without losing your mind in the process. This perfect three-tier graduation cake recipe with an elegant fondant cap is designed for exactly that kind of moment. It’s the kind of recipe that balances beauty and simplicity, and let me tell you, it’s easier than you think to pull off. Whether you’re a seasoned baker or a first-time cake decorator, you’ll find this recipe approachable but impressive.
I still remember the soft click of the fondant pieces snapping into place and the satisfied smiles around the table. It’s not about perfection; it’s about the celebration and the memories baked right into the layers. So, if you’re ready to create a graduation centerpiece that tastes as good as it looks, keep reading—this cake will become your go-to for all those special send-offs.
Why You’ll Love This Recipe
This perfect three-tier graduation cake recipe stands out because it’s tested and true, striking the right balance between elegance and ease. I’ve made this cake countless times—sometimes in a rush, sometimes with extra time for detail—and it always delivers.
- Quick & Easy: The whole process can be done within a few hours, making it great for last-minute celebrations or when you have too many things going on.
- Simple Ingredients: No exotic stuff here—basic pantry staples come together to create a showstopper.
- Perfect for Graduation Parties: The three tiers give it that wow factor, and the fondant cap adds a classy, thematic touch that everyone notices.
- Crowd-Pleaser: Both kids and adults rave about the moist layers and the smooth, slightly sweet fondant finish.
- Unbelievably Delicious: The texture is rich but light, with a flavor profile that’s just sweet enough without being overpowering.
What makes this cake different? It’s the way the fondant cap sits just so—not stiff, not droopy—and how the tiers hold their shape without crumbling under the weight. I use a simple vanilla sponge that’s sturdy yet tender, paired with a buttercream that acts as the perfect glue beneath the fondant. This recipe isn’t just a cake; it’s a celebration on a plate—and one that I promise you’ll want to make again and again.
What Ingredients You Will Need
This recipe uses simple, wholesome ingredients to deliver bold flavor and a satisfying texture without the fuss. You’re likely to have most of these in your kitchen already, and where you don’t, the substitutes are easy to find.
- For the Cake Layers:
- All-purpose flour, 4 cups (480g) – I prefer King Arthur for consistent texture
- Baking powder, 2 ½ teaspoons
- Salt, ½ teaspoon
- Unsalted butter, 1 cup (227g), softened (adds richness and moisture)
- Granulated sugar, 2 ½ cups (500g)
- Large eggs, 6, room temperature
- Whole milk, 1 cup (240ml), room temperature (can swap for almond milk)
- Pure vanilla extract, 2 teaspoons (use a good-quality brand for flavor)
- For the Buttercream Filling and Crumb Coat:
- Unsalted butter, 1 ½ cups (340g), softened
- Powdered sugar, 5 cups (600g), sifted
- Heavy cream, 2-3 tablespoons (adjust for desired consistency)
- Vanilla extract, 1 teaspoon
- Pinch of salt
- For the Fondant Cap:
- Ready-to-roll white fondant, about 1 lb (450g) – Wilton brand works well
- Black fondant, small amount for the graduation cap details
- Edible gold dust or paint (optional, for accent)
- Vegetable shortening (to prevent sticking during rolling)
Pro Tip: When selecting ingredients, pick fresh eggs and real butter whenever possible. They truly make a difference in flavor and texture. If you’re baking in warmer weather, chill your buttercream slightly before applying to keep it from melting under the fondant.
Equipment Needed
- Three round cake pans in graduated sizes (6-inch, 8-inch, and 10-inch) – metal pans provide even baking
- Electric mixer (stand or hand-held) for creaming butter and mixing batter
- Mixing bowls (various sizes)
- Spatulas (rubber and offset) for spreading and smoothing buttercream
- Rolling pin for fondant (non-stick or lightly dusted with shortening)
- Bench scraper or cake smoother for crisp edges
- Turntable (optional but highly recommended for decorating)
- Measuring cups and spoons (accurate measurements are crucial here)
- Cooling racks to cool cakes evenly
- Sharp serrated knife or cake leveler for trimming layers
If you don’t have a turntable, a lazy Susan or even a plate placed on a damp towel can work in a pinch. For rolling fondant, a silicone mat is a nice investment but parchment paper can suffice. I once used a clean countertop and it was messy but manageable—lesson learned!
Preparation Method

- Prep and Preheat: Preheat your oven to 350°F (175°C). Grease and flour your three cake pans or line them with parchment paper. This ensures easy release and clean edges. This step usually takes about 10 minutes.
- Mix Dry Ingredients: In a medium bowl, sift together 4 cups (480g) all-purpose flour, 2 ½ teaspoons baking powder, and ½ teaspoon salt. Set aside.
- Cream Butter and Sugar: In a large bowl, beat 1 cup (227g) softened unsalted butter with 2 ½ cups (500g) granulated sugar on medium-high speed for about 4-5 minutes until light and fluffy. This aerates the batter, which is key for a tender crumb.
- Add Eggs: Add 6 large eggs one at a time, beating well after each addition. If the batter looks like it’s separating, add a tablespoon of flour to bring it back together.
- Incorporate Dry Ingredients and Milk: Alternately add the dry ingredients and 1 cup (240ml) whole milk to the butter mixture, starting and ending with the flour. Mix on low speed until just combined; overmixing can make the cake dense.
- Add Vanilla: Stir in 2 teaspoons pure vanilla extract for flavor balance.
- Divide and Bake: Evenly divide batter among the three pans (about 4 cups batter per pan). Bake the smallest pan for 30-35 minutes, the medium for 35-40 minutes, and the largest for 40-45 minutes. Use a toothpick inserted in the center to test doneness—it should come out clean.
- Cool Completely: Let cakes cool in pans for 15 minutes before transferring to wire racks to cool completely. This prevents sogginess and helps the layers hold their shape.
- Level the Cakes: Once cool, use a serrated knife or cake leveler to trim domed tops, creating flat surfaces for stacking. This is key for stability.
- Make Buttercream: Beat 1 ½ cups (340g) softened unsalted butter until creamy. Gradually add 5 cups (600g) powdered sugar, alternating with 2-3 tablespoons heavy cream. Add 1 teaspoon vanilla extract and a pinch of salt. Beat on high for 3-4 minutes until fluffy and spreadable.
- Crumb Coat Each Layer: Apply a thin layer of buttercream to each cake layer to trap crumbs. Chill for 20 minutes to set.
- Stack and Fill: Place the largest cake on your cake board or plate. Spread about ½ cup buttercream evenly over the top, then add the medium layer. Repeat with buttercream and place the small layer on top.
- Final Coat: Apply a smooth final layer of buttercream on the entire cake. Use a bench scraper or offset spatula to get sharp, clean edges. Chill for at least 30 minutes to firm up.
- Prepare Fondant Cap: Lightly grease your work surface with vegetable shortening. Roll out white fondant to about 1/8-inch thickness. Cut out a circle large enough to cover the top tier with some overhang (about 12 inches/30cm diameter). Drape fondant carefully over the cake top and smooth gently. Shape the cap’s flat top and edges to resemble a graduation cap.
- Add Details: Roll black fondant into a square for the cap top, and a thin strip for the base. Attach with a tiny bit of water or edible glue. Use edible gold dust to add highlights, if desired.
- Final Touches: Chill the cake for another 15 minutes before serving to let the fondant set and the buttercream firm up.
Note: If your fondant tears, don’t panic! Use a small piece to patch it gently. I’ve done this more times than I care to admit during late-night cake projects.
Cooking Tips & Techniques
Getting a three-tier cake right takes some patience, but a few tricks can make it feel effortless.
- Don’t Skip Cooling: Warm cakes are fragile and crumbly. Cooling fully before frosting is essential to prevent a crumbly mess.
- Level Your Layers: Uneven cakes make stacking tricky and unstable. I use a serrated knife and a steady hand to level each layer—practice makes perfect.
- Crumb Coat Magic: This thin layer traps crumbs so your final frosting looks clean. Chill after crumb coating to make the final coat easier.
- Fondant Handling: Keep your hands and surface lightly greased with vegetable shortening to avoid fondant sticking and tearing. Roll gently but firmly.
- Stacking Stability: For bigger cakes, consider using dowels or straws inside to support the tiers. For this size, chilling the cake well usually does the trick.
- Timing: Don’t rush between steps. Letting the buttercream chill makes smoother finishes easier. Multi-task by preparing fondant while the cake chills.
- Personal Lesson: I once tried to frost a warm cake in a rush, and the buttercream slid right off—lesson learned the hard way!
Variations & Adaptations
Feel free to make this cake your own—there are plenty of ways to switch it up without losing that elegant graduation vibe.
- Flavor Variations: Substitute vanilla with lemon zest and juice for a fresh twist. Chocolate lovers can swap 1 cup (120g) flour for cocoa powder.
- Filling Options: Add a layer of raspberry jam or lemon curd between cake layers for a pop of flavor.
- Gluten-Free: Use a 1:1 gluten-free baking flour blend. Expect slight texture differences but still delicious.
- Dairy-Free: Swap butter for vegan margarine and milk for almond or oat milk. Use dairy-free fondant or homemade marshmallow fondant.
- Decor Style: Instead of a fondant cap, try a buttercream rosette design or edible flowers for a softer look.
- Personal Try: One year, I added edible silver stars to the fondant cap for a nighttime graduation theme—the kids loved it!
Serving & Storage Suggestions
This cake tastes best served at room temperature. Take it out of the fridge 30 minutes before slicing to let the buttercream soften slightly for the best texture.
Pair it with a simple cup of coffee or sparkling lemonade to balance the sweetness. For a party, cut neat slices with a warm serrated knife, wiping between cuts.
Store leftover cake covered in the refrigerator for up to 4 days. To freeze, wrap tightly in plastic wrap and foil; thaw overnight in the fridge before serving.
Reheat slices gently in the microwave for 10-15 seconds to bring back softness. Flavors of the buttercream and fondant actually mellow and meld beautifully after a day, so it can taste even better the next day.
Nutritional Information & Benefits
Each serving of this three-tier graduation cake contains approximately 450 calories, with 25g of fat, 55g of carbohydrates, and 5g of protein. Keep in mind, this is a celebratory treat, best enjoyed in moderation.
The recipe uses real butter and eggs, providing vitamin A and essential nutrients. Vanilla extract adds flavor without extra sugar, and you can opt for almond milk for a lactose-free alternative.
For those with gluten sensitivities, the gluten-free adaptation keeps it accessible. However, the cake does contain common allergens like eggs, dairy, and gluten (unless substituted), so please adjust accordingly.
Honestly, this cake feels like a reward after hard work—perfect for marking milestones with something both tasty and meaningful.
Conclusion
This perfect three-tier graduation cake with an elegant fondant cap is more than just a dessert—it’s a celebration centerpiece that brings people together. Whether you’re baking for your own graduate or a friend’s big day, this recipe strikes that sweet spot between impressive and doable.
Feel free to tweak the flavors, try different decorations, or even incorporate your grad’s favorite colors or themes. I love this cake because it reminds me of those slightly chaotic but joyful moments in the kitchen that end with smiles all around.
If you give this recipe a try, I’d love to hear how it went! Leave a comment, share your photos, or tell me about your own graduation cake stories. Here’s to sweet celebrations and the memories we bake along the way!
FAQs
How do I keep my cake layers from drying out?
Make sure to not overbake the cakes and cool them completely before wrapping tightly in plastic wrap if you’re not assembling right away. Adding a simple syrup brush can also help add moisture.
Can I make the cake ahead of time?
Yes! You can bake the layers up to 2 days ahead and keep them wrapped at room temperature or refrigerated. Assemble and decorate the day of the event for best results.
What if I don’t have fondant experience?
Start with ready-to-roll fondant and practice rolling it out on a greased surface. Don’t worry about perfection—small imperfections add charm, and you can patch tears with small fondant pieces.
How do I store a fondant-covered cake?
Keep it in a cool, dry place away from direct sunlight. Refrigeration can cause condensation, so if you refrigerate, cover lightly and bring the cake back to room temperature before serving.
Can I use other flavors for the cake layers?
Absolutely! This recipe is versatile. Try chocolate, lemon, or even almond flavorings to customize your cake to the graduate’s tastes.
Pin This Recipe!
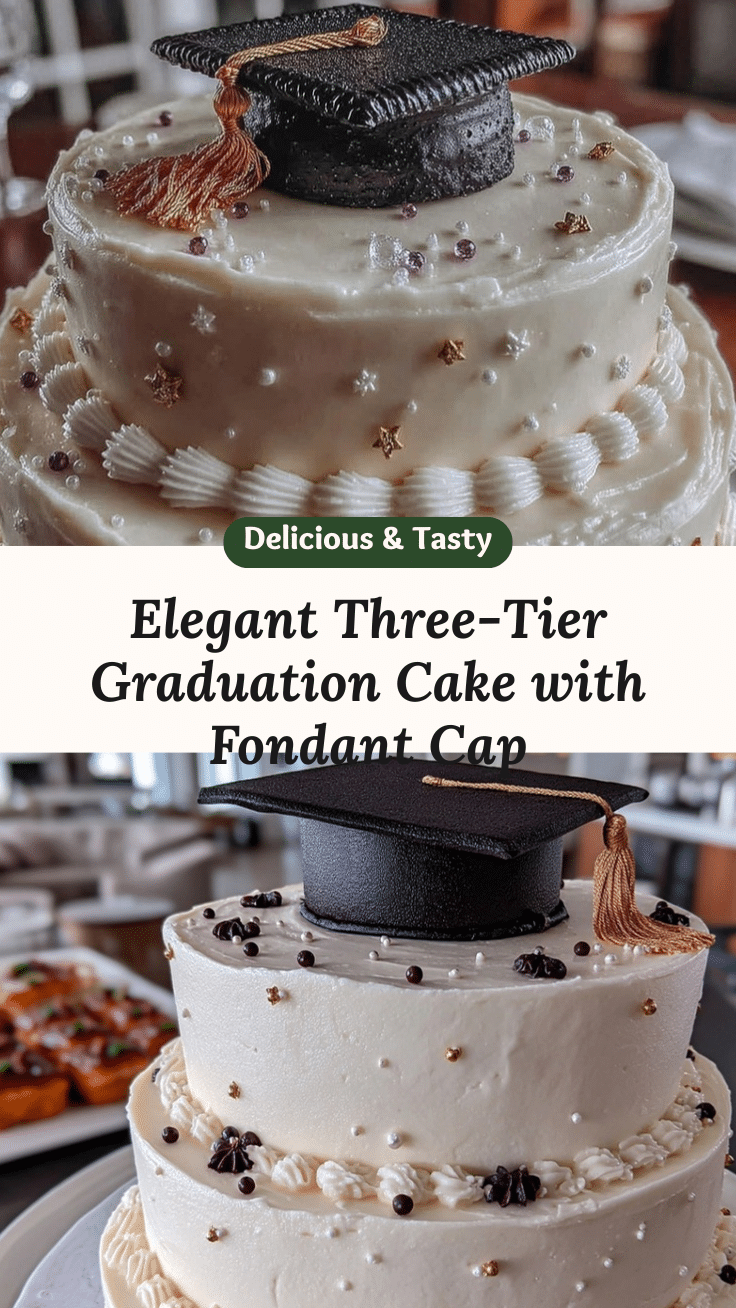
Perfect Three-Tier Graduation Cake Recipe Easy Elegant Fondant Cap Tutorial
A simple yet elegant three-tier vanilla sponge cake with buttercream filling and a classy fondant graduation cap, perfect for milestone celebrations.
- Prep Time: 30 minutes
- Cook Time: 40-45 minutes
- Total Time: 3 hours
- Yield: 12-16 servings 1x
- Category: Dessert
- Cuisine: American
Ingredients
- 4 cups (480g) all-purpose flour
- 2 ½ teaspoons baking powder
- ½ teaspoon salt
- 1 cup (227g) unsalted butter, softened
- 2 ½ cups (500g) granulated sugar
- 6 large eggs, room temperature
- 1 cup (240ml) whole milk, room temperature (can substitute almond milk)
- 2 teaspoons pure vanilla extract
- 1 ½ cups (340g) unsalted butter, softened (for buttercream)
- 5 cups (600g) powdered sugar, sifted
- 2–3 tablespoons heavy cream
- 1 teaspoon vanilla extract (for buttercream)
- Pinch of salt (for buttercream)
- About 1 lb (450g) ready-to-roll white fondant
- Small amount black fondant for graduation cap details
- Edible gold dust or paint (optional)
- Vegetable shortening (to prevent sticking during rolling)
Instructions
- Preheat oven to 350°F (175°C). Grease and flour three cake pans (6-inch, 8-inch, 10-inch) or line with parchment paper.
- Sift together flour, baking powder, and salt in a medium bowl; set aside.
- Beat 1 cup softened butter with granulated sugar on medium-high speed for 4-5 minutes until light and fluffy.
- Add eggs one at a time, beating well after each addition. If batter separates, add a tablespoon of flour.
- Alternately add dry ingredients and milk to butter mixture, starting and ending with flour. Mix on low speed until just combined.
- Stir in 2 teaspoons vanilla extract.
- Divide batter evenly among pans (about 4 cups per pan). Bake smallest pan 30-35 minutes, medium 35-40 minutes, largest 40-45 minutes. Test doneness with toothpick.
- Cool cakes in pans 15 minutes, then transfer to wire racks to cool completely.
- Level cakes by trimming domed tops with serrated knife or cake leveler.
- Make buttercream: Beat 1 ½ cups softened butter until creamy. Gradually add powdered sugar alternating with heavy cream. Add 1 teaspoon vanilla and pinch of salt. Beat until fluffy.
- Apply thin crumb coat of buttercream to each layer. Chill 20 minutes.
- Stack cakes starting with largest layer on cake board. Spread ½ cup buttercream on top, add medium layer, repeat, then add small layer.
- Apply smooth final coat of buttercream over entire cake. Use bench scraper or offset spatula for clean edges. Chill at least 30 minutes.
- Prepare fondant cap: Grease surface with shortening. Roll white fondant to 1/8-inch thickness. Cut circle about 12 inches diameter. Drape over top tier and smooth gently. Shape edges to resemble graduation cap.
- Roll black fondant into square for cap top and thin strip for base. Attach with water or edible glue. Add edible gold dust if desired.
- Chill cake 15 minutes before serving to set fondant and firm buttercream.
Notes
Use fresh eggs and real butter for best flavor. Chill buttercream before applying fondant to prevent melting. Level cake layers for stability. Use dowels for extra support if desired. Patch fondant tears with small pieces. Let cake come to room temperature before serving for best texture.
Nutrition
- Serving Size: 1 slice (approximate
- Calories: 450
- Fat: 25
- Carbohydrates: 55
- Protein: 5
Keywords: graduation cake, three-tier cake, fondant cake, buttercream, vanilla sponge, celebration cake, easy cake recipe, elegant cake