Imagine this: the subtle tang of wild yeast, the earthy aroma of flour coming alive, and the gentle crackle of a crusty loaf as you tear into it—fresh from your own oven. That’s what happens when you start your very own homemade sourdough bread starter, and honestly, it’s the kind of kitchen magic that still gets me every time. The first time I set out to grow a sourdough starter, I was knee-deep in flour on a rainy Saturday, nervously peeking under a tea towel, hoping to see some bubbles. I was instantly hooked—the kind of moment where you pause, take a deep breath, and just smile because you know you’re onto something truly special.
Years ago, my grandma would talk about “the starter that lived on the counter” like it was a pet, and back then, I thought it all sounded a bit mysterious. Turns out, she was right—it’s alive, it’s quirky, and it brings a little adventure to every loaf. I stumbled onto this recipe after a failed attempt at store-bought yeast (those little packets were nowhere to be found), and now I wish I’d discovered this method years ago. There’s honestly nothing like the pride of pulling off an artisan bread with a starter you coaxed to life yourself.
My family couldn’t stop sneaking slices off the cooling rack, and, you know what, I can’t blame them. There’s something about the chewy crumb and that rustic tang—pure, nostalgic comfort. It’s perfect for lazy weekend brunches, gifting a loaf to a neighbor, or just brightening up your Pinterest board with gorgeous, golden crusts. I’ve tested this starter more times than I can count (in the name of research, of course), and it’s become a staple for family gatherings and cozy mornings. This homemade sourdough bread starter feels like a warm hug, and you’re going to want to bookmark this one for sure.
Why You’ll Love This Homemade Sourdough Bread Starter
When it comes to baking real artisan loaves, nothing beats a homemade sourdough bread starter. After years of trying every shortcut and YouTube hack, here’s why this method stands out—and why you’ll find yourself coming back to it every time (with a few floury fingerprints on this page, no doubt):
- Quick & Easy (Relatively!): You only need five minutes a day for a week. No fancy kitchen gadgets or endless kneading, just a little patience and a fork.
- Simple Ingredients: All you need is flour and water. No weird additives or commercial yeast—just pantry basics doing what they do best.
- Perfect for Artisan Loaves: This starter brings a complex flavor and chewy, open crumb to your bread—exactly what you want for those bakery-style loaves.
- Crowd-Pleaser: The smell alone will have your family sneaking tastes. Friends will ask for a jar of your “magic starter” (trust me, it happens!).
- Unbelievably Delicious: The tang and depth of flavor are next-level. It’s not just bread—it’s comfort, tradition, and a little bit of kitchen science, all in one.
What makes this homemade sourdough bread starter different? It’s all about consistency and adaptability. I’ve tested this method in dry winters and humid summers; it handles the seasons like a champ. I use a blend of whole wheat and all-purpose flour for a jumpstart of wild yeast, and that’s what gives this starter a reliable rise and robust flavor—none of that sluggish, flat dough you get with some recipes. Plus, the method is forgiving: missed a feeding? No problem. Want to swap in rye flour? Go for it. This starter is as resilient as you need it to be.
Honestly, there’s a little bit of magic every time you see those bubbles. It’s comfort food that’s healthier (no commercial yeast, no weird preservatives), and it fits into your schedule, not the other way around. Whether you’re impressing dinner guests or just making a rainy Tuesday a bit cozier, this sourdough starter will be your kitchen secret weapon. You’re not just baking—you’re making memories and, let’s face it, some seriously good bread.
What Ingredients You Will Need for Homemade Sourdough Bread Starter
This homemade sourdough bread starter uses just two humble ingredients, but they work together to create something magical (and a little unpredictable, in the best way). Here’s what you’ll need, plus some tips for choosing the right stuff:
- Flour (Unbleached All-Purpose or Bread Flour): Start with unbleached all-purpose flour (King Arthur or Bob’s Red Mill are my go-tos for consistency). Bread flour also works well for extra chew. Bleached flour doesn’t play nice with wild yeast, so skip it.
- Whole Wheat or Rye Flour (For a Jumpstart – Optional): On day one, mix in whole wheat or rye flour (25 to 50 g) with your all-purpose flour. These flours have more wild yeast and nutrients, which helps your starter bubble up faster. You can use 100% all-purpose if that’s what you have—just expect things to move a bit slower.
- Water (Filtered or Spring): Tap water works in most places, but if your water’s heavily chlorinated, let it sit out overnight to off-gas, or use filtered water. Chlorine can slow or kill the natural yeast activity.
That’s it! No sugar, no honey, no packets of yeast. It’s just flour and water (the ultimate pantry combo, right?). But let’s dig into a few little details that make a difference:
- Flour Brand Matters: King Arthur and Bob’s Red Mill always give me the most reliable rise and flavor. Store brands sometimes have less protein and can give you a less active starter, but any unbleached flour will do in a pinch.
- Flour Storage: Keep your flour in an airtight container. If it smells stale or musty, grab a fresh bag—it’ll affect your starter’s aroma and rise.
- Room Temperature: Your starter likes to be comfortable, just like you. Between 68°F and 75°F (20°C-24°C) is ideal. Too cold, and things crawl. Too hot, and your starter can get sour or sluggish.
Substitutions:
- Gluten-Free Option: Use a 1:1 gluten-free flour blend (make sure it contains some whole grain, like brown rice or buckwheat, for better fermentation). Results vary, but it works!
- Allergy-Friendly: If wheat is a concern, try rye (for gluten-sensitive, not celiac) or spelt flour. Just remember, the starter will behave differently and may need extra feedings.
In summer, I sometimes toss in a spoonful of local honey or a grape to help jumpstart fermentation, but that’s optional. The real stars here are good flour and happy water. Simple, right?
Equipment Needed for Homemade Sourdough Bread Starter
You don’t need a fancy bakery setup—just a few basics and a little kitchen curiosity. Here’s what you’ll want on hand:
- Kitchen Scale (Digital): For accuracy. Sourdough is picky about ratios. If you don’t have a scale, you can use measuring cups (1/2 cup flour ≈ 60g; 1/4 cup water ≈ 60g), but a scale really helps.
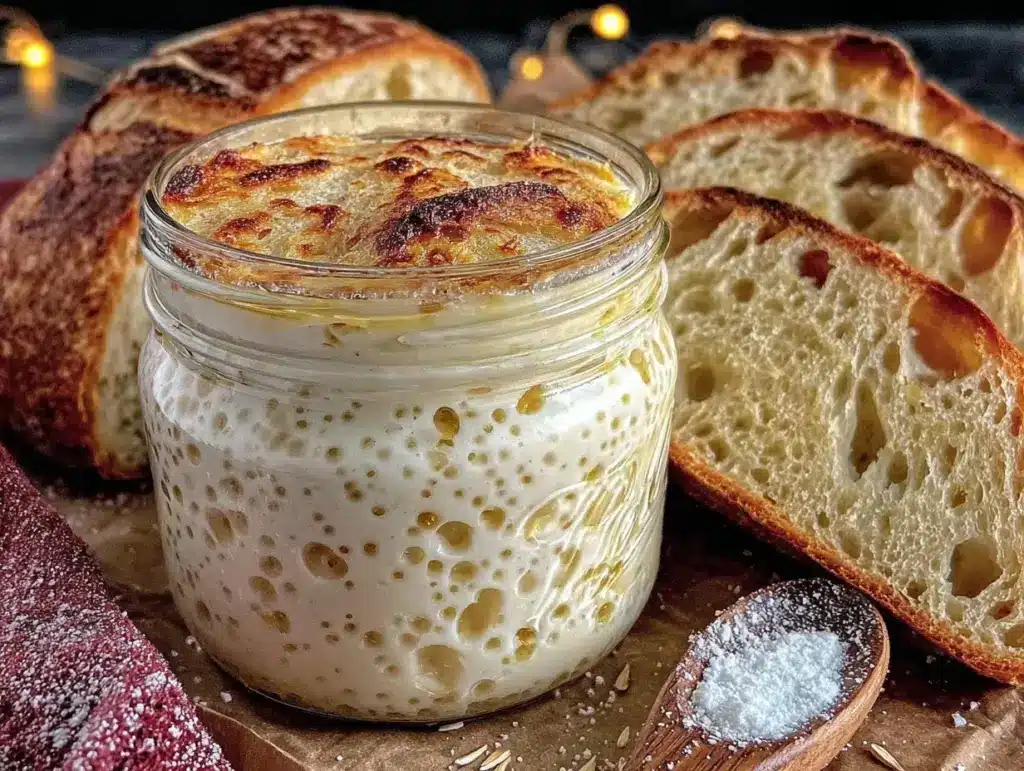
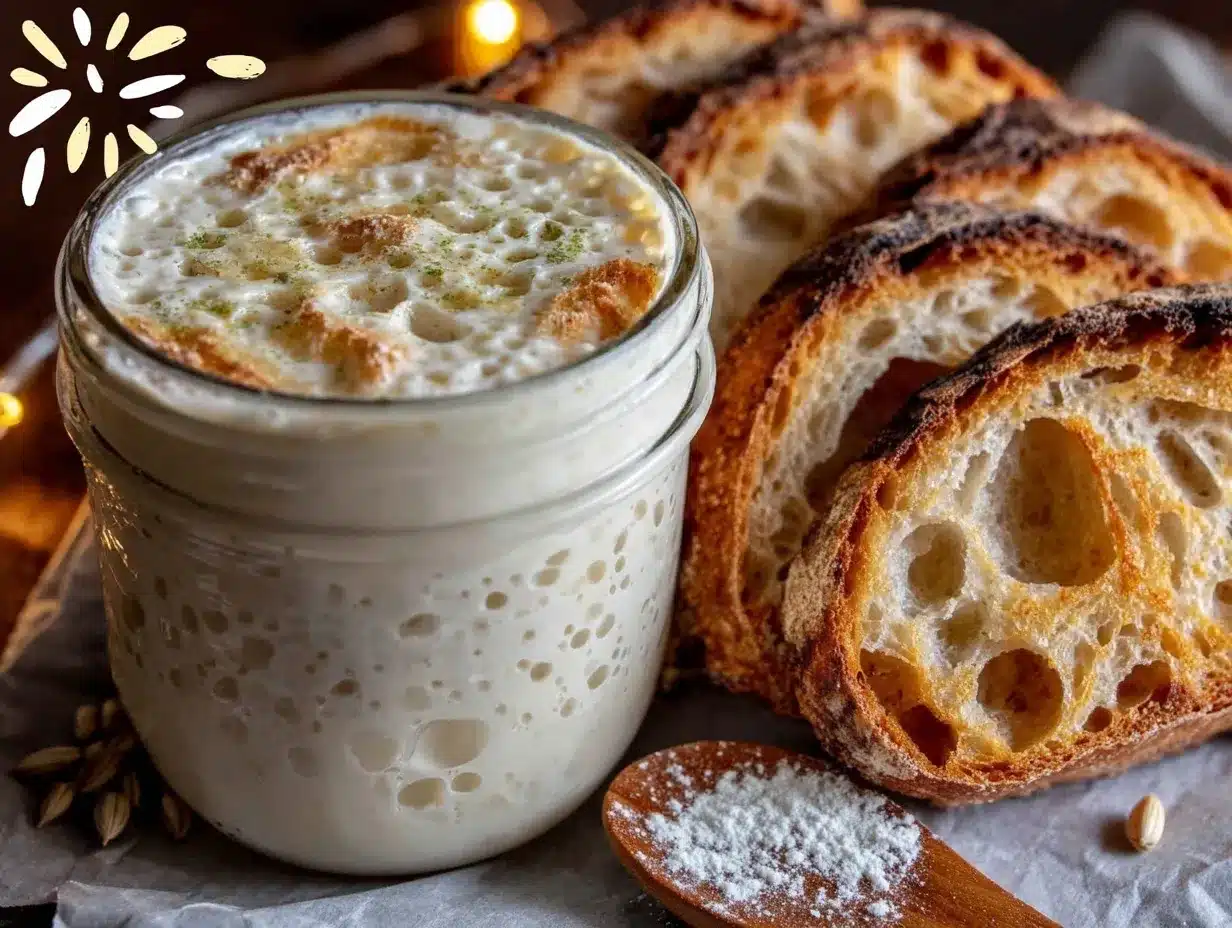
- Medium Glass or Ceramic Jar (Quart-Size): Clear jars (like a mason jar or old pickle jar) let you see all the bubbly action. Avoid metal (it can react with the acid) and plastic (can absorb odors).
- Loose Lid or Tea Towel: You want your starter to breathe, but not dry out. I use a clean tea towel or a jar lid screwed on loosely. Coffee filters or paper towels work in a pinch.
- Rubber Band or Masking Tape: Mark the level of your starter after feeding. It’s satisfying to watch it grow, and helps you see when it’s doubled.
- Spoon or Chopstick: For stirring. I use a wooden spoon, but anything non-reactive is fine.
If you’re on a budget, reuse an old jam jar and a bread tie. I’ve tried just about every container (even an old yogurt tub—no shame), and they all work. Just keep things clean: rinse your jar with hot water between feedings if it gets crusty or smelly. That’s it. No fancy gadgets required, and you’ll feel like a real artisan with flour on your hands.
How to Make a Homemade Sourdough Bread Starter from Scratch
-
Day 1: Mix the Magic
- Mix 50g (1/2 cup) unbleached all-purpose flour and 50g (1/4 cup) filtered water in your clean jar. If you have whole wheat or rye, use half and half for extra wild yeast.
- Stir until you have a thick, smooth paste—no dry flour clumps.
- Scrape down the sides, cover loosely with a tea towel or lid, and mark the level with a rubber band.
- Let sit at room temperature (68–75°F/20–24°C) for 24 hours.
Personal note: It’ll look sleepy at first—don’t worry. You might see a few bubbles, or not. Be patient!
-
Day 2: Feed and Wait
- Check for tiny bubbles or a faint tangy smell. If you see nothing, that’s normal.
- Remove and discard half the starter (about 50g). Replace with 50g flour and 50g water.
- Stir well, scrape down sides, cover, and let rest for another 24 hours.
Troubleshooting: If your starter looks dry, add a bit more water. If it smells off (like rotten eggs), start over with fresh flour and water.
-
Day 3: Bubbles Appear
- You should see bubbles and a slightly sour aroma. The starter may look a bit stretchy or sticky.
- Repeat the discard and feeding: Remove half, add 50g flour and 50g water, stir, cover, rest 24 hours.
Sensory cue: It should smell pleasantly tangy, not harsh. If it’s flat, try moving to a warmer spot (top of fridge works wonders!).
-
Days 4–6: Strengthen the Starter
- Continue the discard and feed process every 24 hours.
- If it’s rising and falling predictably, you can feed twice daily (every 12 hours) for a stronger starter.
- By Day 5 or 6, your starter should double in size within 6–8 hours after feeding.
Tip: If your kitchen is cool, wrap the jar in a kitchen towel or set near a warm appliance.
-
Day 7: Ready to Bake!
- Your starter is bubbly, smells tangy but not sharp, and doubles in size after a feeding—congratulations, it’s ready!
- For best results, feed one more time, wait 4–6 hours, then use in your favorite artisan sourdough bread recipe.
Personal tip: I like to do the “float test”—drop a spoonful in water. If it floats, you’re good to go.
Notes:
- If you miss a feeding by a few hours, don’t panic—just pick up where you left off.
- If you see a dark liquid on top (hooch), stir it back in or pour it off and feed again.
- Your starter will get stronger with each feeding and loaf you bake. It’s a living thing—sometimes a little unpredictable, but always forgiving.
Cooking Tips & Techniques for Sourdough Starter Success
Baking with a homemade sourdough bread starter is as much art as science. Here are tips and tricks I’ve picked up from many flour-dusted mornings and a few (okay, more than a few) failed loaves:
- Keep It Warm—but Not Hot: Starters love a cozy environment. If your kitchen’s chilly, tuck your jar in the oven with just the light on or set it on top of the fridge. I once put mine next to a sunny window and it turned into a bubbling volcano (lesson learned!).
- Feed Consistently: Try to feed at the same time each day. If you forget, don’t stress—just feed it as soon as you remember.
- Use a Kitchen Scale: Precision matters for ratios. I used to eyeball it, and my starter was all over the place. A scale = reliable rises.
- Don’t Overfeed: If your starter looks weak, feed less often. Overfeeding can dilute the yeast. I once fed mine three times a day—my poor starter was exhausted!
- Hydration Matters: If your starter is too thick, add a splash more water. If it’s soupy, add a spoonful of flour. The goal is a thick, pancake batter consistency.
- Don’t Worry About Smell (At First): New starters smell strong! That sharp, cheesy, or even nail polish scent mellows out in a few days. If it smells truly rotten, start over.
- Be Patient: Some starters take a week to mature; others take 10 days. Wild yeast is unpredictable, but worth the wait.
Biggest mistake? Using bleached flour. My first starter went nowhere. Once I switched to unbleached, things took off. And if you ever find a layer of hooch (that grayish liquid) on top, just stir it in or pour off. It’s not harmful—just your starter saying, “Feed me!”
Honestly, your best tool is your nose and your eyes. If it smells pleasantly sour and is full of bubbles, you’re on the right track. And if it flops? Try again. Sourdough is forgiving, and you’ll learn something new every batch.
Variations & Adaptations for Your Sourdough Starter
One thing I love about a homemade sourdough bread starter is how flexible it can be. You can tweak it for flavor, dietary needs, or just to suit what’s in your pantry. Here are some ideas:
- Whole Wheat Starter: Use 100% whole wheat flour. This brings a stronger, nuttier flavor, and the wild yeast activity is usually a bit faster. Great for hearty, rustic loaves.
- Rye Flour Starter: Rye flour is packed with wild yeast and nutrients—perfect for a super-active starter and breads with a mild tang. I love this version for Scandinavian-style loaves.
- Gluten-Free Starter: Use a 1:1 gluten-free baking mix (preferably with brown rice or sorghum for best fermentation). This works for gluten-sensitive folks, but the rise is gentler, so expect a slightly denser loaf.
- Seasonal Add-Ins: In summer, I throw in a few organic grapes (skin on) or a teaspoon of local honey to jumpstart fermentation. Remove the grapes after two days—they’re just a wild yeast booster!
- Allergy Adaptations: For wheat allergies (not celiac), spelt or einkorn flour can work, though the starter may need more frequent feedings.
Personal favorite? I sometimes keep two jars: one with rye for dark, tangy bread, and one with all-purpose for classic country loaves. You can even split your starter and experiment—half the fun is seeing how the flavors and textures change. Just remember, switching flours will change your starter’s personality, but it’ll still make delicious bread.
Serving & Storage Suggestions for Your Sourdough Bread Starter
Once your homemade sourdough bread starter is bubbly and strong, here’s how to keep it happy and use it well:
- Serving: Use your starter at its peak—about 4–8 hours after feeding, when it’s doubled and full of bubbles. That’s when it’ll give your bread the best rise and flavor.
- Presentation: Nothing beats a rustic, flour-dusted loaf sliced up with butter. I love serving thick slices with soup, or toasted with jam for breakfast.
- Storage (Short-Term): If baking daily, keep your starter at room temperature and feed every 24 hours.
- Storage (Long-Term): For less frequent baking, store in the fridge. Feed once a week—just let it warm up, feed, and let it get bubbly before using.
- Freezing: You can freeze a small amount (50g) in an airtight container for up to 3 months. Thaw, feed, and revive for a couple feedings before baking.
- Reheating Bread: If your loaf gets a little stale, sprinkle with water and warm in a 350°F (175°C) oven for 10 minutes. The crust will crisp right up!
- Flavor Development: Sourdough flavor deepens as the starter matures. Old starter makes tangier bread, and a young starter gives a milder flavor.
Honestly, nothing brings a table together like a slice of fresh, homemade sourdough. Leftovers? Makes killer croutons or French toast—if you have any left!
Nutritional Information & Benefits
Here’s the scoop on your homemade sourdough bread starter:
- Calories (per tablespoon): About 30 kcal
- Carbohydrates: 6g
- Protein: 1g
- Fat: 0g
- Fiber: 0.5g
- Sodium: 0mg
The best part? Sourdough is easier to digest than regular bread, thanks to the wild yeast and bacteria breaking down gluten and phytic acid. That’s good news for folks with mild gluten sensitivities (not celiac, though). Plus, you’re skipping commercial additives and preservatives. Allergens? It’s wheat-based, but you can make gluten-free versions if needed. As someone who cares about gut health, I find sourdough gentler and more satisfying than store-bought bread. It’s real food, made with love—and you can taste the difference.
Conclusion
So, why try this homemade sourdough bread starter from scratch? It’s simple, forgiving, and turns two humble ingredients into the kind of artisan loaves you’d pay a small fortune for at a bakery. Whether you’re just starting your sourdough adventure, or you’ve been baking for years, this starter becomes part of your kitchen family—a little wild, a little unpredictable, but always worth it.
Don’t be afraid to experiment—change up the flour, use what you have, and make it your own. Honestly, that’s the beauty of sourdough: it grows and changes with you. I love this recipe for how it brings people together, one loaf at a time. Give it a try, and let me know how your starter grows! Share your photos, your fails, your “aha!” moments in the comments. If you have tips or wild starter stories, I want to hear them!
Here’s to flour on your hands, warm bread on your table, and the joy of homemade sourdough. You’ve got this!
Frequently Asked Questions
How do I know if my sourdough starter is ready to use?
Your starter is ready when it doubles in size 4–8 hours after feeding, is full of bubbles, and passes the float test (a spoonful floats in water). It should smell pleasantly tangy—not harsh or rotten.
What should I do if my starter develops a dark liquid on top?
That’s just “hooch,” a harmless sign your starter is hungry. Pour it off or stir it back in, then feed your starter as usual.
Can I use whole wheat or rye flour for the entire process?
Absolutely! Whole wheat and rye are great for strong, bubbly starters. They add flavor and help capture wild yeast. You can switch to all-purpose flour at any time if you want a milder flavor.
How do I maintain my starter if I’m not baking every day?
Store your starter in the refrigerator and feed it once a week. Before baking, bring it to room temperature, feed, and let it get bubbly and active (usually 4–8 hours).
Is it safe to use a starter that smells very sour?
A strong, tangy smell is normal and safe. If it smells like rotten eggs or mold, discard it and start over. Healthy starters smell yeasty, fruity, or like vinegar.
Pin This Recipe!
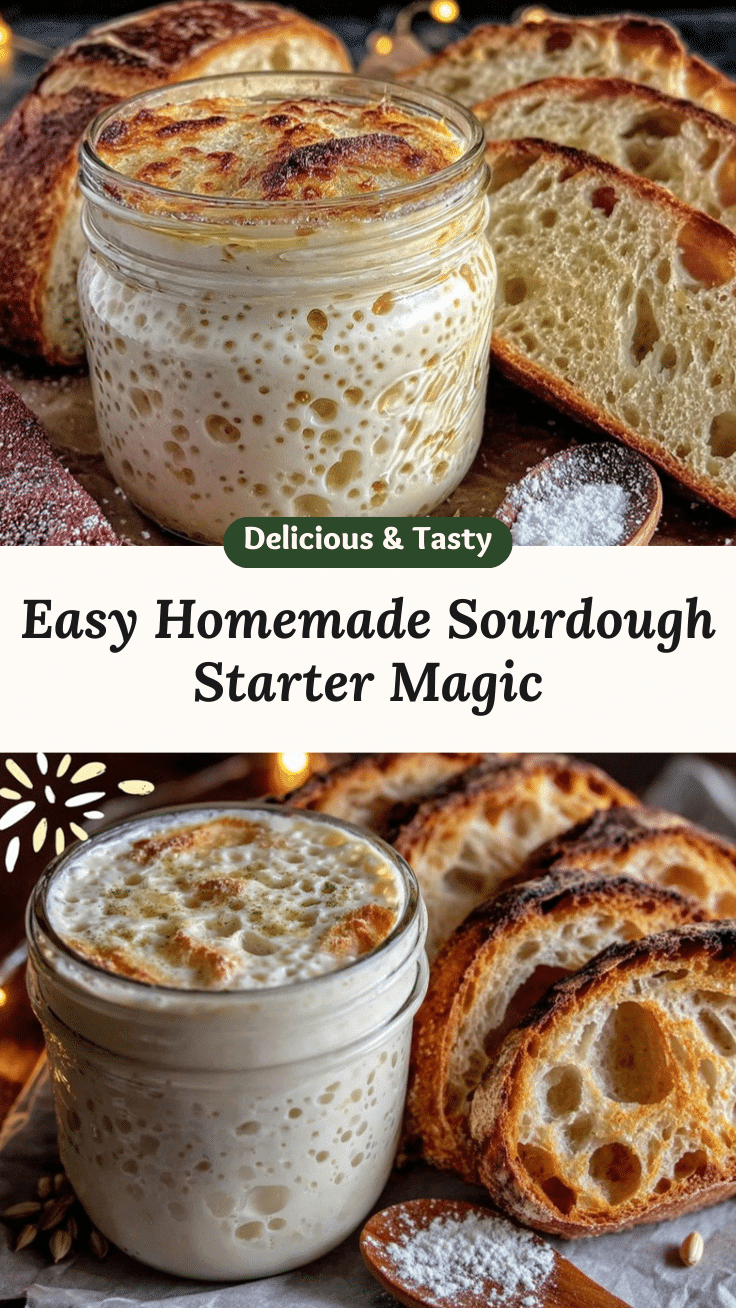
Homemade Sourdough Bread Starter: Easy Step-by-Step Guide for Perfect Artisan Loaves

This homemade sourdough bread starter uses just flour and water to create a bubbly, tangy base for artisan loaves. With simple ingredients and a forgiving method, you’ll have a reliable starter for delicious, bakery-style bread.
- Prep Time: 5 minutes per day
- Cook Time: 0 minutes
- Total Time: 7 days
- Yield: 1 jar of starter (enough for multiple loaves) 1x
- Category: Bread
- Cuisine: American, European
Ingredients
- 50g (1/2 cup) unbleached all-purpose flour (King Arthur or Bob’s Red Mill recommended)
- 50g (1/2 cup) filtered or spring water
- Optional: 25-50g (about 1/4 cup) whole wheat or rye flour for Day 1
- Optional: 1 teaspoon local honey or a few organic grapes (for jumpstarting fermentation)
- Optional: 1:1 gluten-free flour blend (for gluten-free adaptation)
Instructions
- Day 1: Mix 50g (1/2 cup) unbleached all-purpose flour and 50g (1/4 cup) filtered water in a clean glass or ceramic jar. Optionally, use half whole wheat or rye flour for extra wild yeast. Stir until smooth, scrape down sides, cover loosely, and mark the level. Let sit at room temperature (68–75°F) for 24 hours.
- Day 2: Check for bubbles or a tangy smell. Discard half the starter (about 50g), then add 50g flour and 50g water. Stir, cover, and let rest for another 24 hours.
- Day 3: Look for bubbles and a slightly sour aroma. Repeat the discard and feeding: remove half, add 50g flour and 50g water, stir, cover, and rest 24 hours.
- Days 4–6: Continue the discard and feed process every 24 hours. If rising and falling predictably, feed twice daily for a stronger starter. By Day 5 or 6, the starter should double in size within 6–8 hours after feeding.
- Day 7: Starter should be bubbly, tangy, and double in size after feeding. Feed one more time, wait 4–6 hours, then use in your favorite sourdough bread recipe. Optional: Do the float test (drop a spoonful in water—if it floats, it’s ready).
- Maintenance: If baking daily, keep at room temperature and feed every 24 hours. For less frequent baking, store in the fridge and feed once a week.
Notes
Use unbleached flour for best results. If you miss a feeding, just resume as normal. If a dark liquid (hooch) forms, stir it in or pour off and feed. Starter gets stronger with each feeding. For gluten-free, use a blend with whole grains. Room temperature between 68°F and 75°F is ideal. Starter can be frozen for up to 3 months.
Nutrition
- Serving Size: 1 tablespoon (for nu
- Calories: 30
- Carbohydrates: 6
- Fiber: 0.5
- Protein: 1
Keywords: sourdough starter, homemade bread, artisan bread, wild yeast, fermentation, easy sourdough, bread baking, starter recipe, gluten-free sourdough, whole wheat starter