“I never thought a random Tuesday night could turn into a fiesta until my neighbor, Jorge, started unloading bags of chips and toppings from his car. I was fixing the leaky faucet at the time, tools in one hand, curiosity in the other. Jorge wasn’t exactly the guy you’d expect to throw together something spectacular in the kitchen—he’s a quiet guy, more into fixing things than cooking. But that evening, as the sizzle of seasoned beef filled the air and the aroma of homemade cheese sauce wafted through the hallway, I knew I was in for a treat.”
It was the first time I experienced a nacho bar done right, complete with a rich, creamy cheese sauce that wasn’t the usual processed stuff out of a can. Honestly, I wasn’t prepared. The bowl I grabbed for chips cracked under the weight of all the toppings, laughter erupted, and I got a bit messy. Maybe you’ve been there—trying to balance a plate piled high while catching up with friends. That night stuck with me, not just because of the flavors but the way simple ingredients brought everyone together.
Since then, I’ve recreated my own version of this flavorful loaded nacho bar with homemade cheese sauce. It’s become my go-to for game nights, casual get-togethers, or those evenings when you just want something easy but unforgettable. Let me tell you, this isn’t your average nacho spread—it’s the kind that makes you close your eyes after the first bite and keep coming back for more.
Why You’ll Love This Recipe
- Quick & Easy: Comes together in under 30 minutes, perfect for spontaneous gatherings or last-minute cravings.
- Simple Ingredients: No need for specialty stores; most items are pantry staples or easy to find at any grocery store.
- Perfect for Parties: Great for game days, casual dinners, or potlucks where everyone can customize their plate.
- Crowd-Pleaser: Kids and adults alike rave about the balance of flavors and textures—crispy chips, spicy meat, creamy cheese, and fresh toppings.
- Unbelievably Delicious: The homemade cheese sauce takes this nacho bar to the next level—smooth, velvety, and bursting with flavor.
This recipe stands out because of that homemade cheese sauce, which I tweak with a hint of smoked paprika and a splash of lime juice to give it a subtle kick and brightness. Unlike the usual store-bought sauces, this one feels fresh and rich without being overpowering. Plus, layering in seasoned beef, black beans, and colorful veggies adds depth and keeps every bite exciting. Honestly, once you try this, you might never go back to pre-packaged nacho kits.
Whether you want to impress friends without breaking a sweat or just treat yourself to a satisfying meal, this flavorful loaded nacho bar has your back. It’s comfort food with personality, and I can’t wait for you to try it out.
What Ingredients You Will Need
This flavorful loaded nacho bar relies on straightforward, wholesome ingredients that come together to create bold taste and satisfying textures. Most of these are pantry staples, making it easy to whip up anytime you have a craving.
- For the Nachos:
- Tortilla chips (choose sturdy, thick-cut ones for best crunch)
- Ground beef (85% lean recommended for juicy texture)
- Black beans, rinsed and drained (adds protein and fiber)
- Red onion, finely diced (for a sharp crunch)
- Jalapeños, sliced (fresh or pickled, adjust to your heat preference)
- Cherry tomatoes, halved (adds a juicy, fresh pop)
- Fresh cilantro, chopped (for that bright, herbal note)
- Avocado, sliced or diced (optional but highly recommended for creaminess)
- Green onions, sliced (for a mild onion flavor)
- Sour cream or Greek yogurt (for cooling contrast)
- For the Homemade Cheese Sauce:
- Unsalted butter (2 tablespoons, adds richness)
- All-purpose flour (2 tablespoons, to create the roux)
- Whole milk (1 ½ cups / 360 ml, for smooth texture)
- Sharp cheddar cheese, shredded (1 ½ cups / 170 g, use a quality brand like Cabot for best melt)
- Monterey Jack cheese, shredded (½ cup / 55 g, melts beautifully and balances sharpness)
- Smoked paprika (½ teaspoon, adds smoky depth)
- Garlic powder (¼ teaspoon)
- Ground cumin (¼ teaspoon, warms up the flavor)
- Lime juice (1 teaspoon, brightens and balances the richness)
- Salt and black pepper to taste
For substitutions, feel free to swap the ground beef for ground turkey or plant-based meat if you prefer. You can replace black beans with pinto beans or skip them entirely. For dairy-free options, use a plant-based milk (unsweetened almond or oat milk works well) and a vegan cheese alternative, though the texture might be slightly different.
Equipment Needed
- Large skillet or frying pan (preferably non-stick for easy cooking and cleanup)
- Medium saucepan (for making the cheese sauce)
- Whisk (important for smooth sauce with no lumps)
- Sharp knife and cutting board (for chopping veggies and slicing jalapeños)
- Measuring cups and spoons (for precise ingredient ratios)
- Serving platters or trays (to set up your nacho bar spread)
- Optional: Slow cooker (if you want to keep toppings warm during a party)
Personally, I like using a heavy-bottomed pan for the cheese sauce—it distributes heat evenly and prevents scorching, which is a lifesaver. If you don’t have a whisk, a fork can work in a pinch, but lumps might sneak in. Budget-friendly silicon spatulas are great for stirring the sauce and scraping every bit from the pan. For the nacho bar itself, having separate bowls for each topping helps guests customize easily and keeps things neat.
Preparation Method
- Prepare the seasoned beef (about 15 minutes): Heat 1 tablespoon of oil in a large skillet over medium-high heat. Add 1 pound (450 g) of ground beef and cook, breaking it apart with a spatula. When beef starts to brown, sprinkle 1 teaspoon chili powder, ½ teaspoon cumin, ¼ teaspoon garlic powder, and salt and pepper to taste. Stir well and cook until beef is fully browned and slightly crispy on edges (about 7-8 minutes). Drain excess fat if needed and set aside.
- Make the homemade cheese sauce (about 10 minutes): In a medium saucepan, melt 2 tablespoons unsalted butter over medium heat. Once melted, whisk in 2 tablespoons all-purpose flour and cook for 1-2 minutes to form a roux—this removes the raw flour taste. Gradually whisk in 1 ½ cups (360 ml) whole milk, stirring constantly to avoid lumps. Keep whisking until the mixture thickens and bubbles gently (about 3-4 minutes).
- Add cheeses and seasonings: Lower heat to medium-low and stir in 1 ½ cups shredded sharp cheddar and ½ cup shredded Monterey Jack cheese, whisking until melted and smooth. Mix in ½ teaspoon smoked paprika, ¼ teaspoon garlic powder, ¼ teaspoon cumin, and 1 teaspoon lime juice. Taste and adjust salt and pepper as needed. If sauce is too thick, add a splash more milk to loosen.
- Prepare fresh toppings: While the beef cooks and sauce thickens, dice red onion, halve cherry tomatoes, slice jalapeños, chop cilantro, slice green onions, and dice avocado if using. Set everything in small bowls for easy access.
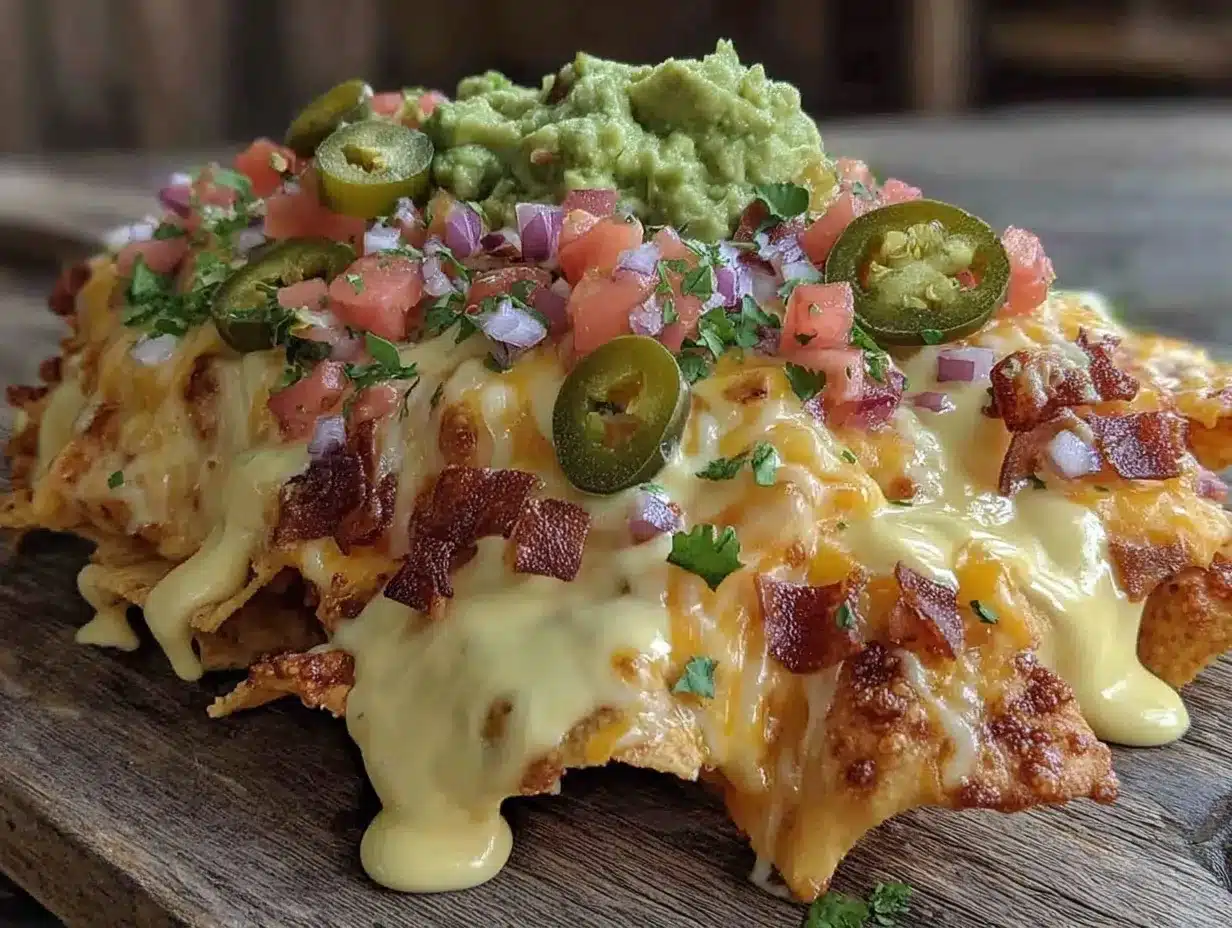
- Assemble the nacho bar: Spread tortilla chips on a large serving platter or individual plates. Evenly distribute seasoned beef and black beans over the chips. Drizzle generous amounts of warm cheese sauce on top. Scatter diced onions, tomatoes, jalapeños, green onions, and cilantro over everything. Add dollops of sour cream or Greek yogurt and avocado slices for creaminess.
- Final touches and serving: Serve immediately while the cheese sauce is warm and gooey. Encourage guests to pile on as much or as little as they like. Leftovers can be reheated gently in the oven or microwave, but chips may lose crispness.
Pro tip: If you want to speed things up, cook the beef while prepping toppings, but be mindful not to let the cheese sauce sit too long—it’s best fresh. And if your sauce looks grainy, a quick whisk with a splash of milk usually smooths it out. I once forgot the lime juice and the sauce tasted flat—adding that little acid note is key!
Cooking Tips & Techniques
Getting the cheese sauce just right is the heart of this recipe. Start by making a smooth roux—cooking the flour in butter long enough to lose that raw taste but not so long it browns. Patience is key here; rushing leads to lumps or a gummy texture.
When adding milk, pour slowly and whisk constantly. This keeps the sauce silky. I remember one time I dumped the milk all at once—hello, instant clumps! A simple fix is to strain or vigorously whisk with a handheld mixer, but better to avoid the mess.
Season the beef well but don’t overpower. The smoky paprika and cumin in the cheese sauce complement the beef’s seasoning, so keep it balanced. Also, choose sturdy tortilla chips; thin ones will get soggy fast, and that’s no fun.
Multitasking helps—prep toppings while the sauce thickens. That way, everything comes together hot and fresh. If making ahead, keep the cheese sauce warm in a double boiler or slow cooker on low; just stir occasionally to prevent skin.
Lastly, don’t be shy with fresh garnishes—they add brightness and texture contrast. I learned the hard way that skipping fresh cilantro leaves the dish feeling one-dimensional.
Variations & Adaptations
- Vegetarian option: Swap ground beef with crumbled tofu, tempeh, or extra beans. Season tofu with taco spices and sauté until crisp.
- Spicy twist: Add a dash of hot sauce to the cheese sauce or top with pickled jalapeños and a sprinkle of cayenne pepper for heat lovers.
- Seasonal veggies: In summer, add grilled corn kernels or diced bell peppers to the toppings for a sweet crunch.
- Gluten-free: Use certified gluten-free tortilla chips and ensure your flour substitute for the roux is gluten-free (like rice flour or cornstarch).
- Personal favorite: I once mixed in a spoonful of chipotle in adobo sauce into the cheese for a smoky, slightly spicy note that blew everyone away.
These variations make the recipe flexible without losing that comforting vibe. Feel free to experiment with toppings and spice levels to suit your crowd’s tastes.
Serving & Storage Suggestions
Serve this loaded nacho bar immediately for maximum crunch and melty cheese goodness. If you’re hosting, set up toppings in separate bowls so everyone can customize their plate just how they like.
Pair with cold drinks like margaritas, iced tea, or a crisp lager to balance the richness. Fresh salsa or guacamole on the side complements the flavors beautifully.
Leftovers can be stored in an airtight container in the refrigerator for up to 2 days. Reheat the cheese sauce gently on the stove, then drizzle over reheated beef and chips in the oven at 350°F (175°C) for about 5-7 minutes to bring back some crispness.
Keep in mind, chips do soften over time, so for best texture, enjoy fresh. Interestingly, flavors meld and deepen if you let the assembled nachos rest briefly before serving—just not too long!
Nutritional Information & Benefits
This flavorful loaded nacho bar offers a balanced mix of protein, fiber, and satisfying fats. The ground beef provides essential iron and B vitamins, while black beans add plant-based protein and fiber, helping you stay fuller longer.
The homemade cheese sauce, made with real cheese and milk, offers calcium and vitamin D, important for bone health. Using fresh vegetables boosts the vitamin and antioxidant content, particularly from tomatoes and jalapeños.
For dietary considerations, this recipe can be easily adapted to gluten-free and vegetarian diets without losing its hearty appeal. It’s a treat that balances indulgence with wholesome ingredients, making it a great choice for casual meals that still feel nourishing.
Conclusion
This flavorful loaded nacho bar with easy homemade cheese sauce recipe is one of those dishes that makes entertaining a breeze and eating a joy. You get the perfect combo of textures and tastes that bring everyone to the table—crisp chips, savory beef, creamy cheese, and fresh, zesty toppings.
Don’t hesitate to tweak the toppings or spice levels to fit your mood or guest preferences. I love how this recipe adapts to whatever I have on hand, yet never feels like a compromise. Honestly, it’s become a staple in my recipe box for nights when I want something fuss-free but memorable.
Give it a try, share it with friends, and tell me how you made it your own. Your comments and creative twists are what make this journey so much fun. So grab that skillet, crank up your favorite playlist, and get ready to impress with this crowd-pleasing nacho bar. Happy munching!
FAQs
Can I make the homemade cheese sauce ahead of time?
Yes! You can prepare the cheese sauce up to a day in advance. Store it in an airtight container in the fridge and gently reheat it on the stove with a splash of milk to restore creaminess.
What’s the best way to keep the tortilla chips crispy?
Serve chips fresh and add toppings just before eating. Avoid covering them too long with wet ingredients. If prepping ahead, keep chips separate and let guests assemble their own plates.
Can I use shredded pre-packaged cheese for the sauce?
Absolutely, but I recommend shredding block cheese yourself when possible—it melts better and avoids additives that can affect texture.
How spicy is this recipe? Can I adjust the heat?
The heat level is mild by default but can be increased by adding more jalapeños, hot sauce, or cayenne pepper, depending on your preference.
Is this recipe suitable for kids?
Definitely! You can keep toppings mild and let kids customize their nachos. The cheese sauce is creamy and mild, making it kid-friendly.
Pin This Recipe!

Flavorful Loaded Nacho Bar with Easy Homemade Cheese Sauce

A quick and easy loaded nacho bar featuring seasoned beef, black beans, fresh toppings, and a rich homemade cheese sauce that elevates the classic nacho experience. Perfect for game nights, casual get-togethers, or any occasion that calls for a crowd-pleasing, customizable meal.
- Prep Time: 15 minutes
- Cook Time: 15 minutes
- Total Time: 30 minutes
- Yield: 6 servings 1x
- Category: Main Course
- Cuisine: Mexican
Ingredients
- Tortilla chips (choose sturdy, thick-cut ones for best crunch)
- 1 pound ground beef (85% lean recommended)
- 1 cup black beans, rinsed and drained
- 1/2 cup red onion, finely diced
- 1/4 cup jalapeños, sliced (fresh or pickled, adjust to heat preference)
- 1/2 cup cherry tomatoes, halved
- 1/4 cup fresh cilantro, chopped
- 1/2 avocado, sliced or diced (optional)
- 1/4 cup green onions, sliced
- Sour cream or Greek yogurt (for serving)
- 2 tablespoons unsalted butter
- 2 tablespoons all-purpose flour
- 1 1/2 cups whole milk
- 1 1/2 cups sharp cheddar cheese, shredded
- 1/2 cup Monterey Jack cheese, shredded
- 1/2 teaspoon smoked paprika
- 1/4 teaspoon garlic powder
- 1/4 teaspoon ground cumin
- 1 teaspoon lime juice
- Salt and black pepper to taste
- 1 teaspoon chili powder
- 1/2 teaspoon cumin (for beef seasoning)
- 1/4 teaspoon garlic powder (for beef seasoning)
- 1 tablespoon oil (for cooking beef)
Instructions
- Heat 1 tablespoon of oil in a large skillet over medium-high heat. Add ground beef and cook, breaking it apart with a spatula.
- When beef starts to brown, sprinkle chili powder, cumin, garlic powder, salt, and pepper. Stir well and cook until beef is fully browned and slightly crispy on edges (about 7-8 minutes). Drain excess fat and set aside.
- In a medium saucepan, melt butter over medium heat. Whisk in flour and cook for 1-2 minutes to form a roux.
- Gradually whisk in whole milk, stirring constantly to avoid lumps. Continue whisking until mixture thickens and bubbles gently (about 3-4 minutes).
- Lower heat to medium-low and stir in shredded cheddar and Monterey Jack cheeses until melted and smooth.
- Mix in smoked paprika, garlic powder, cumin, and lime juice. Taste and adjust salt and pepper as needed. Add more milk if sauce is too thick.
- Prepare fresh toppings: dice red onion, halve cherry tomatoes, slice jalapeños, chop cilantro, slice green onions, and dice avocado if using. Set in small bowls.
- Spread tortilla chips on a large serving platter or individual plates. Evenly distribute seasoned beef and black beans over the chips.
- Drizzle warm cheese sauce generously over the chips and toppings.
- Scatter diced onions, tomatoes, jalapeños, green onions, and cilantro over everything.
- Add dollops of sour cream or Greek yogurt and avocado slices for creaminess.
- Serve immediately while cheese sauce is warm and gooey. Encourage guests to customize their plates.
Notes
Use sturdy, thick-cut tortilla chips to prevent sogginess. Whisk milk in gradually to avoid lumps in cheese sauce. Cheese sauce can be made ahead and reheated with a splash of milk. For vegetarian option, substitute ground beef with crumbled tofu or tempeh. For gluten-free, use certified gluten-free chips and substitute flour with rice flour or cornstarch.
Nutrition
- Serving Size: Approximately 1/6th
- Calories: 520
- Sugar: 5
- Sodium: 720
- Fat: 32
- Saturated Fat: 18
- Carbohydrates: 32
- Fiber: 6
- Protein: 28
Keywords: nachos, loaded nachos, cheese sauce, homemade cheese sauce, game day recipe, party food, easy nachos, ground beef nachos, vegetarian option, gluten-free option