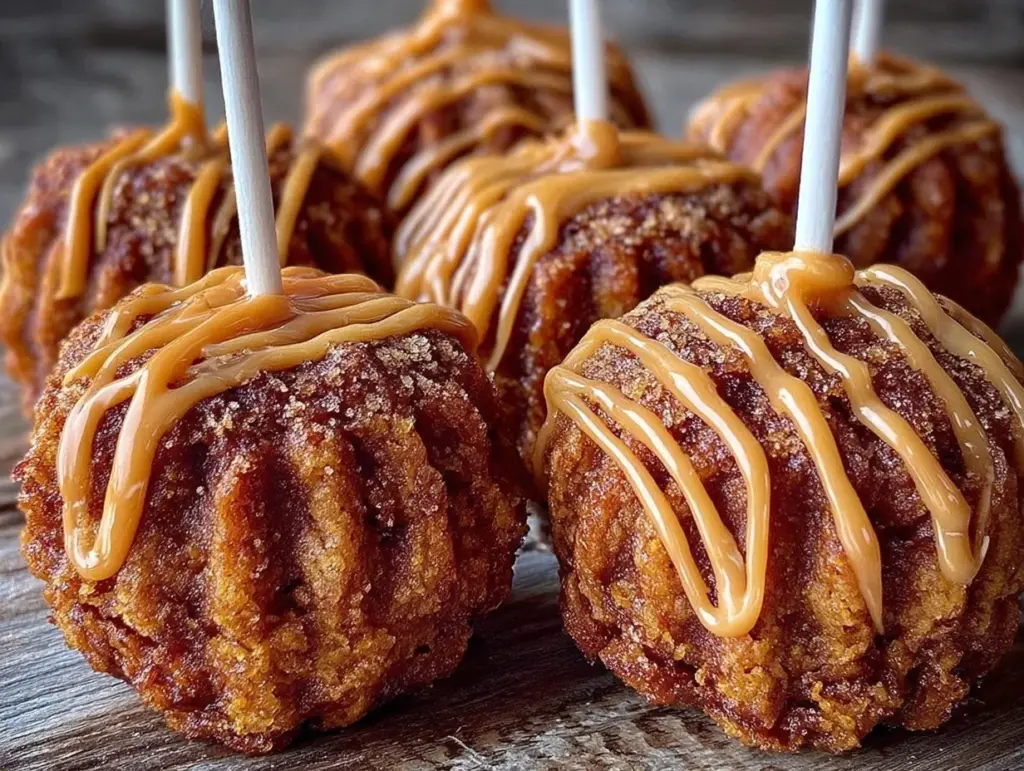
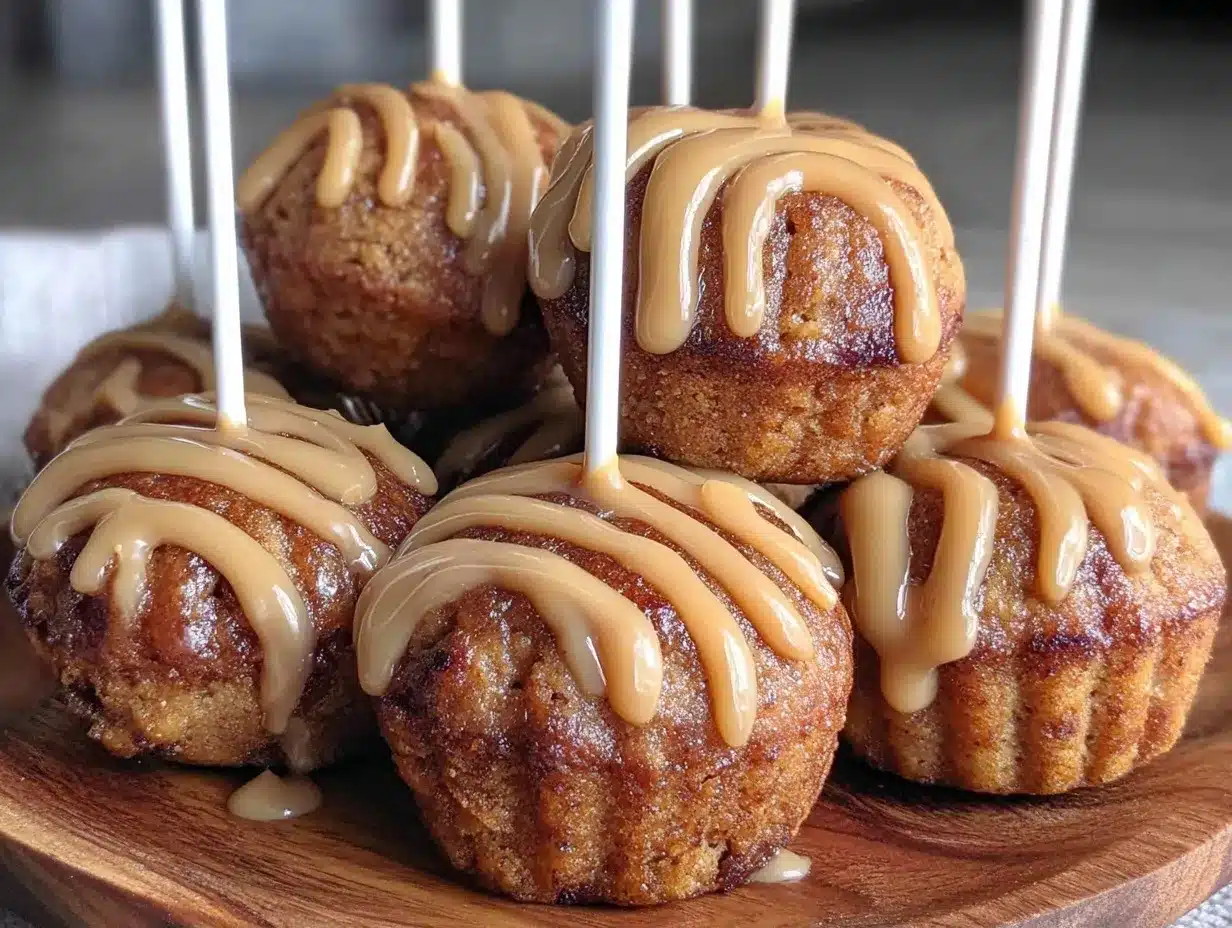
Let me paint you a picture: the kitchen fills with the cozy scent of cinnamon and nutmeg, swirling around hints of buttery pastry as the oven works its magic. You glance at the tray—golden, crispy mini pumpkin pie pops with their little lollipop sticks, lined up like edible works of art. The first time I made these, it was a chilly October morning (the leaves were just starting to crunch underfoot) and I was determined to find a new twist on pumpkin pie for Thanksgiving. Honestly, the moment I pulled the tray out and saw those perfect, hand-held pies glistening, I paused. It was one of those “heart-skipping” moments, where you know you’ve stumbled onto something special—the kind of treat that’s as fun to eat as it is to make.
When I was knee-high to a grasshopper, my grandma used to bake classic pumpkin pies for the holidays. She’d let me help—well, mostly with licking the spatula. Fast forward a couple decades, and here I am, trying to impress my own kids (and, let’s face it, win the neighbor’s bake sale). The first batch of crispy mini pumpkin pie pops vanished before they even cooled, with sticky fingers and happy grins all around. I wish I’d discovered these years ago—they’re dangerously easy, portable, and bring pure, nostalgic comfort.
My family couldn’t stop sneaking them off the rack (I caught my husband trying to swipe a third one!), and friends have begged for the recipe after just one bite. These little pops are perfect for potlucks, classroom parties, Thanksgiving dessert tables, or just brightening up your Pinterest board with that perfect shot of autumn goodness. You know what? After testing this recipe more times than I’d like to admit (in the name of research, of course), it’s become a staple for holiday gatherings and edible gifting. Every bite feels like a warm hug, and I promise—you’re going to want to bookmark this one.
Why You’ll Love These Crispy Mini Pumpkin Pie Pops
There’s something about crispy mini pumpkin pie pops that makes them irresistible. I’ve spent years tinkering with pie crusts and fillings, and honestly, this one hits all the right notes. You don’t need to be a pastry chef to pull these off, but your friends might think you are!
- Quick & Easy: Ready in under 45 minutes, these are perfect for those busy holiday moments (or last-minute dessert emergencies).
- Simple Ingredients: Everything you need is probably sitting in your pantry—no special trips required.
- Perfect for Entertaining: These pops are a showstopper for Thanksgiving, Friendsgiving, classroom parties, or cozy fall gatherings.
- Crowd-Pleaser: Kids love the lollipop shape; adults can’t get enough of the crispy crust and creamy pumpkin filling.
- Unbelievably Delicious: The combo of flaky pastry and spiced pumpkin is pure comfort—think classic pumpkin pie, but with a fun, modern twist.
What sets this recipe apart is the genius use of store-bought pie dough (for speed and consistency), paired with my tried-and-true pumpkin filling. The pops bake up with a golden crunch that you just don’t get from regular pie slices. Plus, the little sticks make them easy to serve—no forks, no mess, just straight-up fall goodness. I’ve tested different crust brands, played with spice blends, and even experimented with gluten-free alternatives. This version is my absolute favorite: crispy on the outside, creamy inside, and just the right amount of sweetness.
These mini pumpkin pie pops aren’t just another Pinterest trend—they’re comfort food reimagined. They’re healthier than a slab of pie (smaller portions, baked not fried), but with all the soul-soothing satisfaction you crave. Perfect for impressing guests without the stress, or making a regular Tuesday feel like a holiday. Close your eyes after that first bite—you’ll see what I mean.
What Ingredients You Will Need
This recipe uses simple, wholesome ingredients to deliver bold flavor and satisfying texture without the fuss. Most are pantry staples, and there’s plenty of flexibility for substitutions if you need them.
- For the Pie Pops:
- 2 ready-to-use pie crusts (about 14 oz/400g; I usually go for Pillsbury or Trader Joe’s—perfect flakiness every time)
- 1 cup (240g) pure pumpkin puree (not pumpkin pie filling)
- 1/4 cup (50g) brown sugar (light or dark, adds a lovely caramel note)
- 1/2 teaspoon ground cinnamon
- 1/4 teaspoon ground nutmeg
- 1/8 teaspoon ground ginger
- 1/8 teaspoon ground cloves (optional, for extra depth)
- 1/4 teaspoon salt
- 1 large egg (for the filling)
- 1 teaspoon vanilla extract
- For Brushing & Topping:
- 1 large egg, beaten (for egg wash—makes the pops shiny and golden)
- 1 tablespoon granulated sugar (for sprinkling, optional)
- For the Assembly:
- 20-24 lollipop sticks (available at craft stores or online)
Ingredient Tips & Substitutions:
- If you need gluten-free, swap in a gluten-free pie dough (Wholly Wholesome makes a great one).
- For dairy-free, the filling is naturally dairy-free—just check your pie dough.
- If you love extra spice, bump up the cinnamon or add a pinch of cardamom.
- Don’t have lollipop sticks? Use wooden skewers or omit them for “hand pies.”
- Feel free to use homemade pie dough if you’re feeling ambitious (I usually save that for weekends, but it’s fantastic).
- Want it less sweet? Cut the sugar to 2 tablespoons, or use coconut sugar for a deeper flavor.
Honestly, I’ve tried plenty of brands and tweaks—these ingredients always come together for a foolproof result. You’ll be amazed how something so easy can taste so rich and festive!
Equipment Needed
- Baking sheet: A standard rimmed sheet works best; line it with parchment paper for easy cleanup.
- Rolling pin: For smoothing out the pie dough (if it’s a bit stiff from the fridge).
- 3-inch (8 cm) round cookie cutter: Or use a glass rim if that’s what you’ve got—I’ve done both.
- Mixing bowls: One medium for the filling, one small for the egg wash.
- Pastry brush: For brushing on that golden egg wash—if you don’t have one, a clean paintbrush or your fingers work in a pinch.
- Lollipop sticks: Standard cake pop sticks, found at most craft or baking stores.
- Fork: For sealing the edges (and making those cute crimped marks).
I’ve used everything from budget-friendly rolling pins to fancy French ones, and honestly, you don’t need anything fancy. If you’re missing a cookie cutter, a glass with a sharp edge does the trick. Just be sure to keep your baking sheet lined—these pops love to stick when the filling oozes out a little (happens to the best of us). Maintenance tip: pastry brushes wash up quick if you rinse immediately after use, so don’t let the egg wash dry!
Preparation Method
-
Prep the Pie Dough:
Let your pie crusts sit at room temperature for about 10 minutes (they’ll be easier to roll and less likely to crack). Lightly flour your work surface and gently roll out each crust to about 1/8-inch (3 mm) thickness. If the dough feels sticky, add a sprinkle of flour. Use your round cutter or glass to cut out as many circles as possible—aim for 40 to 48 rounds total.
-
Make the Pumpkin Filling:
In a medium bowl, combine 1 cup (240g) pumpkin puree, 1/4 cup (50g) brown sugar, 1/2 teaspoon cinnamon, 1/4 teaspoon nutmeg, 1/8 teaspoon ginger, 1/8 teaspoon cloves (if using), 1/4 teaspoon salt, 1 large egg, and 1 teaspoon vanilla. Whisk until smooth and creamy. The filling will smell spicy and sweet, and should be thick but spreadable—like soft cream cheese.
-
Assemble the Pie Pops:
Lay half the dough rounds on your parchment-lined baking sheet. Place a lollipop stick in the center of each, gently pressing it into the dough (leave about 1 inch/2.5 cm sticking out for easy grabbing). Spoon about 1 to 1 1/2 teaspoons of pumpkin filling onto each round, keeping it centered and away from the edges.
Top each with a second dough round, pressing gently to seal. Use a fork to crimp the edges all the way around—this not only seals the filling, but gives that classic pie look. If the edges don’t stick, use a dab of water or egg wash as “glue.”
-
Brush and Sprinkle:
Whisk 1 egg in a small bowl. Brush each pie pop with egg wash—the tops and the crimped edges. Sprinkle with a little granulated sugar for sparkle and crunch (optional but highly recommended!).
-
Bake to Golden Perfection:
Preheat your oven to 375°F (190°C). Bake the pops for 18-22 minutes, or until the crusts are golden and crisp, and the filling is set. Watch for bubbling filling—some might leak, but that’s part of the charm. Let cool on the sheet for 10 minutes before transferring to a rack. The aroma will be outrageous—try not to eat them all before serving!
Troubleshooting Tips: If your dough cracks, patch with a little extra dough. If the filling leaks, don’t panic—it’ll caramelize at the edges and taste amazing. If sticks fall out, just serve as hand pies. Efficiency tip: Prep all dough rounds and sticks before filling for the smoothest assembly.
Cooking Tips & Techniques
Over the years, I’ve learned a few tricks for making crispy mini pumpkin pie pops turn out perfectly every time. Here’s what works (and what doesn’t):
- Keep Dough Cold: If your kitchen is warm, pop the dough rounds in the fridge for 5 minutes before filling—this helps them hold their shape and bake up extra flaky.
- Don’t Overfill: I know, it’s tempting to pile on the pumpkin, but too much filling causes leaks. Stick to about 1 to 1.5 teaspoons per pop.
- Seal, Seal, Seal: Use a fork to crimp tightly and double-check the edges. If you see gaps, pinch them closed or patch with dough scraps.
- Bake on Middle Rack: Even heat is key—too close to the top and they’ll over-brown; too close to the bottom and the crust can get soggy.
- Egg Wash Matters: It’s the secret to that signature golden look and crisp texture. Don’t skip it!
Common mistakes? Skipping the egg wash (pops look dull), rushing the sealing step (filling leaks everywhere), or underbaking (dough stays pale and soft). I’ve made all those mistakes, and trust me, a little extra care goes a long way. Timing tip: assemble all pops, then brush and bake together for consistent results. Multitasking tip: prep the filling while the dough softens—makes everything flow smoother.
For consistency, I recommend using the same brand of pie dough each time—some brands bake up flakier than others. And don’t worry about the occasional leak or uneven pop; homemade means imperfectly perfect. These little pies always taste amazing, even when they look a bit rustic!
Variations & Adaptations
Crispy mini pumpkin pie pops are super flexible—here are some fun ways to make them your own:
- Gluten-Free: Use a store-bought gluten-free pie dough, or your favorite homemade blend. The filling is naturally gluten-free!
- Dairy-Free: Just check your pie dough package; most pumpkin fillings don’t need dairy. Substitute coconut oil for egg wash if needed.
- Seasonal Flavors: Swap pumpkin for sweet potato puree or butternut squash in the filling. Both taste delicious and add a twist on tradition.
- Spice It Up: Add a dash of cayenne or black pepper for a subtle heat, or stir in orange zest for a citrusy lift.
- Chocolate Drizzle: Once cooled, drizzle pops with melted dark chocolate for a fancy touch. My kids love this version!
- Hand Pie Option: Skip the sticks and just crimp the rounds as half-moon hand pies—great for lunchboxes or snacking.
I’ve tried all sorts of tweaks—my personal favorite is the orange zest addition. It gives the pumpkin filling a bright, unexpected twist that feels perfect for Thanksgiving. If you’re working around allergies, sunflower seed butter can replace egg in the filling for binding. For extra crunch, sprinkle turbinado sugar on top before baking. Try a few variations—you’ll be amazed how easily this recipe adapts to your needs!
Serving & Storage Suggestions
Serve crispy mini pumpkin pie pops slightly warm or at room temperature. They look adorable arranged in a mason jar or laid out on a wooden board—perfect for Pinterest photos and party tables. Pair with mugs of hot apple cider, pumpkin spice lattes, or a dollop of whipped cream on the side.
For storage, cool pops completely and place in an airtight container. They’ll stay fresh at room temperature for up to 2 days, or refrigerate for up to 5 days. If you want to freeze, wrap individually in plastic and freeze for up to a month; thaw at room temperature, then crisp in a 350°F (175°C) oven for 5 minutes to refresh.
Reheating tip: a quick zap in the microwave works, but the oven keeps the crust crispy. Honestly, the flavors get even cozier after a day or two, as the spices settle. These pops are perfect for make-ahead holiday prep or edible gifting—just wrap in cellophane and tie with a ribbon!
Nutritional Information & Benefits
Each mini pumpkin pie pop (based on 24 pops) is about 90 calories, 3g fat, 15g carbs, 1g protein, and 6g sugar. They’re lower in sugar than traditional pumpkin pie slices and portion-controlled for easy snacking.
Pumpkin puree is a powerhouse—packed with vitamin A, fiber, and antioxidants for eye and immune health. If you use coconut sugar, it adds minerals and a lower glycemic load. Most pops are nut-free and dairy-free (depending on dough), but always check labels for allergens like wheat and eggs.
From a wellness perspective, these pops let you indulge without going overboard. One or two is just enough to satisfy that holiday sweet tooth. Plus, pumpkin’s nutrients mean you’re sneaking something good into your celebration!
Conclusion
Crispy mini pumpkin pie pops are the kind of treat you’ll want to make again and again. They deliver all the cozy, spiced flavor of classic pumpkin pie—just in a fun, hand-held package that’s guaranteed to get smiles.
Customize them to suit your taste, swap out fillings, or try new shapes—there’s no wrong way to enjoy these. Personally, I love how easy they are to share with friends and family (and how they always disappear in record time). If you’re looking for a new Thanksgiving tradition, this is it.
Let me know how your pops turn out in the comments! Share your creative twists, tag me on social, or bring a batch to your next gathering. Wishing you a warm, delicious, and happy fall—these mini pies just might become your new favorite holiday treat!
Frequently Asked Questions
Can I use homemade pie dough for mini pumpkin pie pops?
Absolutely! Homemade pie dough gives even more flavor and flakiness. Just chill it well before rolling for best results.
How do I keep the filling from leaking out?
Don’t overfill, and make sure to crimp the edges tightly with a fork. If you see gaps, patch with a little extra dough or a dab of water.
Can I make these ahead of time?
Yes! You can assemble the pops and refrigerate them overnight before baking, or bake them in advance and store in an airtight container for up to 2 days.
Do I need to use lollipop sticks?
Nope, you can skip the sticks and bake them as mini hand pies. They’re just as delicious and even easier to store.
Can I freeze pumpkin pie pops?
Yes. Once baked and cooled, wrap individually and freeze for up to a month. Thaw and re-crisp in the oven before serving for best texture.
Pin This Recipe!
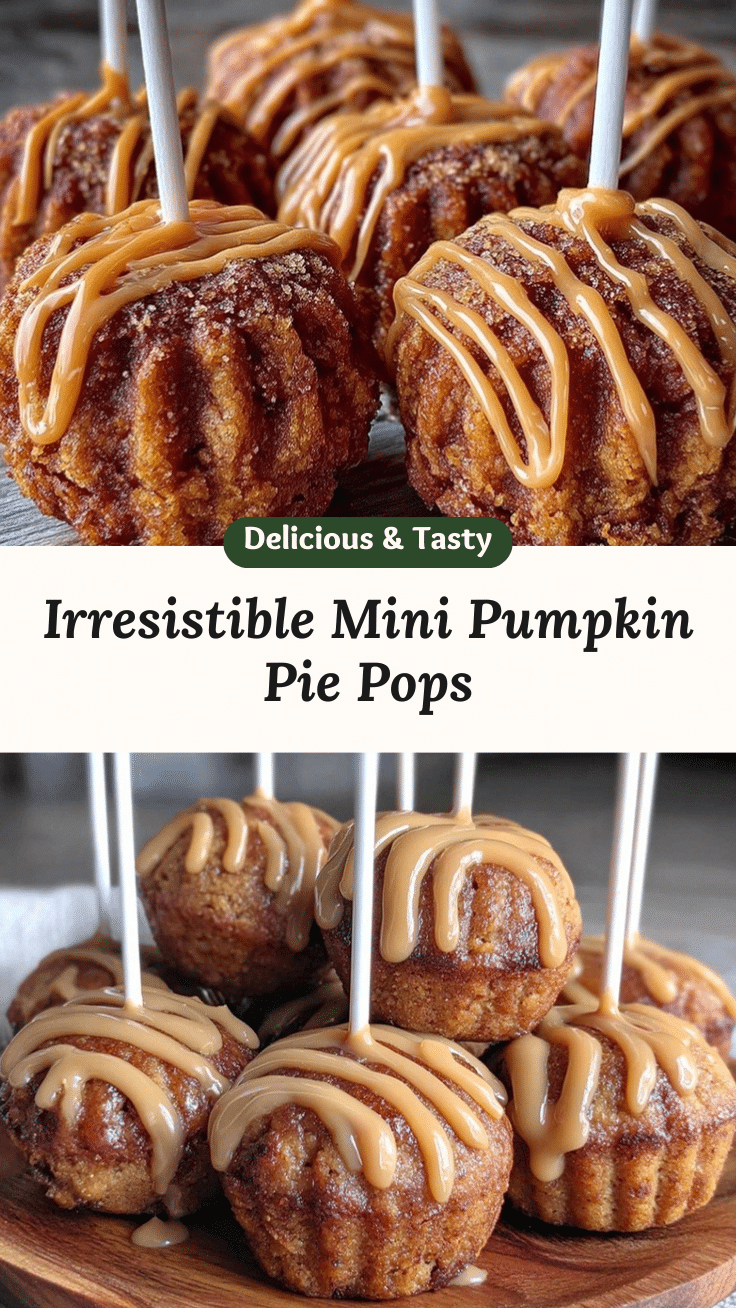
Crispy Mini Pumpkin Pie Pops

These hand-held pumpkin pie pops feature a crispy, golden crust and creamy spiced pumpkin filling, making them a fun and easy twist on classic pumpkin pie for Thanksgiving or fall gatherings. Perfect for parties, potlucks, and edible gifting, they’re ready in under 45 minutes and loved by kids and adults alike.
- Prep Time: 20 minutes
- Cook Time: 22 minutes
- Total Time: 42 minutes
- Yield: 20-24 pops 1x
- Category: Dessert
- Cuisine: American
Ingredients
- 2 ready-to-use pie crusts (about 14 oz)
- 1 cup pure pumpkin puree (not pumpkin pie filling)
- 1/4 cup brown sugar (light or dark)
- 1/2 teaspoon ground cinnamon
- 1/4 teaspoon ground nutmeg
- 1/8 teaspoon ground ginger
- 1/8 teaspoon ground cloves (optional)
- 1/4 teaspoon salt
- 1 large egg (for filling)
- 1 teaspoon vanilla extract
- 1 large egg, beaten (for egg wash)
- 1 tablespoon granulated sugar (for sprinkling, optional)
- 20–24 lollipop sticks
Instructions
- Let pie crusts sit at room temperature for about 10 minutes. Lightly flour your work surface and roll out each crust to about 1/8-inch thickness. Cut out 40 to 48 rounds using a 3-inch round cutter or glass.
- In a medium bowl, whisk together pumpkin puree, brown sugar, cinnamon, nutmeg, ginger, cloves (if using), salt, egg, and vanilla until smooth and creamy.
- Lay half the dough rounds on a parchment-lined baking sheet. Place a lollipop stick in the center of each, pressing gently into the dough. Spoon 1 to 1 1/2 teaspoons of pumpkin filling onto each round, keeping it centered.
- Top each with a second dough round, pressing gently to seal. Use a fork to crimp the edges all the way around. If needed, use water or egg wash to help seal.
- Whisk 1 egg in a small bowl. Brush each pie pop with egg wash on tops and edges. Sprinkle with granulated sugar if desired.
- Preheat oven to 375°F. Bake pops for 18-22 minutes, until crusts are golden and crisp and filling is set. Let cool on the sheet for 10 minutes before transferring to a rack.
Notes
Keep dough cold for flakiness. Don’t overfill to prevent leaks. Seal edges tightly with a fork. Pops can be made gluten-free or dairy-free with appropriate dough. For extra crunch, sprinkle turbinado sugar before baking. Pops can be made ahead and stored airtight for up to 2 days, or frozen for up to a month.
Nutrition
- Serving Size: 1 pie pop
- Calories: 90
- Sugar: 6
- Sodium: 80
- Fat: 3
- Saturated Fat: 1
- Carbohydrates: 15
- Fiber: 1
- Protein: 1
Keywords: pumpkin pie pops, mini pumpkin pies, Thanksgiving dessert, fall treats, hand pies, easy pumpkin pie, kid-friendly dessert, edible gifts