“You know that feeling when you’re craving something sweet but don’t want to spend hours in the kitchen?” Well, that was me last Saturday night. I’d just wrapped up a long day, and honestly, the thought of turning on the oven felt like climbing a mountain. Then, while chatting with my neighbor, Linda (who’s a wizard with desserts, by the way), she casually mentioned her secret for a creamy no-bake Oreo cheesecake delight. I was skeptical at first—I mean, no baking? Really? But curiosity got the best of me.
That evening, armed with a cracked mixing bowl and a half-empty tub of cream cheese, I decided to give it a shot. Of course, I forgot the vanilla extract on my first try and had to make a quick dash to the store (classic me). But when I finally took that first bite, the smooth, rich texture with chunks of Oreo cookies felt like a little party in my mouth. It wasn’t just dessert; it was comfort, nostalgia, and ease all rolled into one.
Maybe you’ve been there too, looking for a dessert that doesn’t require a bakery degree or a ton of time. This creamy no-bake Oreo cheesecake delight recipe has stuck with me ever since—not just because it tastes amazing but because it’s the kind of recipe you can pull off even when life’s chaos tries to win.
Why You’ll Love This Recipe
Honestly, this creamy no-bake Oreo cheesecake delight has become my go-to for parties and casual get-togethers. I’ve tested it multiple times, tweaking here and there, and it’s always a hit. Here’s why it might become your favorite too:
- Quick & Easy: Comes together in under 20 minutes, which is a lifesaver for busy evenings or last-minute invites.
- Simple Ingredients: You probably already have most of these in your pantry or fridge—no hunting for fancy stuff.
- Perfect for Parties: Whether it’s a birthday, potluck, or just a cozy night in, this dessert impresses without stress.
- Crowd-Pleaser: Kids and adults alike can’t get enough of the creamy texture with crunchy Oreo bites.
- Unbelievably Delicious: The balance of sweet creaminess and chocolate cookie bits is straight-up addictive.
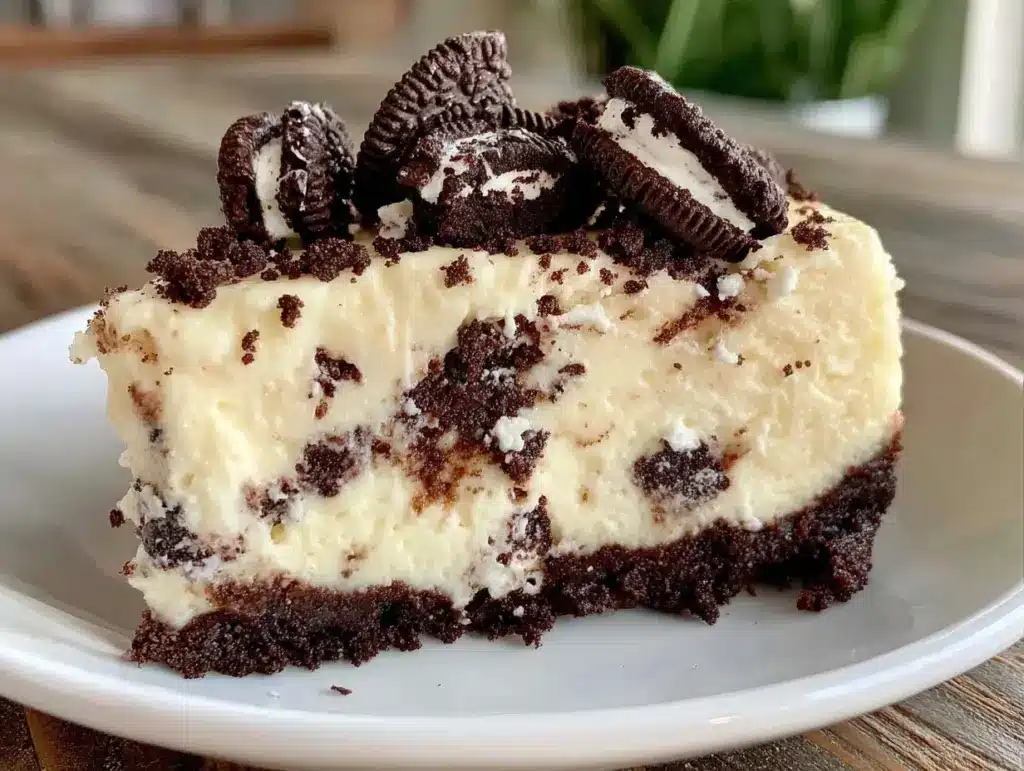
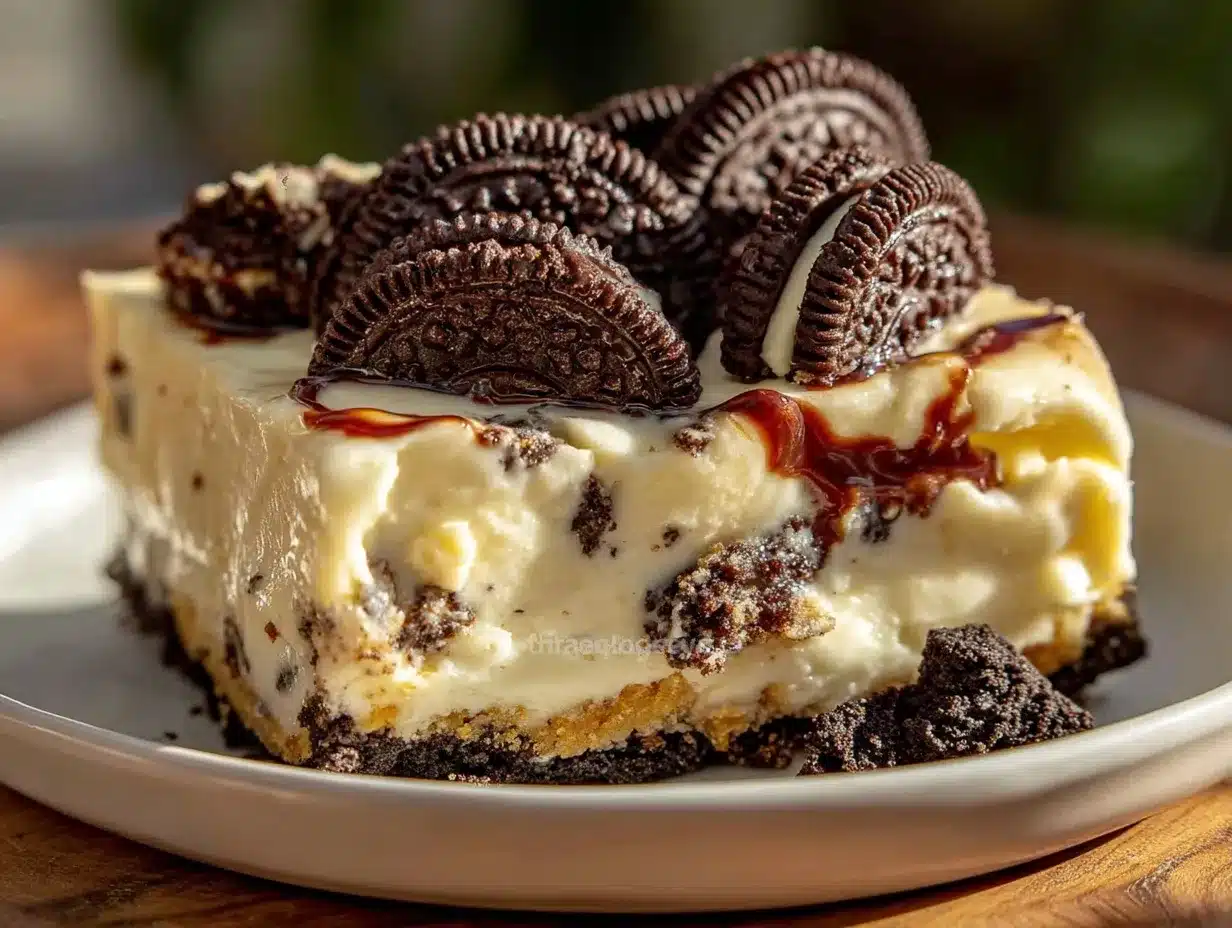
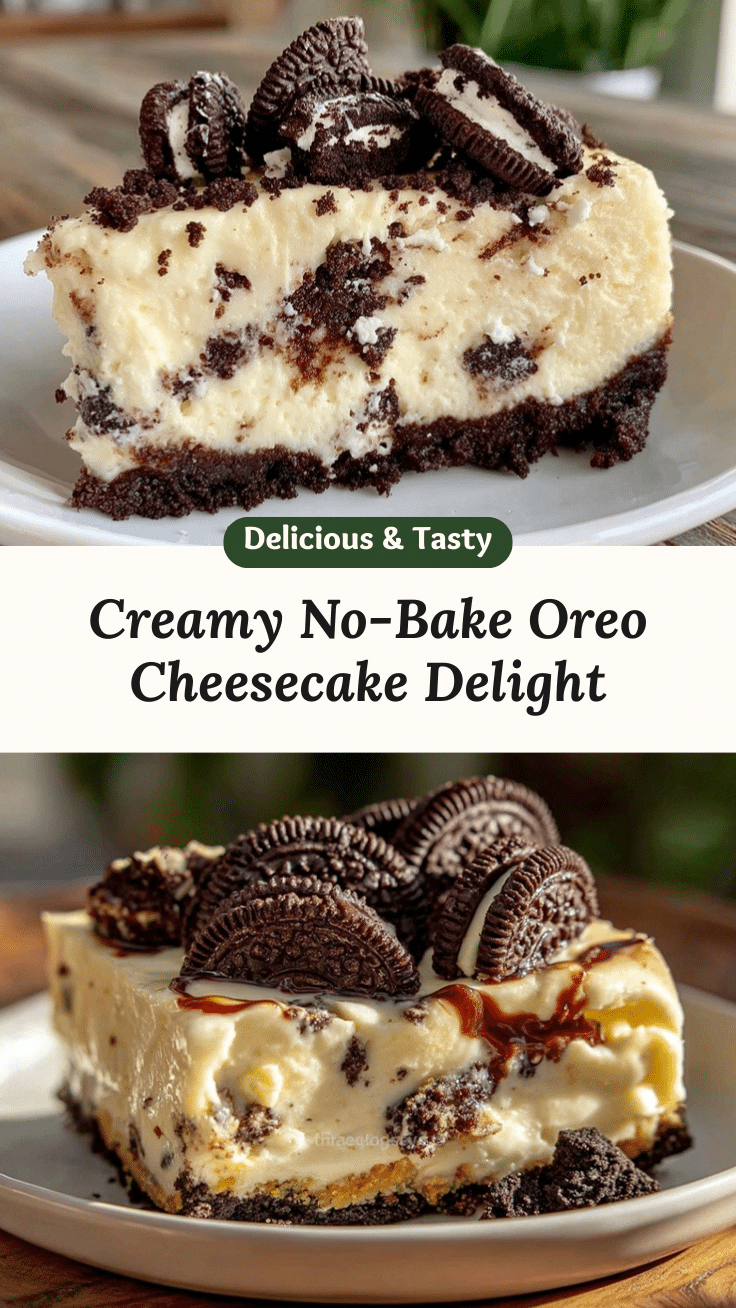
This isn’t just another cheesecake recipe. What sets it apart is the silky smooth filling that feels light but indulgent, thanks to folding in whipped cream the right way. Plus, the crushed Oreos in the base and throughout the filling create a delightful texture combo you don’t get with store-bought versions. Honestly, it’s the kind of dessert that makes you close your eyes and savor every bite—pure comfort food without the fuss.
What Ingredients You Will Need
This recipe uses simple, wholesome ingredients to deliver bold flavor and satisfying texture without the fuss. Most of these are pantry staples, and the Oreos add that classic cookie crunch that makes it special.
- For the Crust:
- 24 Oreo cookies, finely crushed (about 1 ¾ cups crumbs)
- 5 tablespoons unsalted butter, melted (I prefer Kerrygold for richness)
- For the Filling:
- 16 ounces (450g) cream cheese, softened (room temperature is key for smoothness)
- ⅔ cup (130g) granulated sugar
- 1 teaspoon pure vanilla extract (don’t skip this—it brightens the flavor)
- 1 ½ cups (360ml) heavy whipping cream, cold
- 12 Oreo cookies, roughly chopped (for mixing into the filling)
Feel free to swap regular Oreos with a gluten-free version if needed. For dairy-free options, almond-based cream cheese and coconut cream can work, but texture might vary slightly. Also, if you want a little extra zing, a tablespoon of cream cheese adds a subtle tang that balances the sweetness.
Equipment Needed
- 9-inch (23 cm) springform pan or pie dish (springform makes serving easier)
- Mixing bowls (one large for filling, one medium for whipping cream)
- Electric mixer or stand mixer (to get that perfectly whipped cream and smooth filling)
- Spatula (silicone ones work best for folding gently)
- Food processor or resealable bag and rolling pin (to crush Oreos finely)
- Measuring cups and spoons
If you don’t have a food processor, smashing Oreos in a bag with a rolling pin is a perfectly fine workaround. I once made a mess of crumbs all over the counter doing it by hand—lesson learned, keep the bag sealed tight! For whipping cream, I prefer using a chilled metal bowl to speed things up, but room temp works in a pinch.
Preparation Method
- Prepare the crust: Crush 24 Oreos into fine crumbs using a food processor or place them in a sealed bag and crush with a rolling pin. Mix the crumbs with the melted butter until combined and the mixture feels like wet sand. Press this firmly into the bottom of your springform pan (or pie dish) to create an even layer. Chill in the fridge for at least 15 minutes to set while you make the filling.
- Make the filling base: In a large bowl, beat the softened cream cheese with granulated sugar and vanilla extract using an electric mixer on medium speed until smooth and creamy—about 2-3 minutes. If you notice lumps, keep mixing; room temperature cream cheese helps avoid this.
- Whip the cream: Using a separate chilled bowl and clean beaters, whip the cold heavy cream on high speed until soft peaks form—this usually takes around 3-4 minutes. Be careful not to overwhip or it will turn grainy.
- Combine filling: Gently fold the whipped cream into the cream cheese mixture in batches, using a spatula. Folding is key here—too much stirring can deflate the cream. When mostly combined, fold in the roughly chopped Oreos evenly.
- Assemble the cheesecake: Pour the filling over the chilled crust and smooth the top with your spatula. Cover loosely with plastic wrap and refrigerate for at least 4 hours, though overnight is best to let the flavors meld and the texture firm up nicely.
- Serve and garnish: Before serving, you can sprinkle extra crushed Oreos or even add a drizzle of chocolate syrup on top if you’re feeling fancy. Slice carefully with a warm knife for clean cuts.
If you’re short on time, a quick chill in the freezer for 1-2 hours can speed up the firming process, but don’t forget to bring it back to fridge temperature before serving for the best texture.
Cooking Tips & Techniques
One thing I learned the hard way was that rushing the chilling time ruins the texture—impatient me tried slicing after just an hour once, and it was a gooey mess. So, patience really pays here. Also, always whip your cream to soft peaks, not stiff peaks; it blends better and keeps the filling airy.
When folding the whipped cream into the cream cheese, think of it like tucking in a blanket rather than stirring a stew. This gentle motion keeps the air bubbles intact, making the cheesecake delight fluffy instead of dense.
Pro tip: soften your cream cheese an hour before starting, or zap it in 10-second bursts in the microwave (but watch closely!). Lumps in the batter are the enemy of smoothness.
Also, pressing the crust firmly and evenly helps avoid crumbly slices. Sometimes I use the bottom of a glass to press it down—works like a charm. Lastly, warming your knife under hot water between slices makes cleaner cuts without dragging crumbs.
Variations & Adaptations
- Chocolate Lover’s Twist: Add ½ cup of melted semi-sweet chocolate to the cream cheese mixture before folding in the whipped cream for a richer, double-chocolate cheesecake.
- Berry Infusion: Fold in ½ cup of fresh raspberries or strawberries for a fruity surprise that balances the sweetness. Perfect in summer when berries are at their peak.
- Nut-Free Version: Replace Oreos with gluten-free, nut-free sandwich cookies to keep it allergy-friendly without sacrificing texture.
- Mini Cheesecakes: Use muffin tins lined with cupcake liners for individual servings—great for parties and easier portion control.
- Dairy-Free Adaptation: Substitute cream cheese with a plant-based version and use coconut cream whipped to soft peaks instead of heavy cream. The texture shifts slightly but still delightful.
Personally, I once tried adding a hint of espresso powder to the filling for a mocha vibe—unexpectedly good and got rave reviews from friends who love coffee.
Serving & Storage Suggestions
This creamy no-bake Oreo cheesecake delight is best served chilled but not ice-cold—you want that creamy softness to shine through. Let it sit at room temperature for 10-15 minutes before slicing if it’s been straight from the fridge.
For presentation, a simple sprinkle of crushed Oreos or a dusting of cocoa powder adds a nice touch. Pair it with a cup of rich coffee or a glass of cold milk to complement the flavors perfectly.
Leftovers? They keep beautifully covered in the fridge for up to 4 days. If you want to store it longer, freeze individual slices wrapped tightly in plastic wrap and foil; thaw overnight in the fridge before serving.
Reheating isn’t necessary, but if you prefer a slightly softer texture, leave slices out at room temperature for a short while. The flavors actually deepen after a day or two, making it an even better treat.
Nutritional Information & Benefits
Per serving (based on 12 servings): approximately 320 calories, 25g fat, 18g carbohydrates, and 5g protein. While this dessert is indulgent, cream cheese and heavy cream provide a good dose of calcium and vitamin A.
Oreos, while a treat, add a nostalgic crunch and sweetness without overpowering the cheesecake’s creamy base. This recipe can be adapted for gluten-free diets by swapping cookie types, and dairy-free versions are possible with alternative ingredients, though texture might vary.
From my perspective, this cheesecake offers a satisfying pleasure that can fit within a balanced lifestyle when enjoyed occasionally. It’s a sweet reward after a busy day, and the no-bake method means less stress and more time to savor the moment.
Conclusion
So, if you’re looking for a creamy no-bake Oreo cheesecake delight that’s easy to make, uses straightforward ingredients, and impresses without hours of effort, this recipe is a winner. I love how customizable it is—you can tweak flavors or presentation to your liking, and it still turns out fantastic.
Honestly, I keep coming back to this recipe because it feels like a little celebration in a slice, every time. Give it a try, and I’d love to hear how you put your spin on it. Don’t be shy—drop a comment below or share your photo; this is the kind of dessert worth bragging about.
Happy no-baking and happy eating!
FAQs
Can I make this cheesecake ahead of time?
Yes! It actually tastes better after chilling overnight, which helps the flavors meld and the texture set perfectly.
What if I don’t have a springform pan?
You can use a regular pie dish or any round baking dish, just be careful when slicing and serving as the crust is more delicate without the removable sides.
Can I use a different cookie instead of Oreos?
Absolutely. Sandwich cookies like Golden Oreos or gluten-free varieties work well. Just adjust the sweetness accordingly.
How do I prevent lumps in the filling?
Make sure your cream cheese is fully softened before mixing, and beat it well until smooth. Room temperature ingredients make a big difference.
Is it possible to freeze the entire cheesecake?
You can freeze it, but it’s best to freeze individual slices wrapped tightly. The texture might change if freezing the whole cheesecake, but it’s still tasty after thawing in the fridge.
Pin This Recipe!
Creamy No-Bake Oreo Cheesecake Delight

A quick and easy no-bake Oreo cheesecake with a creamy texture and crunchy cookie bits, perfect for parties and casual get-togethers.
- Prep Time: 15 minutes
- Cook Time: 0 minutes
- Total Time: 4 hours 15 minutes
- Yield: 12 servings 1x
- Category: Dessert
- Cuisine: American
Ingredients
- 24 Oreo cookies, finely crushed (about 1 ¾ cups crumbs)
- 5 tablespoons unsalted butter, melted
- 16 ounces (450g) cream cheese, softened
- ⅔ cup (130g) granulated sugar
- 1 teaspoon pure vanilla extract
- 1 ½ cups (360ml) heavy whipping cream, cold
- 12 Oreo cookies, roughly chopped (for mixing into the filling)
Instructions
- Crush 24 Oreos into fine crumbs using a food processor or place them in a sealed bag and crush with a rolling pin.
- Mix the crumbs with the melted butter until combined and the mixture feels like wet sand.
- Press this firmly into the bottom of your springform pan or pie dish to create an even layer.
- Chill in the fridge for at least 15 minutes to set while you make the filling.
- In a large bowl, beat the softened cream cheese with granulated sugar and vanilla extract using an electric mixer on medium speed until smooth and creamy, about 2-3 minutes.
- Using a separate chilled bowl and clean beaters, whip the cold heavy cream on high speed until soft peaks form, about 3-4 minutes.
- Gently fold the whipped cream into the cream cheese mixture in batches using a spatula.
- Fold in the roughly chopped Oreos evenly.
- Pour the filling over the chilled crust and smooth the top with your spatula.
- Cover loosely with plastic wrap and refrigerate for at least 4 hours or overnight for best results.
- Before serving, optionally sprinkle extra crushed Oreos or drizzle chocolate syrup on top.
- Slice carefully with a warm knife for clean cuts.
Notes
Soften cream cheese before mixing to avoid lumps. Whip cream to soft peaks, not stiff. Chill cheesecake for at least 4 hours or overnight for best texture. Use a warm knife for clean slices. Press crust firmly and evenly.
Nutrition
- Serving Size: 1 slice (1/12th of c
- Calories: 320
- Sugar: 15
- Sodium: 210
- Fat: 25
- Saturated Fat: 15
- Carbohydrates: 18
- Fiber: 1
- Protein: 5
Keywords: no-bake cheesecake, Oreo cheesecake, easy dessert, party dessert, creamy cheesecake, no oven dessert