Introduction
Let me set the scene: the aroma of bubbling cheddar and hot, velvety noodles sneaking out from my oven is enough to make the whole house pause in anticipation. The first time I whipped up this creamy mac and cheese recipe inspired by Cracker Barrel, I caught myself grinning like a kid at a county fair—right after that first forkful. You know when a recipe just hits all the right notes? That was this moment. The kind of pause where you close your eyes, savor the taste, and realize you’ve stumbled on something truly comforting.
It all started years ago, back when I was knee-high to a grasshopper and my grandma would make her “special” mac and cheese for any big family gathering. Fast forward to a rainy Saturday and there I was, determined to recreate that soul-warming, creamy goodness I’d tasted at Cracker Barrel (honestly, I’ve tried a lot of versions, but theirs is dangerously easy and oh-so-creamy). My family couldn’t stop sneaking spoonfuls off the cooling rack—my youngest actually tried to hide a serving for later. I can’t blame them. It’s pure, nostalgic comfort in a bowl.
Whether you’re looking for the perfect potluck dish or need a sweet treat for your kids after a long day, this mac and cheese is your golden ticket. It’s the kind of recipe I wish I’d discovered years ago—it just feels like a warm hug. I’ve tested it more times than I care to admit (in the name of research, of course), and now it’s a staple for family gatherings, gifting, or those nights when only cheesy carbs will do. If you love copycat recipes, creamy sauces, and the unmistakable flavor of Cracker Barrel’s mac and cheese, you’re going to want to bookmark this one!
Why You’ll Love This Recipe
Let’s face it, creamy mac and cheese is basically a universal comfort food. But this Cracker Barrel copycat recipe stands out for a bunch of reasons—trust me, I’ve made just about every cheesy noodle combo out there. Here’s why this one deserves a spot in your recipe box:
- Quick & Easy: Comes together in under 30 minutes, so you can toss it together after work or on a busy weeknight. No complicated steps or fancy techniques needed.
- Simple Ingredients: Everything is easy to find. You probably already have most of it in your pantry or fridge. No need for a special grocery trip just to make dinner.
- Perfect for Any Occasion: Whether you’re hosting brunch, heading to a potluck, or just craving a cozy dinner, this mac and cheese delivers. It’s a showstopper at holiday gatherings too.
- Crowd-Pleaser: Kids gobble it up, adults sneak extra servings, and everyone asks for the recipe. I’ve seen folks go back for seconds (and thirds!) at potlucks.
- Unbelievably Delicious: The secret is a blend of sharp cheddar and creamy milk, plus a few tricks to get that ultra-smooth, luscious sauce. It’s rich, cheesy, and honestly, a little addictive.
This creamy mac and cheese isn’t just another plain pasta dish—it’s the best version I’ve tested. Blending the cheese right into the hot milk (with a hint of butter) means every bite is silky smooth, not grainy or oily. The seasoning is perfectly balanced, so it tastes like Cracker Barrel’s signature dish but with a homemade twist.
It’s the kind of recipe that makes you close your eyes after the first bite. Comfort food, but faster. Healthier than most restaurant versions, but still packed with that soul-soothing satisfaction. Great for impressing guests without breaking a sweat, or just making a Tuesday night feel a little more special. I still remember the look on my family’s faces the first time I served it—pure joy. That’s why I keep making it, and why I think you’ll love it too.
What Ingredients You Will Need
This creamy mac and cheese recipe uses simple, wholesome ingredients to deliver bold flavor and satisfying texture—without the fuss. Most are pantry staples, and you can easily swap things out if needed. Here’s what you’ll need:
- For the Pasta:
- Elbow macaroni – 16 oz (450g) (classic shape, but you can use shells or cavatappi too)
- For the Cheese Sauce:
- Sharp cheddar cheese – 3 cups (340g), freshly grated (I prefer Tillamook or Cabot for better melt)
- Colby cheese – 1 cup (110g), grated (adds a mellow, creamy note)
- Cream cheese – 4 oz (115g), softened (secret to extra creaminess)
- Whole milk – 2 cups (480ml) (for richness; 2% works if that’s all you have)
- Unsalted butter – 4 tbsp (56g), cubed
- All-purpose flour – 2 tbsp (16g) (for thickening)
- Salt – 1 tsp (or to taste; I like kosher salt)
- Ground white pepper – 1/2 tsp (adds a gentle heat without overpowering)
- Mustard powder – 1/2 tsp (optional, but it deepens the flavor)
- Garlic powder – 1/2 tsp (for a savory kick)
- For Topping (Optional):
- Panko breadcrumbs – 1/2 cup (25g) (for crunch, if you like baked mac and cheese)
- Extra grated cheddar – 1/2 cup (55g)
- Melted butter – 2 tbsp (28g)
Ingredient Tips: Always grate your own cheese—pre-shredded just doesn’t melt as smoothly. For gluten-free, swap the pasta and flour for GF versions. If you’re dairy-free, try oat milk and a vegan cheese blend (I’ve used Daiya and it’s pretty good in a pinch!). For a lighter version, use reduced-fat cheese and milk, though the sauce won’t be quite as rich.
Want to go low-carb? Swap out the pasta for cauliflower florets (blanch them first). In summer, I toss in fresh peas or roasted cherry tomatoes for a pop of color. Use what you’ve got—this recipe is forgiving! If you’re shopping, look for cheese blocks rather than bags. Trust me, the melt is so much better.
Equipment Needed
- Large pot: For boiling the pasta. I use a 6-quart stainless steel pot—easy to clean, heats evenly.
- Medium saucepan: For making the cheese sauce. A heavy-bottomed pan works best to prevent scorching.
- Whisk: For blending the flour, butter, and milk smoothly. A balloon whisk is my go-to.
- Wooden spoon or spatula: For stirring the pasta and sauce together.
- Colander: For draining the cooked pasta.
- Measuring cups and spoons: Accurate measurements keep your sauce creamy, not clumpy.
- Oven-safe casserole dish (if baking): 9×13 inch (23×33 cm) works well. Pyrex or ceramic is great.
- Grater: For shredding cheese—box grater or food processor both work. I use my old box grater, but the processor saves time if you’re doing a big batch.
If you don’t have a whisk, a fork can work in a pinch (though you’ll need some elbow grease!). No casserole dish? Use any oven-proof pan, even a deep pie plate. For budget-friendly options, check thrift stores—my favorite casserole dish was a $2 find. Just make sure your pot is big enough for all that cheesy goodness!
To keep your equipment in good shape, soak pans right after use (cheese sauce can stick if you leave it sitting). I’ve ruined a whisk or two by not cleaning up quickly, so learn from my mistakes!
Preparation Method
- Preheat the oven (if baking): Set your oven to 350°F (175°C). If you’re skipping the baked version, you can skip this step.
- Cook the pasta: Bring a large pot of salted water to a boil. Add 16 oz (450g) of elbow macaroni and cook until just al dente—usually 7-8 minutes. (Keep a close eye—overcooked noodles get mushy!) Drain and set aside. Toss with a bit of butter to prevent sticking if you’ll be waiting a few minutes.
- Make the roux: In a medium saucepan, melt 4 tbsp (56g) unsalted butter over medium heat. Once bubbling, whisk in 2 tbsp (16g) flour. Cook for 1-2 minutes until the mixture is golden and smells slightly nutty—don’t let it brown too much, or your sauce will taste burnt.
- Add the milk: Slowly whisk in 2 cups (480ml) whole milk. Go slow—this is how you avoid lumps. Stir constantly until the mixture thickens slightly, about 3-5 minutes. You’re looking for the consistency of heavy cream.
- Season the sauce: Mix in 1 tsp salt, 1/2 tsp ground white pepper, 1/2 tsp mustard powder, and 1/2 tsp garlic powder. Taste and adjust—sometimes I add a pinch more salt or a dash of hot sauce, depending on my mood.
- Melt the cheese: Lower the heat to medium-low. Add 3 cups (340g) sharp cheddar, 1 cup (110g) Colby cheese, and 4 oz (115g) cream cheese, stirring until everything is melted and smooth. If you see tiny specks of unmelted cheese, just keep stirring—it’ll come together!
- Combine with pasta: Add the drained macaroni to the cheese sauce. Stir well until every noodle is coated. If it looks too thick, splash in a little extra milk (I usually add 2-3 tbsp).
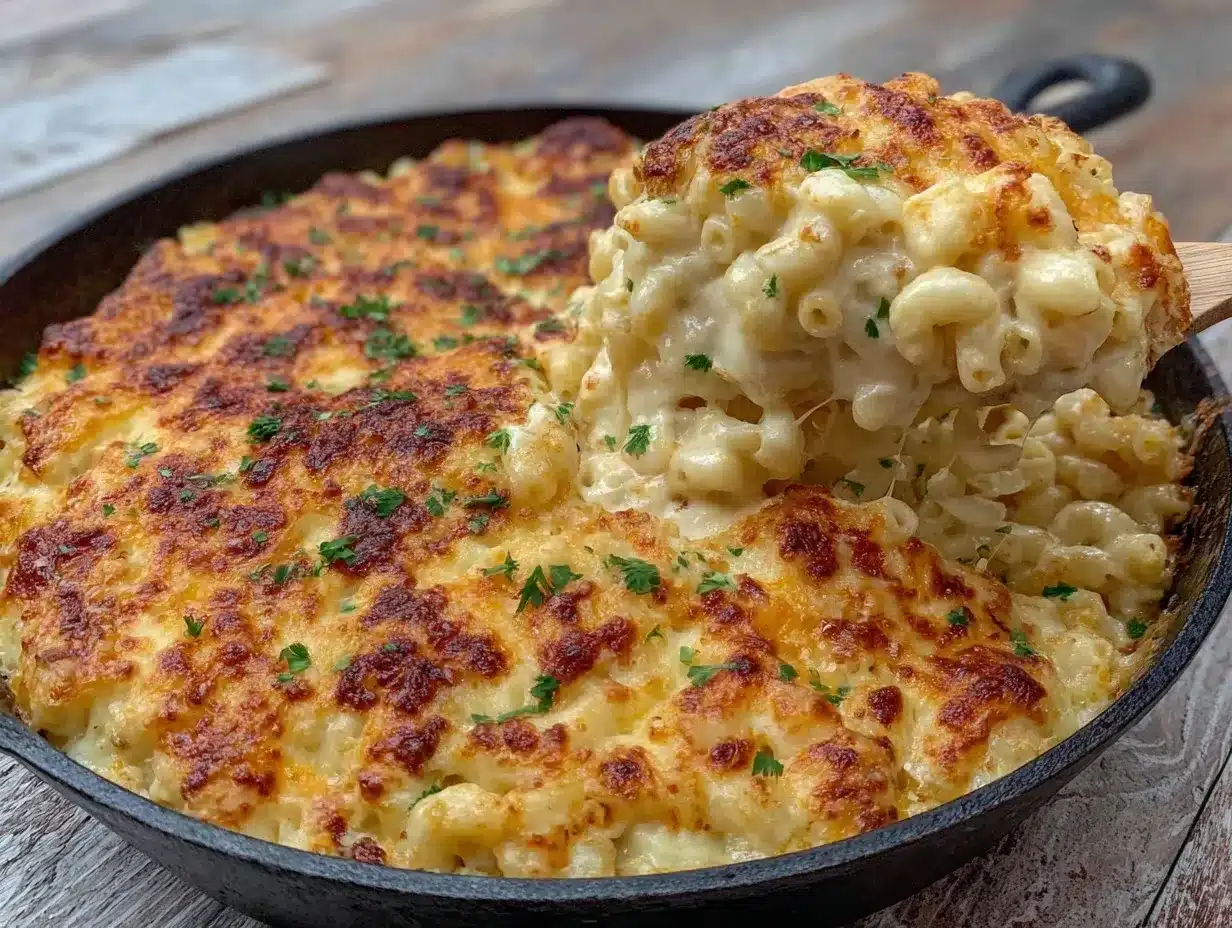
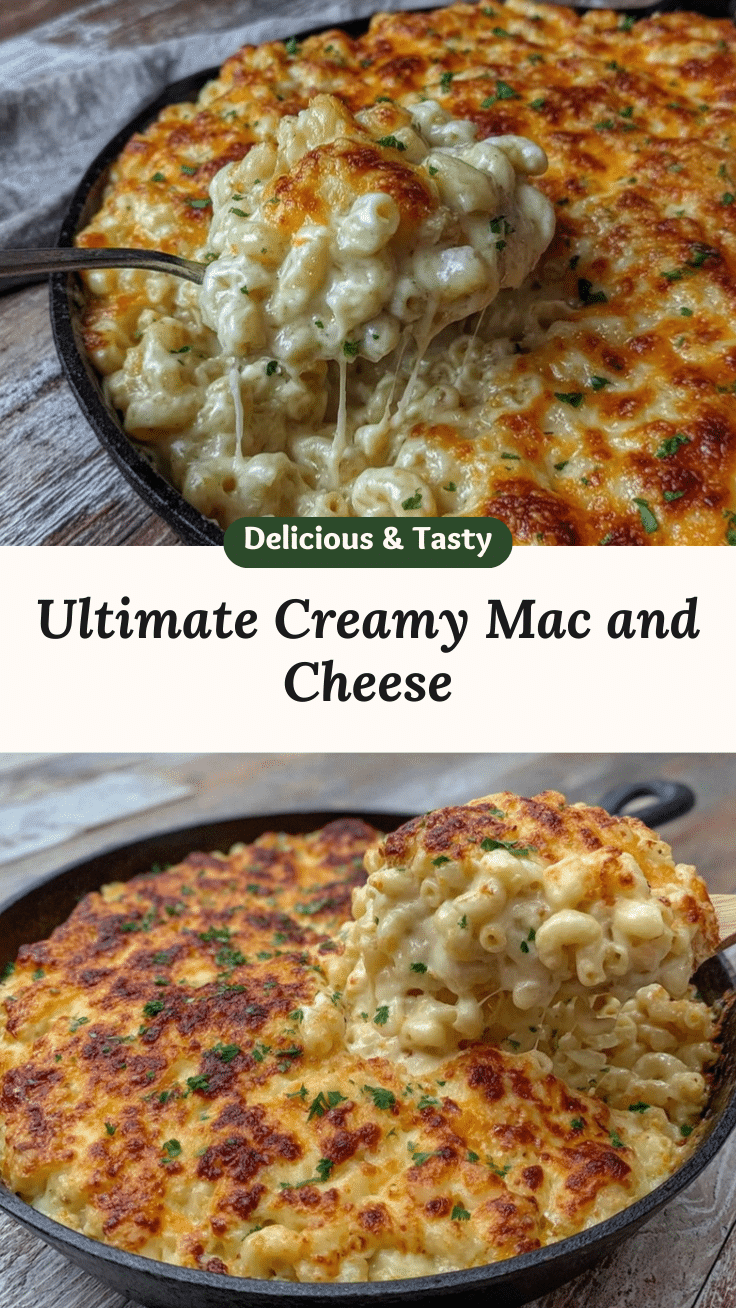
- Bake (optional): Pour the mac and cheese into your casserole dish. Mix 1/2 cup (25g) panko breadcrumbs with 2 tbsp (28g) melted butter and 1/2 cup (55g) extra cheddar. Sprinkle over the top. Bake for 20 minutes, until the top is golden and bubbling. Let cool 5 minutes before serving—it’ll firm up as it sits.
Troubleshooting Tips: If your sauce is grainy, the cheese got too hot—always melt over low heat. If it’s too thick, add extra milk, one spoonful at a time. For super smooth sauce, use freshly grated cheese and keep the heat gentle. And if your pasta sticks together before mixing, just rinse it quickly with warm water.
Personal Notes: I sometimes prep the sauce while the pasta cooks to save time. If you’re in a rush, skip the baking step—stovetop mac is just as creamy and delicious. For extra flavor, stir in a tablespoon of Dijon or a handful of cooked bacon bits. Honestly, this recipe forgives a lot—just don’t walk away from the stove during the sauce stage!
Cooking Tips & Techniques
Here’s the real scoop—after years of mac and cheese mishaps (lumpy sauce, oily cheese, sad noodles), I’ve picked up a few tricks that make a world of difference. First, always use freshly grated cheese. Pre-shredded cheese might save time, but it’s coated in anti-caking agents that can mess with your sauce’s texture.
Start your roux with equal parts butter and flour. Let it cook until it smells nutty, but don’t walk away or it’ll burn (learned that one the hard way). When adding milk, go slow and whisk constantly—this keeps your sauce lump-free. Keep the heat medium-low when melting cheese; high heat can cause the proteins to seize and make your sauce gritty.
If you’re multitasking, cook the pasta and sauce at the same time, but always keep an eye on the sauce. A little patience here pays off! For the baked version, let your mac and cheese sit for five minutes before serving—it helps everything set up and makes scooping neater.
Consistency is everything. If your sauce thickens too much, thin it with a splash of milk or even a bit of reserved pasta water. Want extra creaminess? Add a spoonful of sour cream at the end (that’s my grandma’s secret). And if you’re feeling adventurous, stir in a pinch of smoked paprika for depth.
Common mistakes? Overcooked noodles, greasy sauce, bland flavor. Avoid these by tasting as you go and trust your senses—if it smells cheesy and looks silky, you’re on the right track. And don’t be afraid to tweak the seasoning to suit your taste!
Variations & Adaptations
I love recipes that bend to your needs, and this creamy mac and cheese recipe is no exception. Here are a few tried-and-true variations you can play with:
- Gluten-Free: Use gluten-free elbow pasta and replace the flour in the roux with a gluten-free blend. I’ve tried King Arthur’s and it works like a charm.
- Dairy-Free: Swap the milk for oat or almond milk, and use dairy-free cheese and cream cheese. I’ve made this with Daiya and Kite Hill—still creamy, just a different vibe!
- Veggie Mix-In: Stir in steamed broccoli, peas, or spinach for color and nutrition. Roasted cherry tomatoes add a sweet pop in summer.
- Spicy Kick: Add diced jalapeños or a pinch of cayenne to the cheese sauce for a grown-up twist.
- Protein Boost: Mix in cooked chicken, bacon bits, or shredded rotisserie chicken for a heartier meal.
If you want a stovetop-only version, just skip the baking step—it’s just as creamy and delicious. For a “one-pot” approach, cook the pasta, drain it, and use the same pot for the sauce (less washing up!).
Allergen swaps? Use nut-free milks if you’re worried about allergies, and always check cheese labels for hidden gluten or additives. My personal favorite is adding caramelized onions and a sprinkle of chives—sounds fancy, but it’s really just comfort food with a little extra love.
Serving & Storage Suggestions
This creamy mac and cheese tastes best served piping hot, straight from the oven or stovetop. For parties, I like to portion it into small ramekins for easy serving. If you’re making it for dinner, pair with roasted veggies or grilled chicken for a full meal.
Want to fancy it up? Sprinkle with chopped fresh herbs like parsley or chives for color. Serve alongside a crisp, tangy salad and a glass of cold iced tea—classic Southern comfort!
Storage: Leftovers keep well in the fridge for up to 4 days. Store in an airtight container. To reheat, add a splash of milk and microwave in 30-second bursts, stirring between each. For oven reheating, cover with foil and warm at 325°F (165°C) until hot (about 15 minutes).
This mac and cheese also freezes well. Cool completely, portion into freezer-safe bags or containers, and freeze for up to 2 months. Thaw overnight in the fridge and reheat gently. Flavor deepens over time, so leftovers often taste even better!
Nutritional Information & Benefits
Estimated nutritional values (per serving, about 1 cup):
- Calories: 410
- Fat: 21g
- Carbohydrates: 37g
- Protein: 18g
- Sodium: 640mg
This mac and cheese is a solid source of calcium and protein thanks to all that cheese and milk. If you add veggies or lean protein, you boost the nutrition even more. For gluten-free or low-carb needs, use alternative pasta or swap for cauliflower—still creamy, but lighter.
Potential allergens include dairy, gluten (unless you swap), and possibly eggs in certain pasta brands. I always read labels just to be safe. From a wellness perspective, homemade means you control the ingredients—less sodium and no mystery additives. I like making comfort food that fits my family’s needs, and it’s honestly a lot more wholesome than the boxed stuff!
Conclusion
If you’re searching for the perfect creamy mac and cheese recipe, this Cracker Barrel copycat is a must-try. It’s simple, crowd-pleasing, and endlessly customizable. Whether you’re feeding a hungry family or treating yourself to comfort food after a long day, this recipe brings pure joy in every bite.
Don’t be afraid to tweak the cheese blend, toss in veggies, or try a dairy-free version. That’s half the fun! Personally, I love how it brings back those warm, fuzzy memories of family dinners and laughter around the table. There’s just something special about a dish that makes everyone smile.
Give it a go and let me know what you think! Leave a comment below with your favorite add-ins, share your photos on Pinterest, or tell me how you made it your own. Recipes like this are meant to be shared, so spread the cheesy love and bookmark it for your next comfort food craving!
FAQs
Can I make this mac and cheese ahead of time?
Absolutely! Prepare as directed, cool, then refrigerate for up to 24 hours. When ready to serve, reheat gently with a splash of milk to restore creaminess.
What cheeses work best for creamy mac and cheese?
Sharp cheddar is a classic for flavor and meltiness. Colby adds creaminess, and a bit of cream cheese makes the sauce silky. Always grate fresh for the smoothest texture!
How do I keep my sauce from getting grainy?
Melt cheese over low heat and use freshly grated cheese. If the sauce is too hot, the cheese can separate and get gritty—keep it gentle!
Can I freeze leftovers?
Yes! Portion into freezer-safe containers, freeze up to 2 months. Thaw overnight in the fridge and reheat with a splash of milk for best texture.
What pasta shapes work for this recipe?
Elbow macaroni is classic, but shells, cavatappi, or rotini work well too. Aim for shapes that hold sauce easily—let’s be real, more cheesy goodness per bite!
Pin This Recipe!
Creamy Mac and Cheese Recipe – Easy Cracker Barrel Copycat Steps

This ultra-creamy mac and cheese is a comforting, crowd-pleasing copycat of Cracker Barrel’s classic dish. It’s quick, easy, and packed with rich cheddar flavor—perfect for family dinners, potlucks, or cozy nights in.
- Prep Time: 10 minutes
- Cook Time: 20 minutes
- Total Time: 30 minutes
- Yield: 8 servings 1x
- Category: Main Course
- Cuisine: American
Ingredients
- 16 oz elbow macaroni (about 4 cups dry)
- 3 cups sharp cheddar cheese, freshly grated
- 1 cup Colby cheese, grated
- 4 oz cream cheese, softened
- 2 cups whole milk
- 4 tbsp unsalted butter, cubed
- 2 tbsp all-purpose flour
- 1 tsp kosher salt (or to taste)
- 1/2 tsp ground white pepper
- 1/2 tsp mustard powder (optional)
- 1/2 tsp garlic powder
- 1/2 cup panko breadcrumbs (optional, for topping)
- 1/2 cup extra grated cheddar (optional, for topping)
- 2 tbsp melted butter (optional, for topping)
Instructions
- Preheat oven to 350°F (175°C) if baking.
- Bring a large pot of salted water to a boil. Add elbow macaroni and cook until just al dente, about 7-8 minutes. Drain and set aside. Toss with a bit of butter to prevent sticking if needed.
- In a medium saucepan, melt unsalted butter over medium heat. Whisk in flour and cook for 1-2 minutes until golden and nutty.
- Slowly whisk in whole milk, stirring constantly until slightly thickened, about 3-5 minutes.
- Mix in salt, ground white pepper, mustard powder, and garlic powder. Taste and adjust seasoning as desired.
- Lower heat to medium-low. Add sharp cheddar, Colby cheese, and cream cheese. Stir until melted and smooth.
- Add drained macaroni to cheese sauce and stir until evenly coated. If too thick, add a splash of milk.
- For baked version: Pour mac and cheese into casserole dish. Mix panko breadcrumbs with melted butter and extra cheddar, sprinkle over top. Bake for 20 minutes until golden and bubbling. Let cool 5 minutes before serving.
Notes
For best results, use freshly grated cheese and melt over low heat to avoid grainy sauce. You can skip the baking step for a stovetop-only version. Add-ins like bacon, veggies, or hot sauce are delicious. Gluten-free and dairy-free adaptations work well with alternative ingredients. Leftovers keep well and taste even better after reheating.
Nutrition
- Serving Size: About 1 cup per serv
- Calories: 410
- Sugar: 5
- Sodium: 640
- Fat: 21
- Saturated Fat: 13
- Carbohydrates: 37
- Fiber: 2
- Protein: 18
Keywords: mac and cheese, creamy, Cracker Barrel, copycat, comfort food, easy, cheddar, baked mac and cheese, stovetop mac and cheese, family dinner