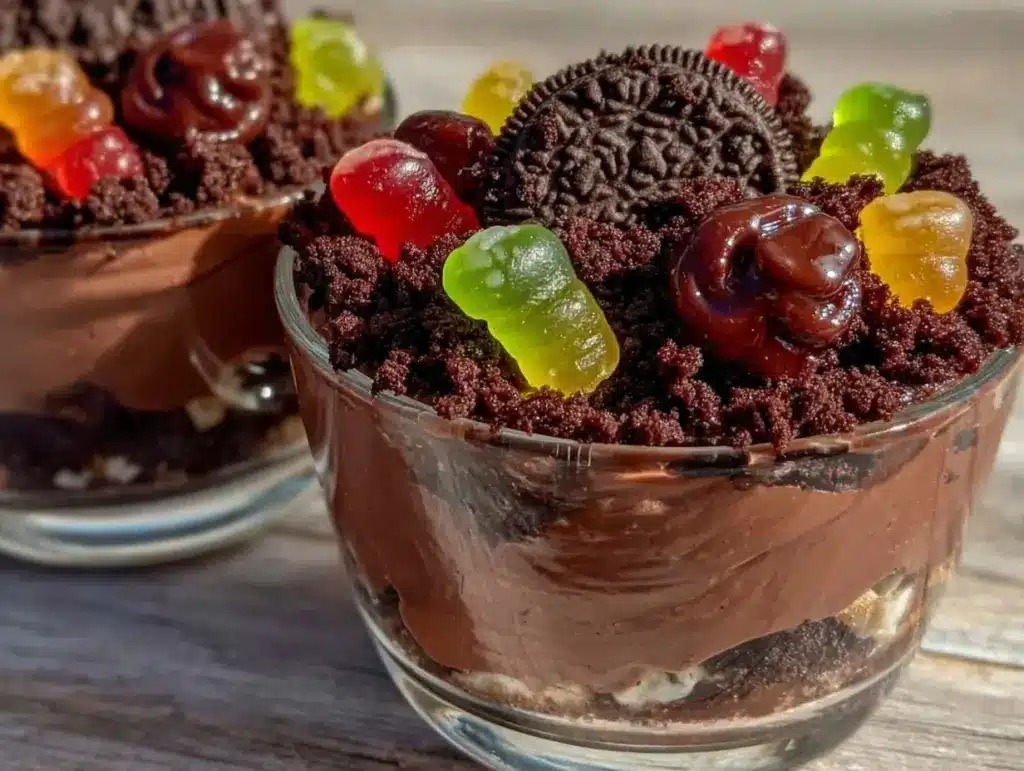
My nephew took one look at the bowl of graveyard dirt cups I’d just set on the table and declared, “These are creepy-good!” That was the exact moment I knew this recipe had crossed from just a fun Halloween idea into a must-make tradition. Honestly, watching him reach in with his fingers to grab the gummy worms wriggling through the crushed Oreos was a small victory of pure joy. The way the chocolate pudding peeked out beneath the crumbly “dirt” and the slightly chewy candy worms made the whole thing feel like a spooky playground for dessert – a little messy, a little silly, and totally delicious.
That afternoon, the kitchen smelled faintly of chocolate and sugar, with a whisper of vanilla pudding simmering on the stove. The crushed Oreo crumbs scattered like actual soil, and the gummy worms weren’t just decoration; they were the star players in this creepy, fun scene. It wasn’t just about the taste (which, by the way, is addictively rich and creamy) but about the whole experience – the tactile delight and goofy smiles that come with eating something that looks like dirt but tastes like a dream.
This recipe for delicious graveyard dirt cups with gummy worms and crushed Oreos stuck with me because it brought out the kid in everyone around the table. It’s the kind of treat that invites you to slow down, laugh a little, and maybe even get your hands dirty. It’s not just a dessert – it’s a little edible Halloween adventure that somehow feels just right every year.
Why You’ll Love This Recipe
After countless tests and a few gummy worm casualties (they’re surprisingly slippery little guys), I can say this recipe for graveyard dirt cups is a winner for so many reasons. It’s one of those rare treats that’s as fun to make as it is to eat.
- Quick & Easy: Ready in under 20 minutes, including prep and assembly, great for last-minute Halloween parties or school events.
- Simple Ingredients: You likely already have pudding mix, Oreos, and gummy worms in your pantry or local store – no need for fancy specialty items.
- Perfect for Halloween: The spooky theme makes it a standout at any Halloween gathering, impressing kids and adults alike.
- Crowd-Pleaser: The combo of creamy pudding, crunchy Oreos, and chewy gummy worms hits all the right texture notes.
- Unbelievably Delicious: The crushed Oreos mimic dirt so well, you honestly almost forget you’re eating cookies and cream goodness.
What sets this recipe apart is the layering technique – instead of just dumping ingredients together, we create a textured, immersive “graveyard” that feels like a little scene. I’ve found that chilling the pudding a bit before layering helps the dirt cups hold their shape better. Plus, adding a pinch of cinnamon to the Oreo crumbs gives a subtle warmth that pairs beautifully with the chocolate.
This isn’t just another pudding cup—it’s a playful dessert that sparks imagination and gets everyone talking. Whether you’re planning a Halloween party or just want an easy, festive treat, these graveyard dirt cups with gummy worms and crushed Oreos deliver the fun and flavor you want.
What Ingredients You Will Need
This recipe uses simple, wholesome ingredients to deliver bold flavor and a satisfying, playful texture without fuss. Most ingredients are pantry staples, with the gummy worms adding that festive Halloween touch.
- Instant Chocolate Pudding Mix – 1 package (3.9 oz / 110 g); I recommend brands like Jell-O for that classic creamy texture
- Cold Milk – 2 cups (480 ml); whole milk gives the best richness, but 2% works fine too
- Oreos – 20 cookies, crushed finely; the classic sandwich cookies give the perfect “dirt” effect (feel free to use gluten-free Oreos if needed)
- Gummy Worms – 1 cup (about 40 worms); any brand works, but I prefer ones that aren’t too sticky
- Whipped Topping – 1 cup (about 240 ml), optional; adds lightness and a creamy finish
- Cinnamon – 1/4 teaspoon, optional; adds a subtle warmth to the cookie crumbs for extra depth
You can swap the chocolate pudding for vanilla if you want a lighter flavor, or try layering in some fresh berries for a juicy surprise (I’ve done this for a fall party and it was a hit!). For a dairy-free version, use coconut milk and a compatible pudding mix, and substitute the whipped topping with coconut whipped cream.
Equipment Needed
- Mixing Bowl: A medium to large bowl for preparing the pudding and mixing crumbs – glass or stainless steel works best.
- Whisk or Electric Mixer: For smooth pudding preparation; I usually use a hand whisk but a mixer saves time.
- Food Processor or Plastic Bag & Rolling Pin: To crush Oreos finely; if you don’t have a processor, put cookies in a sealed plastic bag and crush with a rolling pin or heavy pan.
- Measuring Cups & Spoons: For precise ingredient amounts.
- Serving Cups or Small Mason Jars: Clear cups work best to show off the layers; I like using 8-ounce (240 ml) cups for individual servings.
- Refrigerator: Essential for chilling the pudding and setting the cups before serving.
For budget-friendly options, you can reuse small plastic cups or repurpose glass jars. I recommend washing any used jars thoroughly for food safety. Also, a small spatula or spoon helps spread layers evenly in the cups without making a mess.
Preparation Method
- Prepare the pudding: In a mixing bowl, whisk together the instant chocolate pudding mix with 2 cups (480 ml) of cold milk. Whisk vigorously for about 2 minutes until the mixture thickens. (If using an electric mixer, mix on medium speed for 2 minutes.) You’ll notice the pudding becomes smooth and glossy. Let it sit for 5 minutes to fully set while you work on the next step.
- Crush the Oreos: Place 20 Oreo cookies in a food processor and pulse until you have fine crumbs that resemble dirt. If you don’t have a processor, put the cookies in a sealed plastic bag and crush them with a rolling pin until finely ground. For a fun twist, stir in 1/4 teaspoon cinnamon with the crumbs to add warmth to the “dirt.”
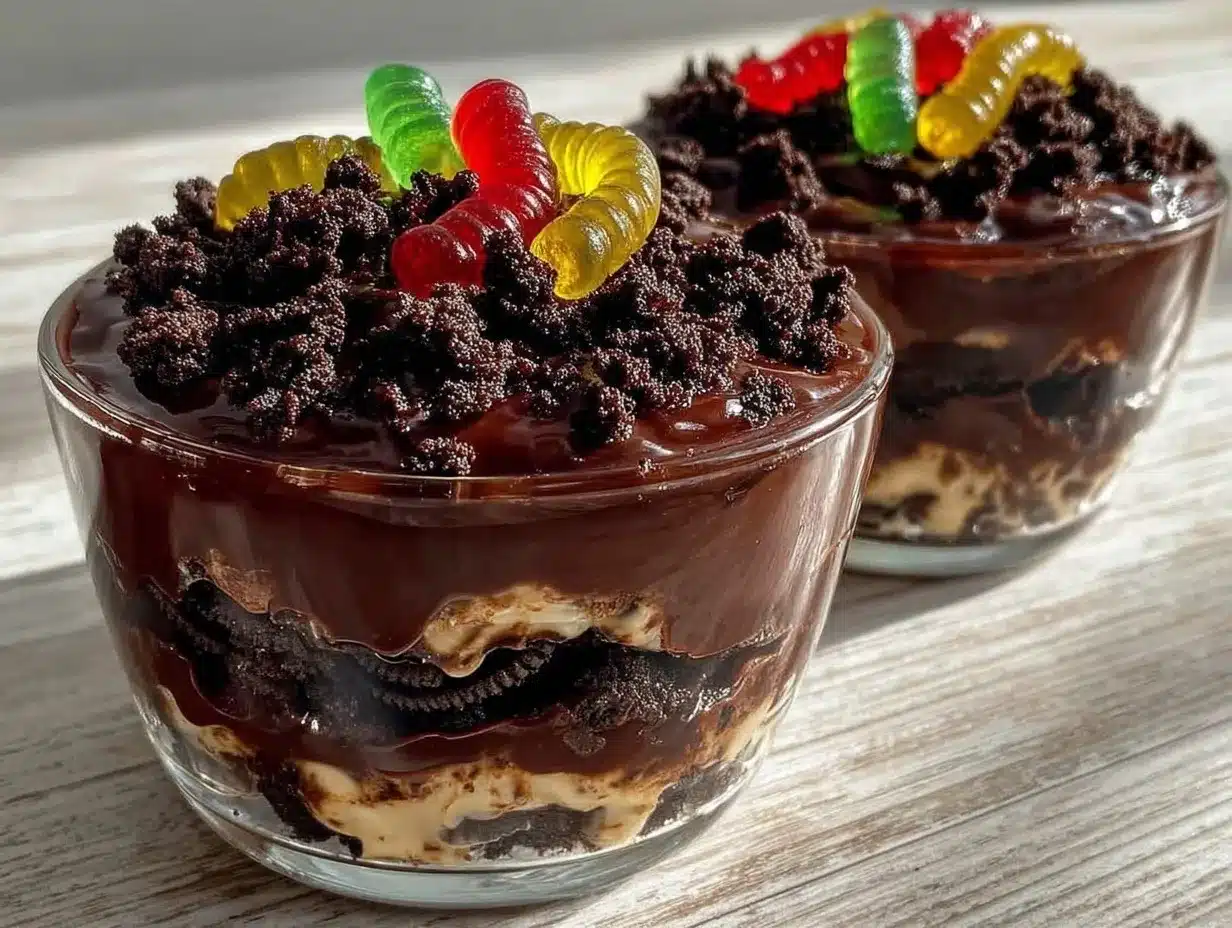
- Layer the dirt cups: Grab your serving cups or jars. Start with a layer of crushed Oreos at the bottom, about 2 tablespoons (30 g). Then add a thick layer of chocolate pudding, about 1/4 cup (60 ml). Repeat the layers until the cup is nearly full, ending with a final layer of Oreo crumbs on top. (This layering creates the “graveyard” look.)
- Add gummy worms: Stick 2-3 gummy worms into each cup, so they peek out from the “dirt.” Arrange them so they look like they’re wriggling through the soil — it’s a little creepy and fun!
- Optional whipped topping: Spoon or pipe a dollop of whipped topping over the final Oreo layer for extra creaminess and a softer texture contrast. This step is optional but recommended for a crowd-pleasing finish.
- Chill: Cover the cups with plastic wrap or lids and refrigerate for at least 30 minutes before serving. This chilling step helps the layers set and flavors meld.
- Serving: Remove from the fridge just before serving. The pudding should be cool and creamy, the Oreo crumbs crisp, and the gummy worms slightly chewy but not sticky.
Pro tip: If you want to prep ahead, assemble the dirt cups without the gummy worms and add them just before serving to keep them from sticking or melting into the pudding. Also, keep an eye on the pudding’s consistency—if it seems too thick after chilling, gently stir before layering.
Cooking Tips & Techniques
One thing I learned the hard way is not to skip the chilling step. The pudding needs that time to fully set so the layers hold their shape instead of sliding around. Honestly, I’ve tried serving these immediately, and it just turned into a chocolate mess.
When crushing the Oreos, aim for a mixture that’s mostly fine crumbs but with a few tiny chunks for texture. Too powdery and it loses the “dirt” feel; too chunky and it looks less like soil.
Choosing the right gummy worms matters too. Some brands are overly sticky and tend to clump together, making the cups look less appealing. I prefer the chewy but slightly firm worms so they maintain shape and are easier to eat.
Here’s a little trick: add a pinch of cinnamon to the crushed Oreos. It’s subtle but adds a warm note that cuts through the chocolate richness. I also sometimes mix in a tablespoon of instant coffee granules for a deeper chocolate flavor—just a touch, so it doesn’t taste like coffee.
Multitasking is key if you’re prepping for a party. While the pudding sets, crush the Oreos and set up your cups. Then assemble quickly once the pudding is ready. It’s a flow that saves time and keeps everything fresh.
Variations & Adaptations
- Dietary swaps: For gluten-free needs, use gluten-free chocolate cookies instead of Oreos and check that your pudding mix is gluten-free. For dairy-free, substitute plant-based milk and use a compatible pudding mix and whipped topping.
- Flavor twists: Swap chocolate pudding for vanilla or butterscotch pudding to change the flavor base. Add a swirl of peanut butter or Nutella between layers for a decadent touch.
- Seasonal variations: In fall, add crushed candy corn on top for extra color and sweetness. For spring, swap gummy worms with gummy bugs or small fruit candies to keep the playful vibe.
- Cooking method adjustment: If you want an even more indulgent treat, bake a chocolate cookie crust at the bottom before layering pudding and crumbs to add a crunchy contrast.
- Personal favorite: I once added a layer of cream cheese frosting mixed with a little powdered sugar in between pudding layers. It made the “dirt” cups feel like a mini dirt cake—rich and delicious!
Serving & Storage Suggestions
Serve these graveyard dirt cups chilled for the best texture and flavor. They look fantastic in clear cups showing off the layers, so presentation really adds to the fun. You can garnish with extra gummy worms or even small Halloween-themed picks for parties.
These cups pair wonderfully with other easy party treats like creamy deviled eggs or the creamy baked crab dip for a mix of sweet and savory on your table.
Store leftovers covered tightly in the refrigerator for up to 2 days. The Oreo crumbs may soften slightly but the pudding will stay creamy and delicious. Re-chill before serving again. Avoid freezing, as the texture of the pudding and gummy worms changes unpleasantly.
Flavors tend to meld and deepen a bit after a few hours, so if you have time, assemble a few hours ahead for a richer taste experience. Just add gummy worms right before serving so they stay chewy and fresh.
Nutritional Information & Benefits
Each serving of these delicious graveyard dirt cups contains approximately 250-300 calories, primarily from sugar and fats in the pudding and Oreos. They offer a quick energy boost and satisfy sweet cravings with a fun, portion-controlled treat.
The calcium from the milk and pudding adds a small nutritional bonus, and the cinnamon in the crumbs brings antioxidants. While this dessert is definitely an indulgence, making it at home lets you control ingredient quality and portion sizes better than store-bought candy.
For those watching allergens, note this recipe contains dairy, gluten, and gelatin (in gummy worms). But with easy substitutions, it can be adapted for many dietary needs.
Conclusion
This recipe for delicious graveyard dirt cups with gummy worms and crushed Oreos is more than just a Halloween treat; it’s a playful way to bring a little spooky fun to your dessert table. I love how it gets everyone involved—from the layering to the gummy worm placement—and how each bite combines creamy, crunchy, and chewy textures.
Feel free to tweak the layers or add your own twist to fit your taste or dietary needs. Whether you’re hosting a party or just want a festive sweet, these dirt cups deliver smiles and satisfaction every time.
Give this recipe a try and see how it becomes a favorite in your own celebrations. And if you have your own creative spin on it, I’d love to hear about it in the comments below—sharing those ideas makes cooking even more fun!
FAQs about Delicious Graveyard Dirt Cups
Can I make these dirt cups ahead of time?
Yes, you can prepare the pudding and Oreo layers up to 24 hours in advance. Just add the gummy worms right before serving so they don’t get sticky.
What can I use instead of gummy worms?
If you want to skip gummy worms, try small candy spiders, chocolate chips, or even fresh berries for a different look and taste.
How do I crush Oreos without a food processor?
Place the Oreos in a sealed plastic bag and crush them with a rolling pin or a heavy pan until finely ground.
Can I use homemade pudding instead of instant mix?
While homemade pudding works, it may be softer and less firm, so chilling longer or adding a thickener like gelatin can help maintain the layered look.
How long do the dirt cups last in the fridge?
They stay fresh for about 2 days when covered tightly. After that, puddings and crumbs can soften too much and gummy worms may lose texture.
Pin This Recipe!
Delicious Graveyard Dirt Cups Recipe Easy Homemade Halloween Treats with Gummy Worms and Oreos

A fun and spooky Halloween dessert featuring layers of creamy chocolate pudding, crushed Oreos mimicking dirt, and chewy gummy worms for a playful treat.
- Prep Time: 10 minutes
- Cook Time: 0 minutes
- Total Time: 40 minutes
- Yield: 8 servings 1x
- Category: Dessert
- Cuisine: American
Ingredients
- 1 package (3.9 oz / 110 g) instant chocolate pudding mix
- 2 cups (480 ml) cold milk (whole or 2%)
- 20 Oreo cookies, crushed finely
- 1 cup (about 40) gummy worms
- 1 cup (about 240 ml) whipped topping (optional)
- 1/4 teaspoon cinnamon (optional)
Instructions
- In a mixing bowl, whisk together the instant chocolate pudding mix with 2 cups (480 ml) of cold milk. Whisk vigorously for about 2 minutes until the mixture thickens. Let it sit for 5 minutes to fully set.
- Place 20 Oreo cookies in a food processor and pulse until you have fine crumbs that resemble dirt. Alternatively, put the cookies in a sealed plastic bag and crush with a rolling pin until finely ground. Stir in 1/4 teaspoon cinnamon with the crumbs if using.
- Grab your serving cups or jars. Start with a layer of crushed Oreos at the bottom, about 2 tablespoons (30 g). Then add a thick layer of chocolate pudding, about 1/4 cup (60 ml). Repeat the layers until the cup is nearly full, ending with a final layer of Oreo crumbs on top.
- Stick 2-3 gummy worms into each cup, so they peek out from the ‘dirt.’ Arrange them to look like they’re wriggling through the soil.
- Optionally, spoon or pipe a dollop of whipped topping over the final Oreo layer for extra creaminess.
- Cover the cups with plastic wrap or lids and refrigerate for at least 30 minutes before serving.
- Remove from the fridge just before serving. The pudding should be cool and creamy, the Oreo crumbs crisp, and the gummy worms slightly chewy but not sticky.
Notes
Chill pudding before layering to help cups hold their shape. Add gummy worms just before serving to prevent sticking. For gluten-free, use gluten-free cookies and pudding mix. For dairy-free, substitute plant-based milk and compatible pudding and whipped topping. Adding cinnamon to Oreo crumbs adds warmth. Optional whipped topping adds creaminess.
Nutrition
- Serving Size: 1 cup (about 8 oz /
- Calories: 275
- Sugar: 28
- Sodium: 180
- Fat: 12
- Saturated Fat: 6
- Carbohydrates: 38
- Fiber: 1
- Protein: 3
Keywords: Halloween dessert, graveyard dirt cups, gummy worms, Oreo pudding cups, easy Halloween treats, spooky dessert, layered pudding dessert