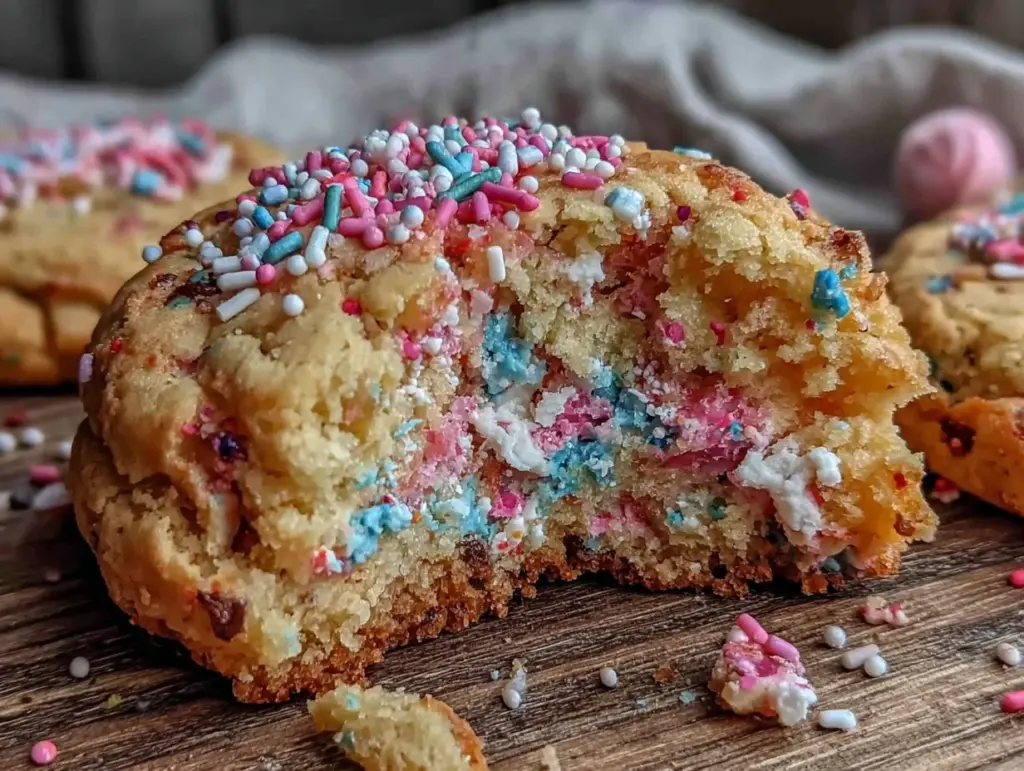
“Wait, don’t hit it yet!” I heard my sister’s voice as the cookie piñata dangled precariously over the backyard picnic table. Honestly, I was skeptical at first. A cookie piñata for a gender reveal? It sounded like a messy, overly ambitious idea. But as the first crack appeared and a cascade of colorful sprinkles spilled out, the whole crowd erupted in laughter and cheers. That moment sealed the deal—this Perfect Gender Reveal Cookie Piñata Smash with Colorful Sprinkle Surprise wasn’t just a dessert; it was an experience.
That day, juggling last-minute party prep and a house full of excited family, I just wanted something fun and stress-free. Somehow, this cookie piñata became the unexpected star. It wasn’t just about revealing pink or blue; it was the joy of smashing open a giant cookie, the unexpected burst of sprinkles, and watching everyone’s faces light up. I made it a couple of times since, tweaking the sprinkle mix and the cookie dough to get just the right crunch and color pop. Honestly, it’s become my go-to for celebrations where you want a sweet surprise with a playful twist.
There’s something about that sprinkle explosion and the crumbly cookie shell breaking apart that feels like pure, unfiltered joy. This recipe stuck with me because it’s easy enough to pull off even when you’re juggling a million things, yet it creates this unforgettable moment for everyone involved. If you’ve ever wanted to turn an ordinary gender reveal into a colorful, fun memory, this cookie piñata might just be your new secret weapon.
Why You’ll Love This Recipe
After a handful of trial runs, I can say this Perfect Gender Reveal Cookie Piñata Smash with Colorful Sprinkle Surprise hits all the right notes for a party centerpiece that’s both charming and delicious. Here’s why it’s become a favorite:
- Quick & Easy: The dough comes together in about 20 minutes, and assembly is straightforward, perfect for busy hosts balancing party details.
- Simple Ingredients: No need for fancy or hard-to-find stuff—most are pantry staples like butter, sugar, and sprinkles you probably already have.
- Perfect for Celebrations: Whether it’s a gender reveal, baby shower, or just a fun family gathering, this cookie piñata steals the show.
- Crowd-Pleaser: The giant cookie shell is buttery and crisp with a hint of sweetness, while the sprinkle surprise adds a playful pop that kids and adults rave about.
- Unbelievably Delicious: The balance between the soft, chewy cookie dough and the crisp outer shell makes every bite irresistible.
What really makes this recipe different from others is the little details I’ve learned to perfect—like chilling the dough for a firmer shell that cracks just right, and using a mix of vibrant sprinkles that won’t bleed color or get soggy. This isn’t just a cookie with a surprise; it’s a carefully crafted moment of delight that guests remember long after the party’s over.
And honestly, it’s the kind of recipe that makes you pause and smile when everyone’s gathered around, hands dusted with sugar, faces filled with anticipation. It’s not just a reveal—it’s a celebration you can taste.
What Ingredients You Will Need
This recipe uses simple, wholesome ingredients to deliver bold flavor and that satisfying texture without fuss. Most are pantry staples, and substitutions are easy if you want to tweak it for dietary needs or preferences.
- For the Cookie Dough:
- 2 ½ cups all-purpose flour (I prefer King Arthur for great texture)
- 1 cup unsalted butter, softened (adds richness and helps with that crisp edge)
- 1 cup granulated sugar
- 1 large egg, room temperature
- 1 teaspoon vanilla extract
- ½ teaspoon baking powder
- ¼ teaspoon salt
- For the Filling and Decoration:
- 1 ½ cups colorful sprinkles (choose a mix with various shapes and sizes for visual impact)
- ½ cup royal icing or store-bought white icing (for sealing the piñata)
- Food-safe ribbon or string (optional, for hanging)
Look for sprinkles that are labeled “suitable for baking” to avoid color bleeding when exposed to moisture. If you want a gluten-free option, swapping the all-purpose flour with almond flour works well, but expect a slightly different texture. For a dairy-free version, use vegan butter and replace the egg with a flax egg (1 tablespoon ground flaxseed + 3 tablespoons water).
If you’re feeling fancy, a pinch of almond extract can add a subtle nutty note, but vanilla does the trick beautifully every time. The royal icing is key—it acts like glue to hold your cookie piñata together and keep the sprinkles from spilling prematurely.
Equipment Needed
- Mixing bowls (medium and large)
- Electric mixer or hand mixer (for creaming butter and sugar)
- Rolling pin (to roll out the dough evenly)
- Large round cookie cutter or a clean bowl (about 8 inches diameter) to shape the cookie shells
- Baking sheets lined with parchment paper
- Cooling rack (to let the cookies cool without sogginess)
- Small offset spatula or butter knife (for spreading the royal icing)
- Optional: kitchen twine or ribbon if you plan to hang the piñata
If you don’t have a rolling pin, a clean wine bottle works in a pinch (trust me, I’ve done it). For shaping, any round object roughly 8 inches wide can act as a template—just trace lightly on parchment paper under the dough. The offset spatula helps spread icing smoothly, but a butter knife works fine if that’s what you have.
Investing in a good quality mixer makes the creaming step much easier, especially for beginners. I’ve found that a stand mixer with a paddle attachment gives the creamiest butter-sugar mix, but a hand mixer is perfectly fine if you’re careful not to overmix the flour in later.
Preparation Method

- Mix the Dough: In a large bowl, cream together 1 cup softened unsalted butter and 1 cup granulated sugar until light and fluffy—about 3-4 minutes with an electric mixer. Add 1 large egg and 1 teaspoon vanilla extract, mixing until combined. (Tip: Room temperature eggs blend better and help the dough come together smoothly.)
- Combine Dry Ingredients: In a separate bowl, whisk together 2 ½ cups all-purpose flour, ½ teaspoon baking powder, and ¼ teaspoon salt. Gradually add this to the wet mixture, mixing on low speed until just combined. (Avoid overmixing here to keep the cookie tender.)
- Chill the Dough: Divide the dough in half, shape each into a disc, wrap in plastic wrap, and refrigerate for at least 1 hour. Chilling firms the dough, making it easier to roll and shape, plus it helps the cookie hold its shape during baking.
- Preheat Oven and Prepare Baking Sheet: Set oven to 350°F (175°C). Line baking sheets with parchment paper to prevent sticking and ensure even baking.
- Roll and Cut: On a lightly floured surface, roll out one disc of dough to about ¼ inch (6 mm) thickness. Use an 8-inch round cookie cutter or bowl to cut two large circles—these will be the front and back of the piñata shell. Repeat with the second disc for extra pieces to form the rim.
- Shape the Rim: Roll the remaining dough into a long rope about 1 inch (2.5 cm) wide. Carefully curve it into a circle slightly smaller than the cookie rounds. This will create the “wall” of the piñata for the sprinkles to sit inside.
- Bake: Place the cookie rounds and the rim on baking sheets. Bake for 12-14 minutes, or until edges turn golden and the cookies feel firm. (Watch closely after 10 minutes to avoid overbaking.) Let cool completely on a wire rack to avoid soggy bottoms.
- Assemble the Piñata: Using a small offset spatula, spread a thin layer of royal icing on one cookie round’s flat side. Press the dough rim into the icing, forming a shallow bowl. Spoon 1 ½ cups of colorful sprinkles into the cavity. Spread royal icing on the second cookie round and gently press it on top, sealing the sprinkles inside. Hold it gently for a minute to set.
- Optional Hanging: If you want to hang your cookie piñata, carefully poke two small holes near the edge before assembling. Thread food-safe ribbon or twine through and tie securely.
- Final Chill: Refrigerate the assembled cookie piñata for about 30 minutes to firm up the icing and make it easier to handle during the big reveal.
Pro tip: If your dough feels too soft while rolling, pop it back in the fridge for 10-15 minutes. This little patience step avoids dough sticking and misshapen cookies. Also, don’t skip the chilling after assembly—it keeps the piñata sturdy enough for smashing without crumbling too early.
Cooking Tips & Techniques
One thing I learned early is the importance of dough temperature. Warm dough can spread too much, turning your piñata into a flat cookie instead of a hollow shell. Always chill the dough well before rolling and again after assembly.
When cutting out the cookie rounds, handle the dough gently but firmly. Pressing too hard can make the edges uneven, which affects how well the pieces stick together. Also, greasing your hands lightly when shaping the rim helps prevent cracks.
Royal icing acts as the glue here—don’t skimp on it. Spread it evenly but thinly for a clean seal. If it’s too thick, it can crack; too thin, and the sprinkles might sneak out early.
During the baking phase, keep a close eye on your cookies after the 10-minute mark. The goal is a golden edge with a firm surface but not overly browned. Overbaking leads to a brittle shell that shatters messily.
Multitasking tip: While the dough chills, prep the sprinkles and royal icing. This keeps the assembly smooth and stress-free. If you want to add a little extra flair, try mixing in some edible glitter or confetti sprinkles for that wow factor.
Variations & Adaptations
This cookie piñata recipe is flexible and can be customized in fun ways:
- Dietary Variations: For gluten-free, swap all-purpose flour with a 1:1 gluten-free blend. Use vegan butter and egg replacer for dairy-free and egg-free versions.
- Seasonal Twist: Change the sprinkle colors to match holidays or party themes—orange and black for Halloween, red and green for Christmas, or pastel shades for springtime celebrations.
- Flavor Boost: Add citrus zest (like lemon or orange) to the dough for a bright, fresh note. Alternatively, try folding in mini chocolate chips for a double surprise.
- Different Fillings: Instead of sprinkles, try small candies like mini M&Ms or edible pearls for a different texture and look. Just be mindful of color bleed.
- Cooking Method: If you prefer, bake smaller individual cookie piñatas for personal servings—just reduce baking time to 8-10 minutes.
Personally, I once swapped sprinkles for tiny edible flowers for a garden-themed reveal—it was delicate, beautiful, and a big hit. The key is to keep the filling light enough to pour out easily yet vibrant enough to create that reveal excitement.
Serving & Storage Suggestions
Serve this cookie piñata at room temperature to enjoy the perfect crunch and sprinkle burst. Present it as the centerpiece of your reveal table, with a small bat or spoon nearby for the smashing moment.
Complement it with light finger foods like creamy deviled eggs or a fresh fruit platter to balance the sweetness. For drinks, a sparkling lemonade or a fruity sangria keeps things festive.
Store any leftovers in an airtight container at room temperature for up to 3 days. The cookie shell may soften slightly, but the sprinkles remain colorful and fun. If you want to keep it longer, freeze the assembled piñata wrapped tightly in plastic wrap and thaw gently before serving.
Reheating isn’t recommended since the cookie shell can become too fragile, but if you must, a quick 5-10 seconds in the microwave (just until warm) can soften the cookie slightly without melting the icing.
One neat thing I noticed: the cookie’s flavor actually deepens after a day, making it an even more satisfying treat the next day—if you can resist smashing it immediately!
Nutritional Information & Benefits
This treat is definitely a party indulgence but made with simple ingredients you can feel good about. Each serving (approximately 1/10th of the piñata) contains roughly:
| Calories | 220 kcal |
|---|---|
| Fat | 10g (mostly from butter) |
| Carbohydrates | 30g |
| Sugar | 15g |
| Protein | 2g |
The butter provides some vitamin A and healthy fats, while the sprinkles add mostly sweetness with a playful look. If you’re mindful of allergens, this recipe contains gluten, dairy, and eggs, but substitutions are simple to accommodate common dietary restrictions.
I appreciate that this recipe lets you celebrate with a homemade treat that’s free from preservatives or artificial colors, unlike many store-bought gender reveal sweets. Plus, it’s a fun way to get everyone involved without stress about complicated baking.
Conclusion
This Perfect Gender Reveal Cookie Piñata Smash with Colorful Sprinkle Surprise offers so much more than just a sweet bite—it’s a shared moment of excitement, surprise, and joy. Whether you’re a seasoned baker or just looking for a fun way to mark a special occasion, this recipe invites you to create memories that stick.
Feel free to tweak the sprinkle colors, try different fillings, or pair it with savory bites like creamy baked crab dip for a full party spread. Personally, I love how this piñata brings out the kid in everyone (including me!), making the reveal as lively as the event itself.
Give it a go, and let the smashing—and smiling—begin.
FAQs
How do I prevent the sprinkles from sticking to the cookie shell?
Make sure the royal icing is fully set before filling with sprinkles, and avoid pressing the sprinkles too firmly into the icing. This keeps them loose enough to fall out easily when smashed.
Can I make the cookie piñata ahead of time?
Yes, you can assemble it a day before the event. Store it in a cool, dry place and cover loosely to prevent dust. Chill it again before serving to keep it firm.
What if I don’t have royal icing—can I use another glue?
You can use thickened frosting or melted white chocolate as an alternative, but royal icing gives the strongest, cleanest seal.
Is it safe to hang the cookie piñata?
Yes, if you use food-safe ribbon or twine and reinforce the holes well before hanging. Make sure it’s hung low enough for easy smashing and on a sturdy support.
Can I use this recipe for other celebrations besides gender reveals?
Absolutely! Swap the sprinkles for colors or candies that match the occasion—it’s perfect for birthdays, anniversaries, or any party needing a fun surprise.
Pin This Recipe!
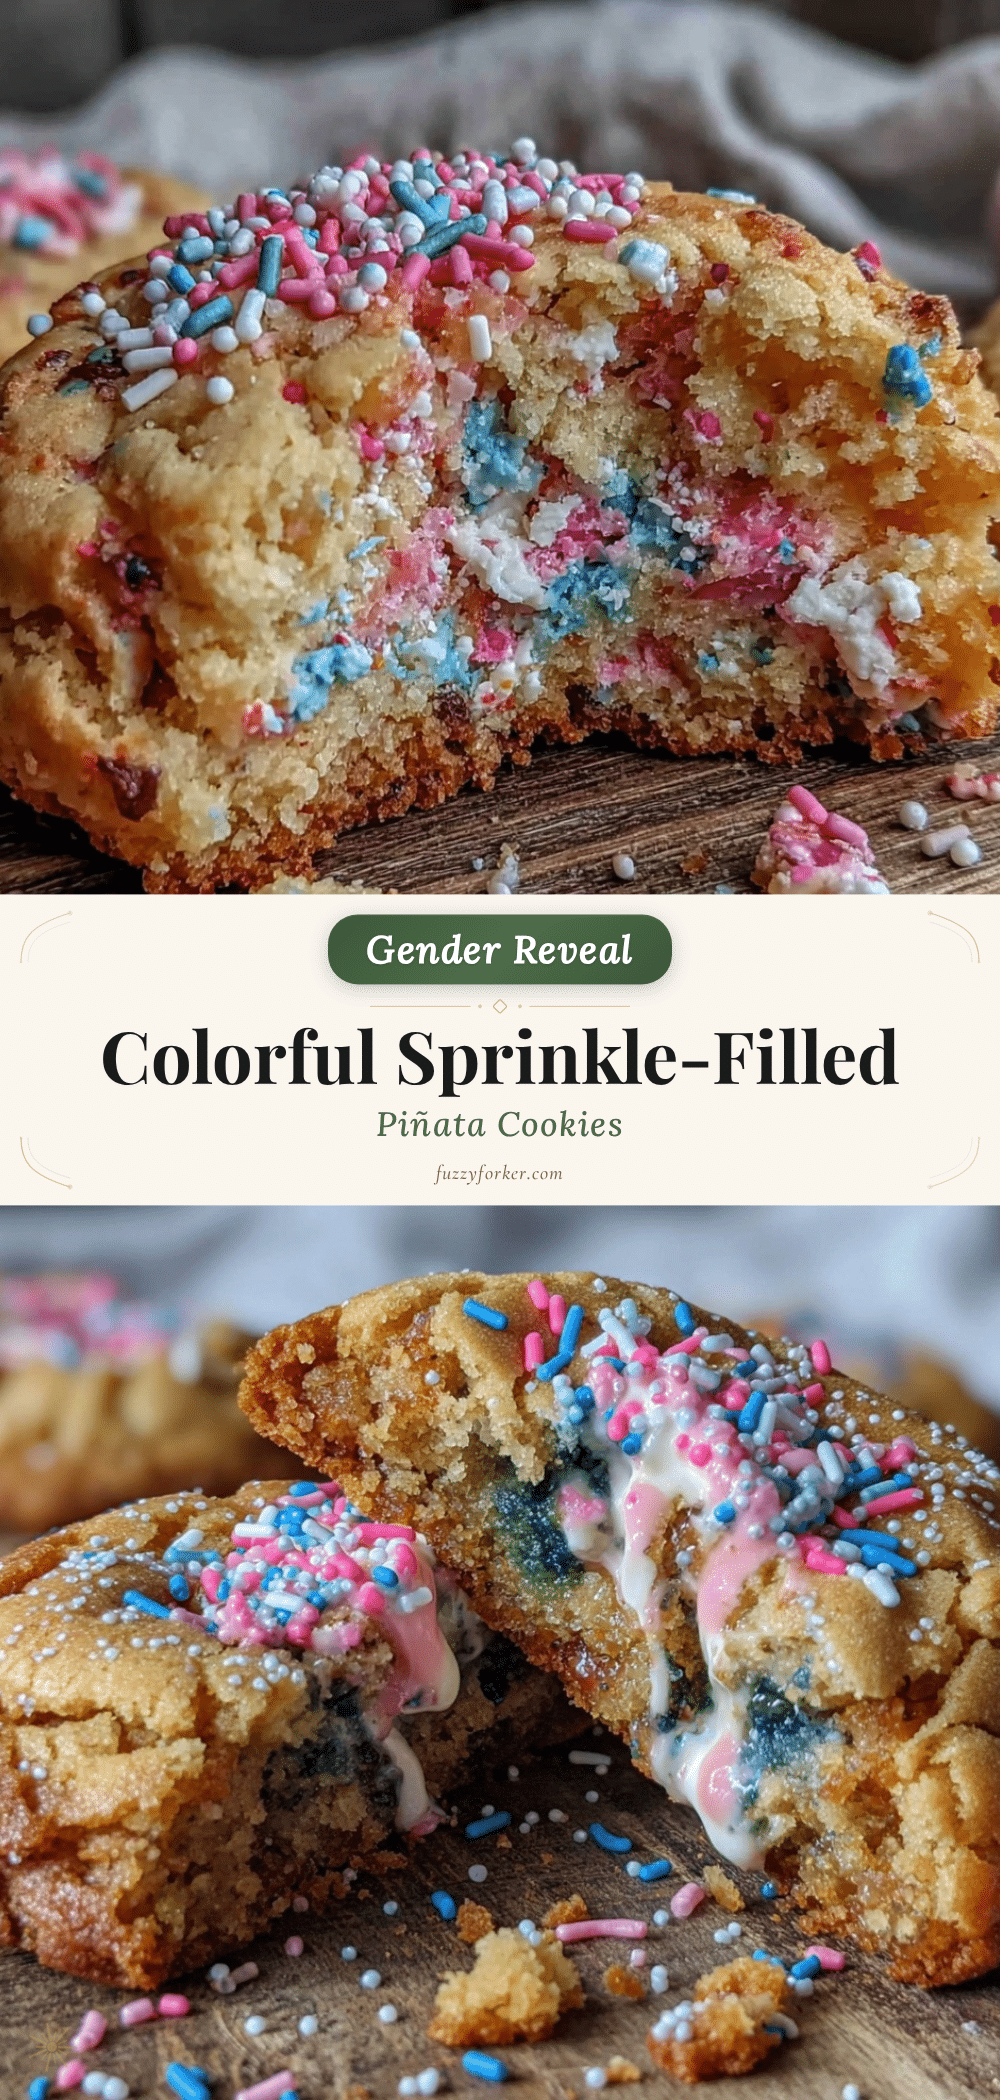
Perfect Gender Reveal Cookie Piñata Smash Easy Colorful Sprinkle Surprise Recipe
A fun and easy giant cookie piñata filled with colorful sprinkles, perfect for gender reveals and celebrations. This recipe creates a crunchy cookie shell with a playful sprinkle surprise inside.
- Prep Time: 20 minutes
- Cook Time: 12-14 minutes
- Total Time: 1 hour 50 minutes
- Yield: 10 servings 1x
- Category: Dessert
- Cuisine: American
Ingredients
- 2 ½ cups all-purpose flour (King Arthur preferred)
- 1 cup unsalted butter, softened
- 1 cup granulated sugar
- 1 large egg, room temperature
- 1 teaspoon vanilla extract
- ½ teaspoon baking powder
- ¼ teaspoon salt
- 1 ½ cups colorful sprinkles (baking safe)
- ½ cup royal icing or store-bought white icing
- Food-safe ribbon or string (optional, for hanging)
Instructions
- In a large bowl, cream together 1 cup softened unsalted butter and 1 cup granulated sugar until light and fluffy, about 3-4 minutes with an electric mixer.
- Add 1 large egg and 1 teaspoon vanilla extract, mixing until combined.
- In a separate bowl, whisk together 2 ½ cups all-purpose flour, ½ teaspoon baking powder, and ¼ teaspoon salt.
- Gradually add the dry ingredients to the wet mixture, mixing on low speed until just combined. Avoid overmixing.
- Divide the dough in half, shape each into a disc, wrap in plastic wrap, and refrigerate for at least 1 hour.
- Preheat oven to 350°F (175°C). Line baking sheets with parchment paper.
- On a lightly floured surface, roll out one disc of dough to about ¼ inch (6 mm) thickness.
- Use an 8-inch round cookie cutter or bowl to cut two large circles for the piñata shell front and back. Repeat with the second disc for extra pieces to form the rim.
- Roll the remaining dough into a 1 inch (2.5 cm) wide rope and curve it into a circle slightly smaller than the cookie rounds to form the rim.
- Place cookie rounds and rim on baking sheets and bake for 12-14 minutes until edges are golden and cookies feel firm. Cool completely on a wire rack.
- Spread a thin layer of royal icing on one cookie round’s flat side using a small offset spatula.
- Press the dough rim into the icing to form a shallow bowl and spoon 1 ½ cups of colorful sprinkles inside.
- Spread royal icing on the second cookie round and gently press it on top, sealing the sprinkles inside. Hold gently for a minute to set.
- Optional: Before assembling, poke two small holes near the edge and thread food-safe ribbon or twine for hanging.
- Refrigerate the assembled cookie piñata for about 30 minutes to firm up the icing.
Notes
Chill dough before rolling and after assembly to ensure a firm shell that cracks properly. Use baking-safe sprinkles to avoid color bleeding. Royal icing acts as glue to hold the piñata together. Avoid overbaking to prevent brittle shells. Dough can be softened by chilling again if too soft while rolling.
Nutrition
- Serving Size: Approximately 1/10th
- Calories: 220
- Sugar: 15
- Fat: 10
- Carbohydrates: 30
- Protein: 2
Keywords: gender reveal, cookie piñata, sprinkle surprise, party dessert, easy cookie recipe, celebration dessert


